
Carpal Tunnel Release Recovery Exercises: Week by Week
You're home after carpal tunnel surgery, and ordinary tasks suddenly need planning. Your fingers may feel stiff, your palm may be tender, and you're not sure whether making a fist will help or irritate the incision. The useful question isn't how hard you should exercise. It's which movement your hand is ready to tolerate today.
Carpal tunnel release recovery exercises work best as a progression through healing, comfortable movement, and usable strength. Your surgeon's restrictions take priority over any general routine, especially if your wound or symptoms need closer monitoring.
The Recovery Timeline at a Glance
Two wrists operated on in the same week can sit in different phases. Swelling, wound healing and symptom response set the pace, so each phase below works like a gate: you pass through when your hand meets the condition, whatever the date says.
| Phase | Timing after surgery | Main exercises | Move on when |
|---|---|---|---|
| Early motion | First days, when the surgeon permits | Finger opening and closing, straight-finger, hook-fist and full-fist positions, gentle wrist motion | Incision is healed and motion is pain-free |
| Nerve and tendon gliding | When cleared for controlled gliding | Therapist-taught median-nerve and tendon-gliding positions | Symptoms stay controlled after each session |
| Grip and light strengthening | After initial healing and clearance for resistance | Prescribed wrist-flexor and extensor loading, foam-ball grip work | Grip is tolerated without incision pain or tingling |
| Full strengthening and functional use | After light resistance and everyday tasks are comfortable | Progressive grip, pinch and task practice | Strength, pain and sensation are assessed by the therapist |
The phases overlap. Finger mobility often continues while light resistance begins, and easy household tasks can start while a therapist is still addressing scar sensitivity. Entering a new phase adds work on top; it rarely retires the earlier exercises.
A rehabilitation trial after carpal tunnel release began exercise 12 days after surgery and measured pain, pinch strength and nerve function 10 weeks after randomization. Those figures describe one study's treatment and assessment schedule. They say nothing about when your own hand should be ready.
What the calendar can't tell you
A surgery date cannot confirm that your incision tolerates pressure, or that your grip is ready for resistance. Those decisions rest on the wound examination, your symptom response during each session, and an assessment of how you move.
Real progress feels like easier motion and lighter aching the morning after a session. Overuse announces itself differently: swelling, lingering soreness or tingling still present the next day means the dose was too high, and the phase stays where it is.
The same trial reported no significant difference between exercise alone and exercise combined with ultrasound or laser. Equipment remains an optional clinical choice, and a well-dosed exercise program can carry the rehabilitation on its own.
Practical rule: Choose the phase your hand tolerates today, even when the calendar suggests you should be further along.
Before starting any routine, record these details:
- Surgery date and side: which hand was treated, and when.
- Surgeon's restrictions: instructions on dressings, wrist movement, lifting and gripping.
- Therapy appointment: when someone will check your technique and progression.
Then pick the phase that matches both your clearance and your current function. If the two disagree, stay with the more cautious option until you have spoken with your surgical team.
Early Motion and Gliding Exercises, Step by Step
Active motion means moving under your own control, without the other hand pushing you farther. Start with the dressing and wrist position your surgeon allows, and avoid resting the incision against a hard table edge.
The AAOS therapeutic exercise guide describes a dosage of 10–15 repetitions daily, 6–7 days per week, for approximately 3–4 weeks; after surgery, use that only if your surgeon or therapist approves it. A general carpal tunnel exercise handout isn't automatic clearance for a fresh surgical wound.
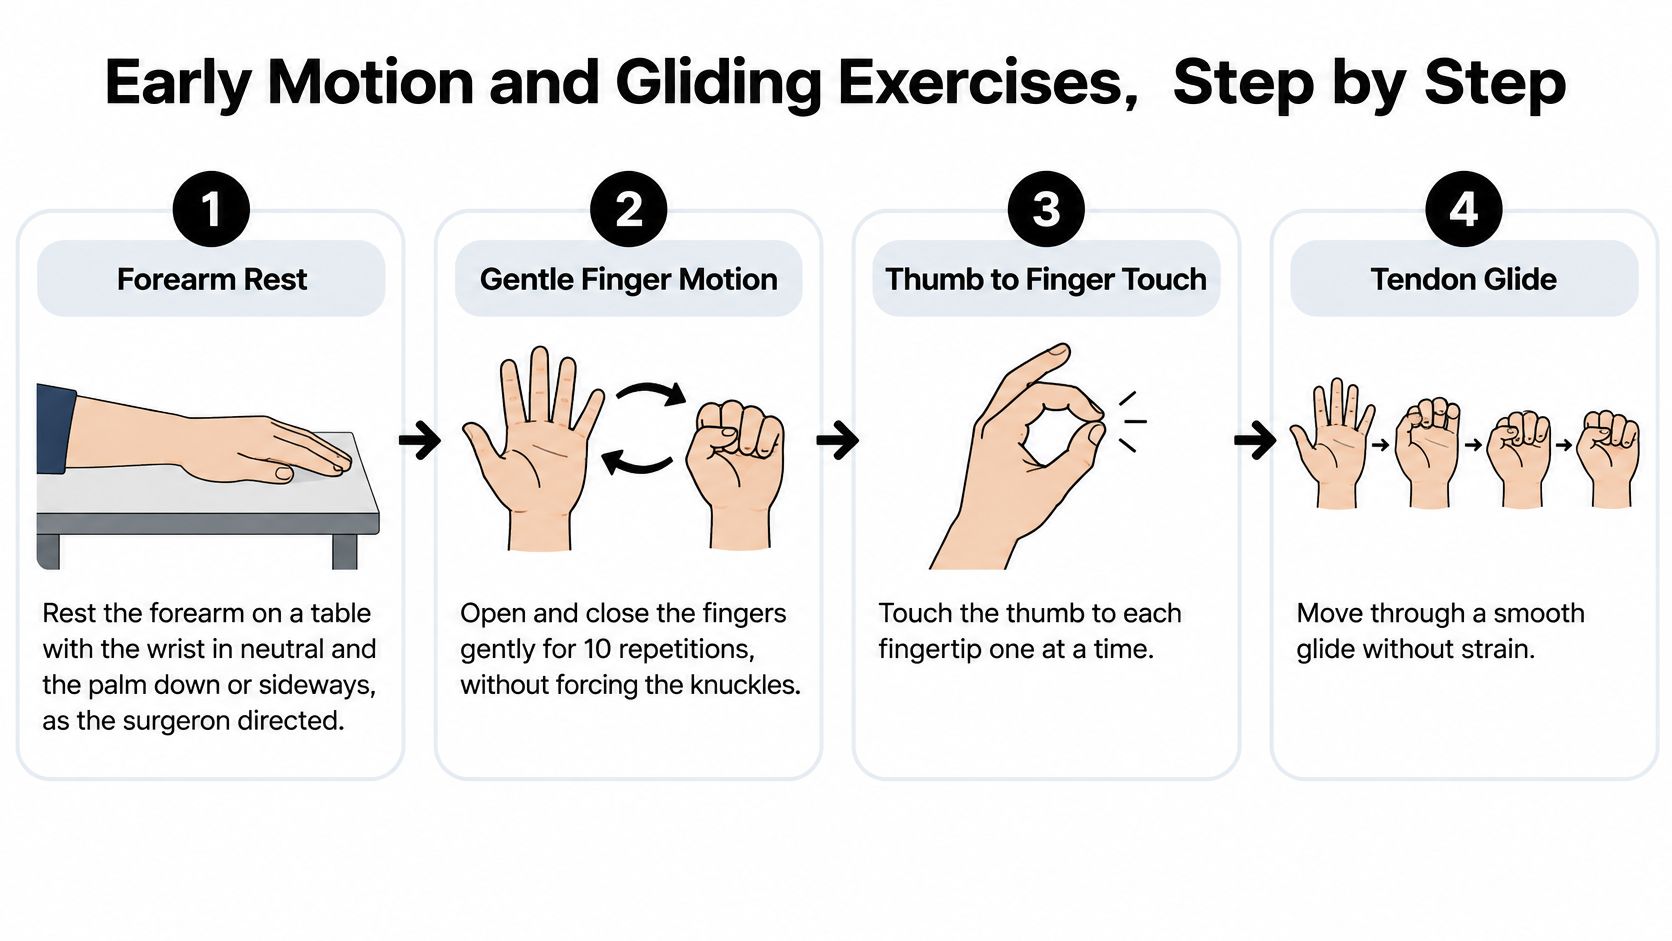
This visual summarizes supported positioning and gentle hand movement.
Make each movement easy to reverse
Support the forearm. Rest it on a table with the wrist neutral and the palm down or sideways, as directed. Support should reduce effort without pressing on the incision.
Open and close gently. Straighten the fingers, then curl them toward the palm without squeezing. Stop short of any position that pulls at the wound.
Change finger positions. Move from straight fingers to a hook fist, with the middle and end joints bent, then toward a comfortable full fist. Return smoothly rather than forcing the fingertips into the palm.
Add a small wrist arc. Bend the wrist gently forward and backward within the permitted range. Keep the fingers relaxed so you're not combining wrist movement with a hard grip.
Use the nerve glide you were taught. Median-nerve gliding isn't a stronger tendon stretch. Have your therapist demonstrate the exact wrist, finger, thumb and arm sequence, then copy that sequence without adding tension.
The common mistake is chasing a bigger stretch. Burning, increasing tingling and lingering pain aren't useful training targets. Don't add force with your other hand, and don't turn every finger movement into a squeeze.
Use reminders without surrendering judgement
A phone reminder or movement log can help you remember the prescribed routine. For readers interested in how digital rehabilitation tools are designed, Zee Palm's physiotherapy app case study offers a technology-design example, not a postoperative prescription.
Finish by checking how the hand feels at rest. It should feel easier to move, not increasingly sore afterward; if symptoms build, stop and have the exercise adjusted.
Building Grip Strength Without Overloading the Wrist
One structured home protocol in the review of postoperative exercise-based rehabilitation began in postoperative week 3 and continued for 12 weeks, using 1-kg dumbbells for 3 sets of 12 repetitions, once daily on 4 days per week, with 1-minute rests, plus foam-ball gripping for 3 sets of 10 repetitions. That's a research benchmark, not a starting prescription for every surgical hand.
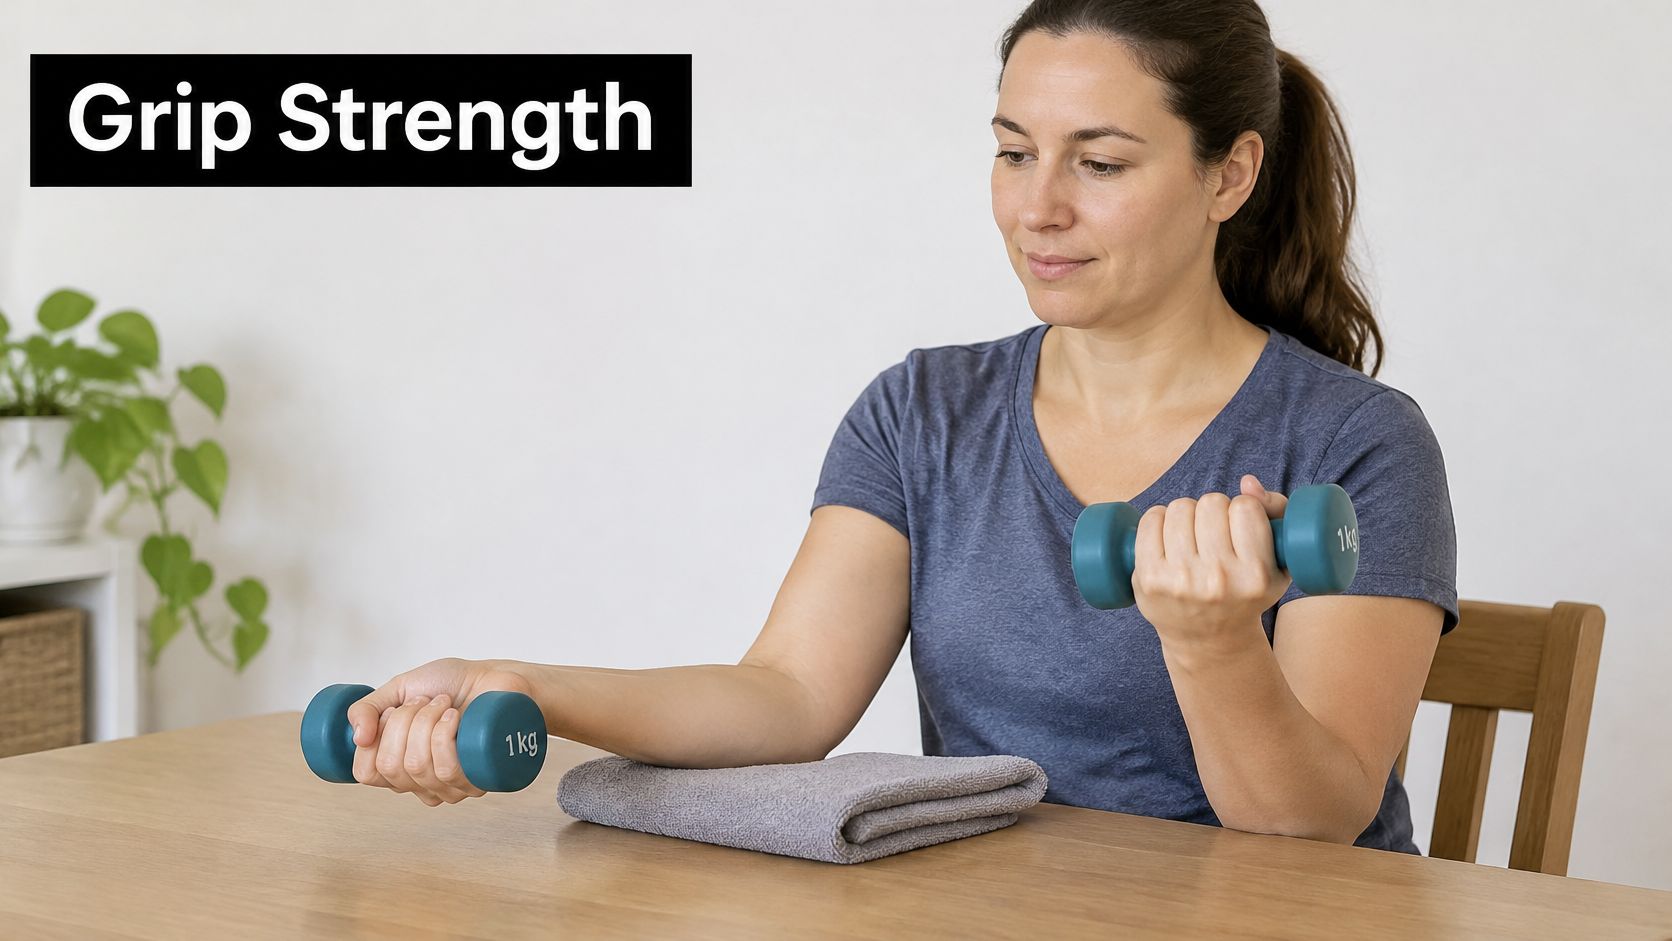
A supported forearm helps keep wrist loading controlled rather than turning it into an arm exercise.
Build control before resistance
Start with an unloaded wrist curl if your therapist has cleared it. Support the forearm, let the hand move beyond the table edge, and lift and lower through a comfortable arc without swinging.
Add the prescribed dumbbell only when that movement is easy to control. A weight is too demanding if you tighten your shoulder, hold your breath, or compensate by moving the whole forearm.
Foam-ball work should begin with a gentle compression, not a maximum squeeze. Light pinch practice can follow when your therapist is satisfied with thumb control and palm tolerance. If you're considering hand exercise putty, ask which resistance suits the task rather than buying the firmest option.
Use demonstrations to check positioning, not to choose your postoperative load.
Match training to the job you need to do
Say you're returning to desk work. Being able to squeeze a ball doesn't establish that you can tolerate prolonged typing, repeated mouse clicks, or carrying a laptop bag. Practice the relevant task in manageable bouts and watch what happens afterward.
Sensory relief isn't the same as restored endurance. Grip stamina, scar sensitivity and fine finger control may still need attention even when the original nighttime symptoms have eased. The evidence doesn't establish a single strengthening regimen as superior, so exercise selection should reflect the remaining limitation.
Keep a short log:
- Work completed: Exercise, resistance and sets.
- Immediate response: Palm discomfort, pulling or altered sensation.
- Later response: Swelling, renewed tingling or reduced task tolerance.
Incision pain, pain at the base of the palm, swelling or returning tingling means the load needs review. Carrying a bag, opening a jar and typing are different demands. Don't use success with one as permission to push all of them.
Scar Care and Sensory Re-Education at Home
Scar care belongs alongside movement, not on top of an unhealed wound. Wait until the incision is fully closed and your surgeon approves massage. If the skin is open, draining or breaking down, seek advice about physical therapy wound care rather than trying to soften it yourself.
Keep sensory practice gentle enough that you can pay attention to what you feel. You're practicing recognition and comfortable contact, not testing how much irritation you can tolerate.
A gentle home sequence
Begin with light circular contact. On healed skin, use a small amount of plain moisturizer and gentle fingertip circles over the scar. The aim is comfortable skin movement; stop if you notice burning, sharp tenderness or irritation.
Try a small sideways movement. When circular contact is comfortable, move the skin gently across the palm without dragging hard over it. Don't pull the scar apart or push through a tight, painful endpoint.
Practice recognizing textures. Start with cotton or a soft cloth, looking at the material before trying to identify it with your eyes closed. Compare what you feel at the thumb, index finger and little finger; introduce rougher fabrics only if comfortable, and don't rub abrasive material against numb or fragile skin.
Add object recognition and light pinch. Sort coins or buttons by size, first with vision and then, if safe, by touch. Stop if manipulating the objects increases tingling or makes you grip harder to compensate for reduced sensation.
Treat sensory practice as information gathering, not a test you have to pass.
Sensation may feel different across neighboring areas of the hand. Record changes such as finding a button easier to recognize or tolerating a sleeve against the scar, rather than judging progress only by whether everything feels normal.
Bring persistent sensitivity, altered sensation or difficulty handling small objects to your therapist. A scar that becomes hot, swollen, blistered or broken needs clinical review, not a more vigorous massage.
Progression Gates and Warning Signs
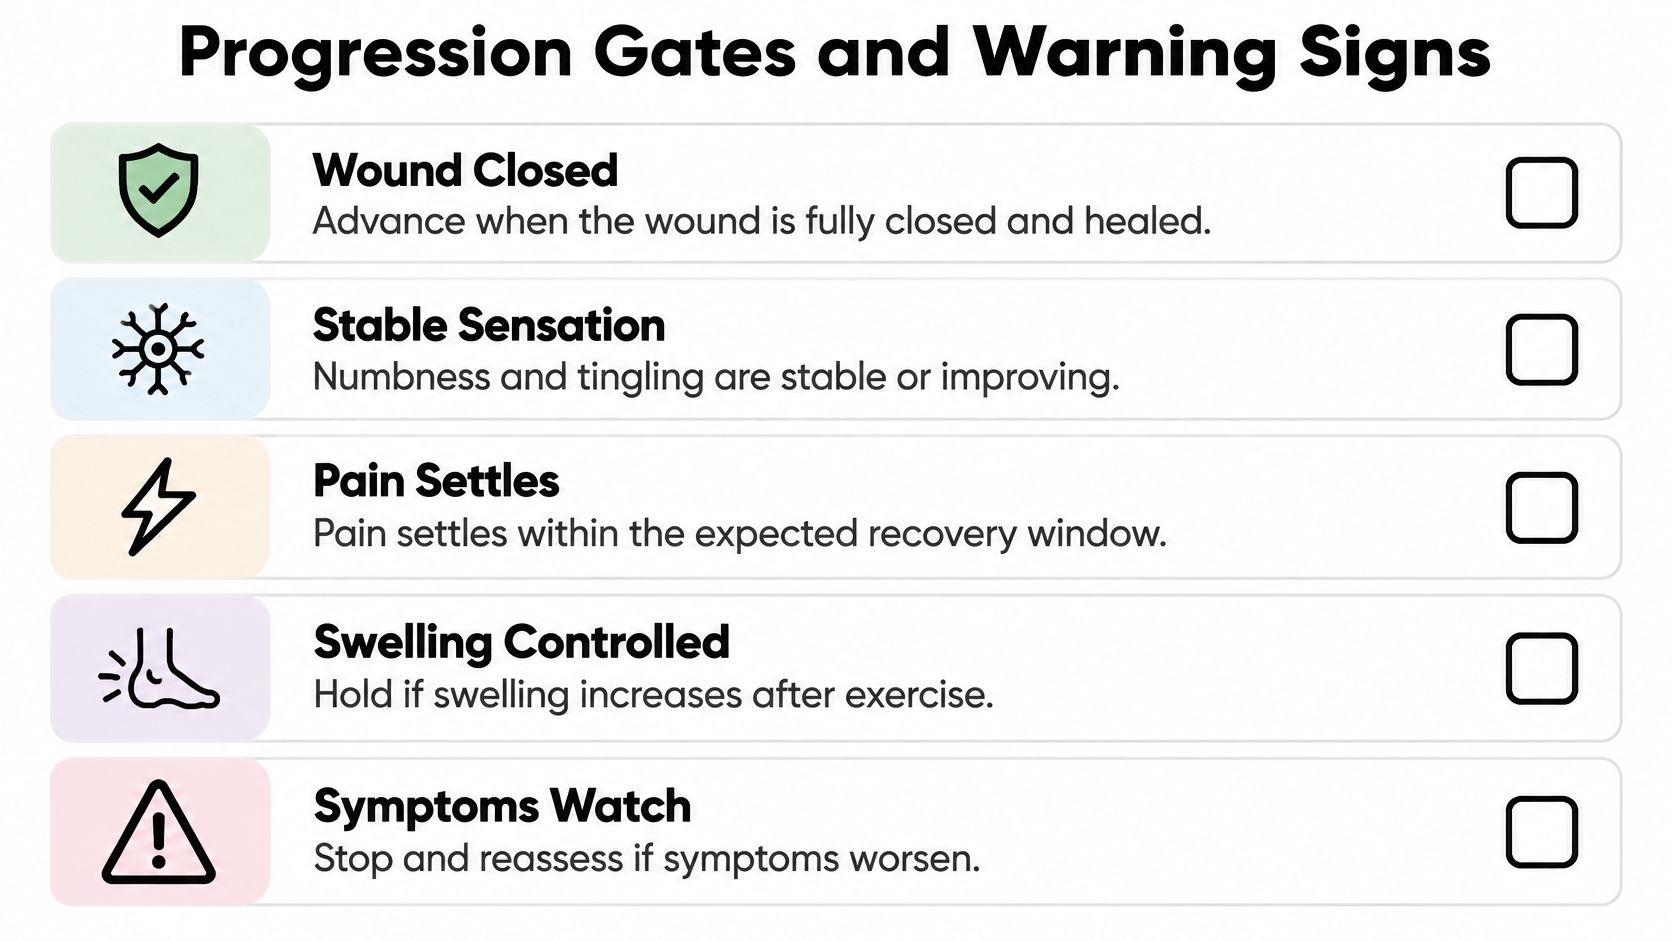
Use this comparison before increasing an exercise. Advance means consider a small change with your clinician's plan, not automatically increase everything.
| Measure | Advance when | Hold when |
|---|---|---|
| Wound | Fully closed and healed | Still open, draining or tender to touch |
| Symptoms | Numbness and tingling stable or improving | Tingling increases during or after sessions |
| Pain | Returns to baseline within the recovery window agreed with your clinician | Persists into the next day or worsens across sessions |
| Range of motion | Comfortable and gradually growing | Range stalls or needs forcing |
| Grip and pinch | Light loads tolerated without swelling | Pain or swelling appears with gripping |
There isn't a universal stopwatch for acceptable postoperative pain. Ask your therapist what settling time is reasonable for your hand, and use your resting symptoms and later task tolerance as part of that judgement.
The AAOS clinical practice guideline for carpal tunnel syndrome describes better short-term outcomes in a trial comparing early motion with splinting, but also inconsistent findings across gliding studies. More exercise isn't automatically better, and a favorable result for early movement doesn't justify ignoring a surgeon's restriction.
Keep a visible checklist beside your written routine.
Change the dose without losing the signal
Review your log regularly and change only one exercise variable at a time. Increasing resistance, repetitions and work demands together makes it difficult to identify what caused a flare.
If several measures worsen, pause progression and contact your therapist. Don't schedule a longer session to make up for exercises you've skipped.
Consider someone who pushes through burning during a glide, develops swelling that evening and wakes with more tingling. That pattern isn't evidence of productive stretching. Stop the provoking exercise, avoid further loading and contact the surgeon's office promptly.
Choose the right clinical contact
- Call the surgeon promptly: Drainage, spreading redness, worsening swelling, escalating numbness or severe pain that doesn't settle needs surgical-team advice.
- Seek urgent assessment: Sudden loss of finger movement or rapidly worsening symptoms shouldn't wait for a routine therapy appointment.
- Contact the therapist: A particular movement repeatedly causes symptoms that settle when you stop, or you're unsure how to reduce resistance or range.
At our visits, treatment depends on the service and can include manual therapy, strengthening exercises, hot or cold packs, electrical stimulation, stretching and/or an adjustment. For a postoperative hand, any selected treatment must fit the surgical restrictions and the problem being addressed. Comfort measures don't replace assessment of a wound or worsening nerve symptoms.
Confirm Your Exercise Plan With Your Surgeon
Leave your next visit with a written routine you can follow. Bring your phase table, exercise log and a brief symptom list, including what happens during movement and later in the day.
A useful plan identifies the permitted movement, its dose, the reason to stop and the criteria for advancing. A list of exercise names without those details leaves too much guesswork.
Questions worth taking to the appointment
- Gliding clearance: Which tendon and nerve glides can I start, and what repetition count should I use?
- Resistance: What weight, grip material and exercise volume are appropriate?
- Progression: What should improve before I increase the challenge?
- Daily restrictions: What should I avoid at work, while driving and around the house?
- Reassessment: When should grip strength, sensation and task tolerance be checked again?
If the incision hasn't closed as expected, ask the surgeon whether you need a dedicated wound review. Wound Services' information on outpatient surgical wound assessment offers context for that discussion, but it doesn't replace instructions from the team responsible for your operation.
Turn the answers into a usable routine
Ask your therapist to watch you perform the movements before you leave. Being able to explain an exercise isn't the same as performing it without compensating, straining or pressing on the scar.
We're a Certified Outpatient Rehabilitation Facility in Deerfield Beach, Florida. If you don't have a written program, use our hand physical therapy information to prepare for a call, and confirm availability and suitability for your postoperative needs before booking.
Choose the phase that matches your current function, confirm the restrictions with your surgeon, and arrange rehabilitation guidance if the exercise dose is still unclear. The next useful step is the one you can perform comfortably and repeat reliably, not the hardest movement on a handout.
MedAmerica Rehab Center offers physical and occupational therapy and pre- and post-surgical rehabilitation to support mobility and everyday function. Visit MedAmerica Rehab Center to discuss an evaluation for your recovering hand, and bring your surgeon's instructions so your exercise plan can match your healing and grip tolerance.
MedAmerica Rehab · Deerfield Beach
Talk to a clinician about your pain
Physical therapy, chiropractic, acupuncture and shockwave therapy under one roof, since 1995. Same-day appointments are available.
Mon–Thu 8:00 AM – 6:30 PM · Fri 8:00 AM – 3:00 PM