

Ankle Sprain Recovery Exercises: Speed Your Healing
You step off a curb, your foot rolls, and everything changes in a second. There's the sharp pain, the fast swelling, and then the question almost everyone asks right away: “Do I just rest this, or should I start moving it?”
That uncertainty causes a lot of bad recoveries. Some people baby the ankle for too long and end up stiff and weak. Others try to “walk it off,” push too early, and turn a manageable sprain into a stubborn one. The ankle usually heals best with a phased plan that protects the ligaments first, then restores motion, then strength, then balance and real-world function.
Good ankle sprain recovery exercises aren't random. They should match where your tissue is in the healing process and how severe the sprain is. That matters more than most online guides admit.
Your First Steps After an Ankle Sprain
You can replay the moment clearly. The ankle twists inward, you feel a pop or a sharp pull, and within minutes the outside of the joint starts to swell. Then you test a step, wince, and wonder whether this is something minor or the start of a long setback.
The first thing to know is that an ankle sprain is frustrating, but it's usually manageable when you respect the sequence of recovery. A healthy plan doesn't mean complete inactivity for days on end. It means doing the right thing at the right time.
Here's the roadmap I give patients in clinic:
- Protect the joint early so the injured ligaments aren't stressed again.
- Restore motion before stiffness settles in.
- Rebuild strength so the ankle can handle body weight and direction changes.
- Retrain balance and coordination so the joint responds well when you move quickly, step on uneven ground, or return to sport.
A lot of people get stuck because they only focus on pain. Pain matters, but it isn't the only marker. Swelling, walking quality, ankle motion, and control all tell you whether you're progressing.
Practical rule: If your ankle gets more swollen or more reactive the day after exercise, you did too much or moved ahead too quickly.
For comfort in the first part of recovery, it also helps to understand when to use ice and when to use heat for an ankle sprain. Early on, individuals typically need calming strategies more than aggressive stretching.
Phase 1 The Acute and Protective Phase
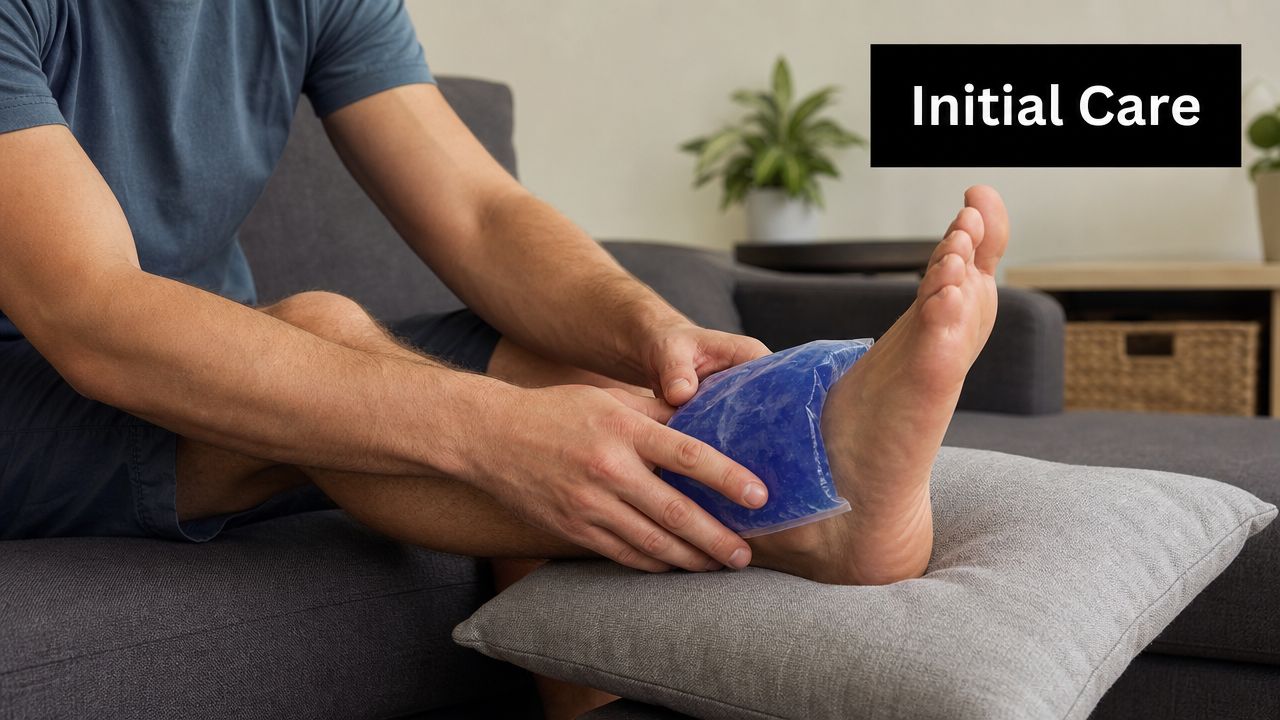
The first 48 to 72 hours are about controlling the situation, not proving toughness. If the joint is repeatedly irritated during this window, swelling tends to build, motion gets harder, and later exercises become less effective.
Protect before you push
Think of this phase as damage control. The ligaments have been stretched or torn, and the surrounding tissues are usually inflamed and guarded. Your job is to limit additional stress.
Use these priorities:
- Rest the ankle from provoking activity. That doesn't mean you stay frozen on the couch all day. It means you stop movements that increase pain, limping, or swelling.
- Ice for symptom control. A cold pack or even a bag of frozen peas wrapped in a towel can help calm the area.
- Compression to manage swelling. A snug elastic wrap can help, but your toes should not become cold, numb, or discolored.
- Elevation when possible. Propping the ankle up can help reduce fluid buildup after the injury.
What this should look like at home
A simple home setup works fine. Sit with the foot supported, use a wrapped ice pack, and recheck the skin after each session. If you use a compression wrap, start near the foot and move upward with even pressure rather than making one tight band around the ankle.
Watch your walking. If every step looks uneven, shorten the distance and use support if needed. A bad limp teaches the body poor mechanics and often makes the hip and knee work harder than they should.
Don't test the ankle over and over just to see if it's “still bad.” Repeated stress in the first few days doesn't speed healing.
What doesn't work well in this stage
People often make the same mistakes:
| Common mistake | Better choice |
|---|---|
| Trying to stretch aggressively | Keep motion gentle and non-provocative |
| Returning to long walks too soon | Limit activity to what you can do without a worsening limp |
| Wrapping the ankle too tightly | Use firm but comfortable compression |
| Ignoring swelling because pain is “not too bad” | Treat swelling as a sign the joint still needs protection |
This phase is short, but it matters. If you handle it well, the next phase usually goes much more smoothly.
Phase 2 Restoring Gentle Mobility and Range of Motion
Once the ankle is calmer, the next priority is motion. Stiff ankles stay sore longer, and they often lead people to compensate by turning the foot out, shortening stride length, or shifting weight away from the injured side.
Clinical guidance for early rehabilitation supports starting movement quickly. A structured protocol places Week 1 on pain-free range of motion with 30 repetitions of alphabet exercises and 30 ankle pumps for 3 sets before moving on to resisted work later on, according to this rehabilitation protocol for ankle injury.

Start with seated, pain-free movement
This isn't the stage for “no pain, no gain.” The ankle should move, but the movement should stay controlled and tolerable.
A strong starting menu includes:
Ankle pumps
Sit or lie down and gently pull the foot up, then point it down. Keep the motion smooth rather than forceful.Alphabet exercise
Trace the letters of the alphabet in the air with your foot. This creates small multidirectional movements without loading the ankle.Gentle circles
Move through small circles clockwise and counterclockwise if that motion feels comfortable.
If you need a refresher on safe mobility work, these range of motion exercises are a useful reference.
How to dose early mobility work
Use the Week 1 benchmark above as a framework, but let symptoms guide the depth of motion. The key is to finish feeling looser, not more inflamed.
Try this approach:
- Begin small. Short arcs are fine at first.
- Stay out of sharp pain. Stretching discomfort is different from a pinching or unstable feeling.
- Repeat consistently. Gentle motion done regularly usually beats one long session.
A towel stretch can also help if the calf feels tight, but keep it easy. The goal is restoring ankle movement, not yanking on healing tissue.
If the ankle feels better during the exercise but puffs up later that night, your volume was too high even if the session seemed fine in the moment.
What progress should feel like
The earliest wins are often simple. Your foot starts moving more naturally when you point it up and down. Walking gets less stiff. The ankle doesn't feel as “blocked.”
That's enough for now.
Many people rush this stage because mobility exercises don't feel athletic. But skipping them often leads to poor band work later, shallow calf raises, and awkward landing mechanics. Good ankle sprain recovery exercises build on each other. Motion first. Strength second.
Phase 3 Progressive Strengthening Exercises
Once the ankle can move with less irritation, you need to rebuild the muscles that support and stabilize the joint. During this stage, many recoveries either become durable or remain fragile.
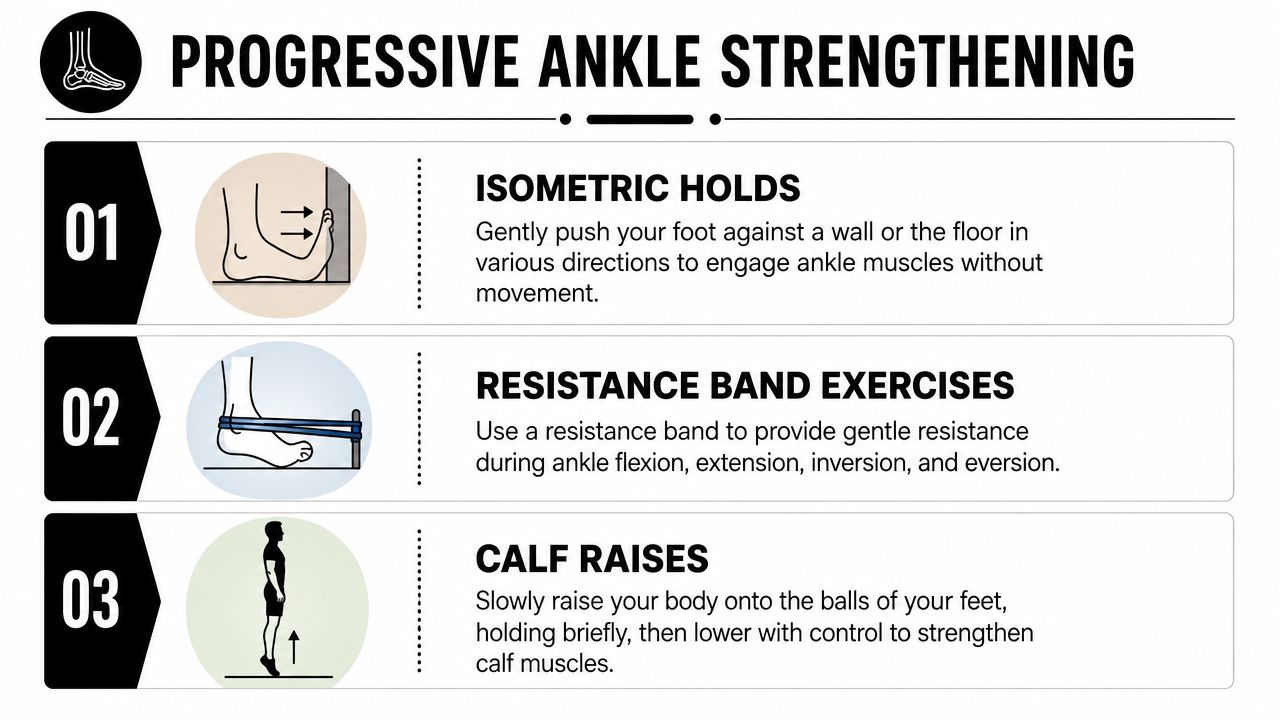
Early rehab guidance supports starting range-of-motion and isometric strength work within 48 to 72 hours, then progressing to dynamic resistance work. It also notes that strengthening should begin with isometric exercises in the four main ankle directions, with manual resistance applied for 3 to 5 seconds for 10 to 12 repetitions in each plane. Dynamic resistive work can then progress to 2 to 3 sets of 10 to 12 repetitions twice daily, as outlined in this clinical review of ankle sprain rehabilitation.
Start with isometric holds
Isometrics are ideal when the ankle still doesn't tolerate much movement. You activate the muscles without asking the joint to move through a full range.
Try pushing the foot gently into an immovable object in these directions:
- Upward
- Downward
- Inward
- Outward
Hold each effort for the recommended 3 to 5 seconds, then relax. These are subtle exercises. You're not trying to overpower the wall or the floor.
Later in rehab, some patients ask about adding load to the lower leg. That can be appropriate in select cases, but progression matters. This overview of ankle weights in physical therapy is useful once the basics are under control.
Here is a simple visual for the strengthening sequence:
Move into resistance band work
Resistance bands let you strengthen through motion once the ankle is ready. The standard pattern is 4-way ankle strengthening:
| Direction | What it trains |
|---|---|
| Dorsiflexion | Pulling the foot upward |
| Plantarflexion | Pointing the foot downward |
| Inversion | Turning the sole inward |
| Eversion | Turning the sole outward |
Eversion work deserves special attention because the peroneal muscles on the outside of the ankle help resist the kind of roll that causes many sprains.
Use smooth reps. Don't snap back against the band. If one direction causes a sharp increase in pain, scale back the resistance or return to isometrics for that movement pattern.
Train both ankles, not just the injured one
This point gets missed constantly. Bilateral training is strongly advised because it produces strength gains in both limbs. The same review notes that if you train only the injured side, the crossover effect in the uninjured leg is only 1.5% to 3.5%. In practice, that means training both sides helps restore symmetry more effectively than treating the injured ankle like it exists in isolation.
That matters because people don't return to life on one leg. They walk, climb stairs, pivot, and react using both sides together.
A stronger uninjured side doesn't automatically protect you. If the gap between sides gets too wide, your movement often becomes less efficient and less confident.
Add standing strength carefully
As tolerance improves, build toward more functional exercises:
- Double-leg calf raises to restore push-off strength
- Single-leg calf raises when control is better
- Heel walks or toe walks if they're comfortable and your gait is steady
If calf raises are shaky, don't force the single-leg version. Use fingertip support, reduce the height, or return to band work for a few more days. The best strengthening plan is the one you can do with control.
Phase 4 Advanced Balance and Return to Activity Drills
Strength alone doesn't make an ankle reliable. The last phase is about teaching the joint to react well when your body moves unpredictably. That's where proprioception comes in. It's your sense of joint position and your ability to make small corrections before a wobble becomes another sprain.
Build balance in a clear progression
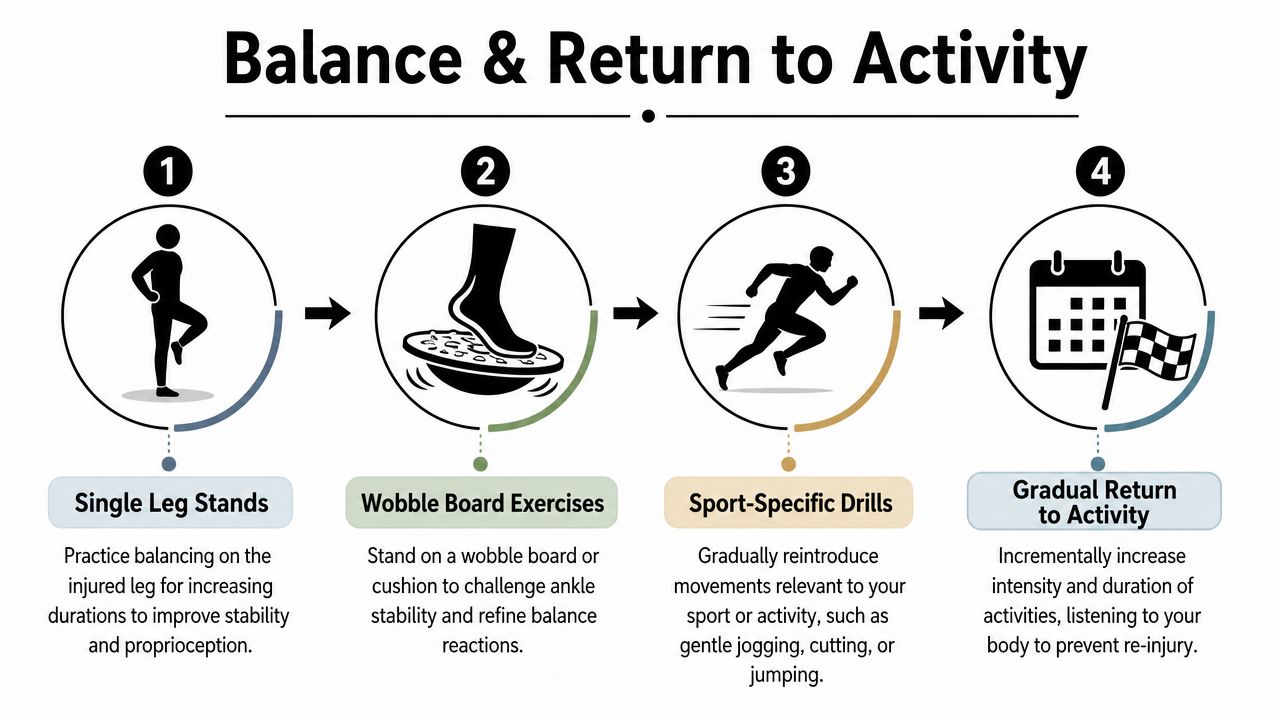
Exercise-based rehab reduces recurrent sprains and helps manage chronic ankle instability. Proprioception work is a core part of that process. A practical progression is to move from easier positions to harder ones, starting with stable support and then reducing visual or surface stability. Return-to-sport guidance also uses a benchmark of standing on the affected leg for 30 seconds with eyes open before progressing further, as described in this return-to-sport ankle rehab video guidance.
A sensible ladder looks like this:
- Single-leg stand, eyes open on the floor
- Single-leg stand, eyes closed once floor balance is solid
- Single-leg stand on a pillow or wobble surface
- Dynamic balance tasks such as reaching, light direction change, and controlled landing
Don't chase difficulty too soon
Balance training should challenge you, but not turn into chaos. If you're waving your arms wildly, hopping off the foot every second, or gripping the floor with your toes, the drill is too advanced.
Use these checkpoints:
- Stable pelvis instead of dropping the hip
- Quiet foot instead of constant toe clawing
- Controlled knee position instead of collapsing inward
The best balance drill is the hardest version you can still do with control.
Reintroduce impact and movement patterns
Return to activity should look like a progression, not a leap. In the same guidance above, Week 2 to 4 emphasizes strength and control with band work, while Week 4 to 6 introduces impact and agility drills such as walk-jog intervals, low pogo hops, and figure-8 patterns. Full return often falls between Week 6 and Week 8 once the person is pain-free, walks without a limp, and has no next-day swelling.
That timeline is helpful, but the criteria matter more than the calendar.
A practical re-entry sequence might be:
- Walk-jog intervals on a flat, predictable surface
- Low pogo hops with soft, quiet landings
- Figure-8 drills to reintroduce turning
- Lateral movement at a controlled speed
- Sport-specific patterns only after the basics feel clean
For athletes, landing quality is often the missing piece. If you're returning to court or field sports, this guide to footwork training for injury prevention is worth reading because it connects ankle control to cutting, landing, and directional mechanics.
Know when you're actually ready
Use function, not optimism, to make the decision. You're in better shape to return when:
| Sign | Why it matters |
|---|---|
| You're pain-free during basic activity | The tissue is tolerating load |
| You walk without a limp | Your mechanics are no longer protective |
| There's no next-day swelling | The ankle is recovering from training appropriately |
| Balance is controlled | The joint can react to small disturbances |
| Agility drills feel organized | You're not just surviving movement |
A lot of re-sprains happen when someone feels “mostly okay” and skips this phase. That's a gamble, not a plan.
Adapting Your Recovery and Knowing When to Get Help
Generic advice breaks down. Not every sprain should follow the same pace, and pretending otherwise is one of the main reasons people stall or re-injure the ankle.
Many online guides tell you what exercise to do, but not how to adjust it for severity. That's a real problem. Guidance on ankle rehab notes that most online content doesn't give enough individualized pacing for sprain severity, even though improper progression for Grade II or III sprains can increase re-injury risk by 2 to 3 times, according to this HealthLinkBC rehabilitation reference.
What Grade I, II, and III usually mean in practice
You don't need perfect anatomy terms to understand the difference.
- Grade I is usually a mild stretch injury. The ankle may be sore and swollen, but walking is often still possible, even if it's uncomfortable.
- Grade II usually means a more significant partial tear. Swelling, bruising, and weight-bearing difficulty are more obvious.
- Grade III is more severe, often with major instability and a much harder time tolerating standing or walking.
The point isn't to self-diagnose with certainty. The point is that the plan should change based on how irritated and unstable the ankle is.
How exercise changes by severity
A one-size-fits-all routine can be too easy for a mild sprain and too aggressive for a more serious one.
Here's a practical comparison:
| Sprain grade | Early focus | Common modification |
|---|---|---|
| Grade I | Restore motion and normal walking quickly | Progress sooner to standing exercises if swelling stays controlled |
| Grade II | Protect tissue while restoring gentle motion | Delay loaded strengthening until walking and swelling improve |
| Grade III | Higher level protection and closer supervision | Use a slower progression and more careful weight-bearing decisions |
For example, a Grade I sprain may tolerate seated range-of-motion work and gentle standing calf raises relatively early. A Grade II sprain may need longer with seated mobility, isometrics, and supported weight shifts before band work feels safe. A Grade III sprain often needs a much more guarded start and a clear exam to rule out associated injury.
Red flags that deserve prompt evaluation
Some symptoms should move you from home rehab to an in-person assessment quickly:
- You can't take several steps without major pain or collapse
- Swelling is severe or keeps escalating
- You have numbness, tingling, or unusual color change in the foot
- Pain is located more over bone than ligament
- The ankle feels grossly unstable
- You heard a pop and now can't function normally
- Symptoms aren't improving, or they worsen with basic rehab
These situations don't mean the outcome will be poor. They mean you need clarity before you keep loading the joint.
The biggest mistake I see is not doing too little exercise. It's doing the wrong exercise for the grade of injury. Good ankle sprain recovery exercises are specific, staged, and adjusted to the ankle in front of you.
A Confident Return to Your Activities
A good recovery doesn't happen because time passed. It happens because you respected the sequence. Protect the ankle early, restore motion, rebuild strength, and finish with balance and activity-specific work.
That last part matters. Plenty of ankles feel better before they're ready.
Stay patient with the process, especially if your sprain was more than mild. If you also want to support healing outside the exercise program, nutrition can help. This overview can help you discover foods for faster muscle repair and build better recovery habits around training.
When you return to walking longer distances, the gym, work demands, or sports, aim for confidence, not just survival. The right plan should leave you feeling steady, not tentative.
If your ankle still feels weak, swollen, unstable, or unclear to you, MedAmerica Rehab Center can help you get a personalized recovery plan based on your sprain severity, movement quality, and activity goals. Their team in Deerfield Beach provides hands-on care and guided rehabilitation to help you return to daily life, work, and sport with more confidence and less risk of re-injury.
MedAmerica Rehab · Deerfield Beach
Talk to a clinician about your pain
Physical therapy, chiropractic, acupuncture and shockwave therapy under one roof, since 1995. Same-day appointments are available.
Mon–Thu 8:00 AM – 6:30 PM · Fri 8:00 AM – 3:00 PM