
8 Best Exercises for Shoulder Stability in 2026
Build Bulletproof Shoulders, One Rep at a Time
A sudden twinge when you reach into a cabinet. A loose, uneasy feeling when you carry a bag. A shoulder that doesn't quite trust you when your arm gets overhead. That's where a lot of people start.
Shoulder instability makes ordinary movement feel unpredictable. You stop throwing, lifting, pushing, even sleeping comfortably on that side. The fix usually isn't “get stronger” in the gym-bro sense. It's getting the right muscles to switch on at the right time, then teaching them to hold steady while the rest of your body moves.
At MedAmerica Rehab Center, that's how we approach the best exercises for shoulder stability. We start with control, not load. We build the shoulder blade first, wake up the rotator cuff, and then progress into reaching, pressing, carrying, and anti-rotation work that looks like real life.
If your joints feel generally stiff or under-supported, some people also pair rehab with recovery habits like sleep, walking, and nutritional support such as collagen for joint support and mobility. That doesn't replace exercise, but it can fit into a broader plan.
Get to the list. If an exercise feels sharp, unstable, or sketchy, scale it back. A stable shoulder improves from good reps, not brave reps.
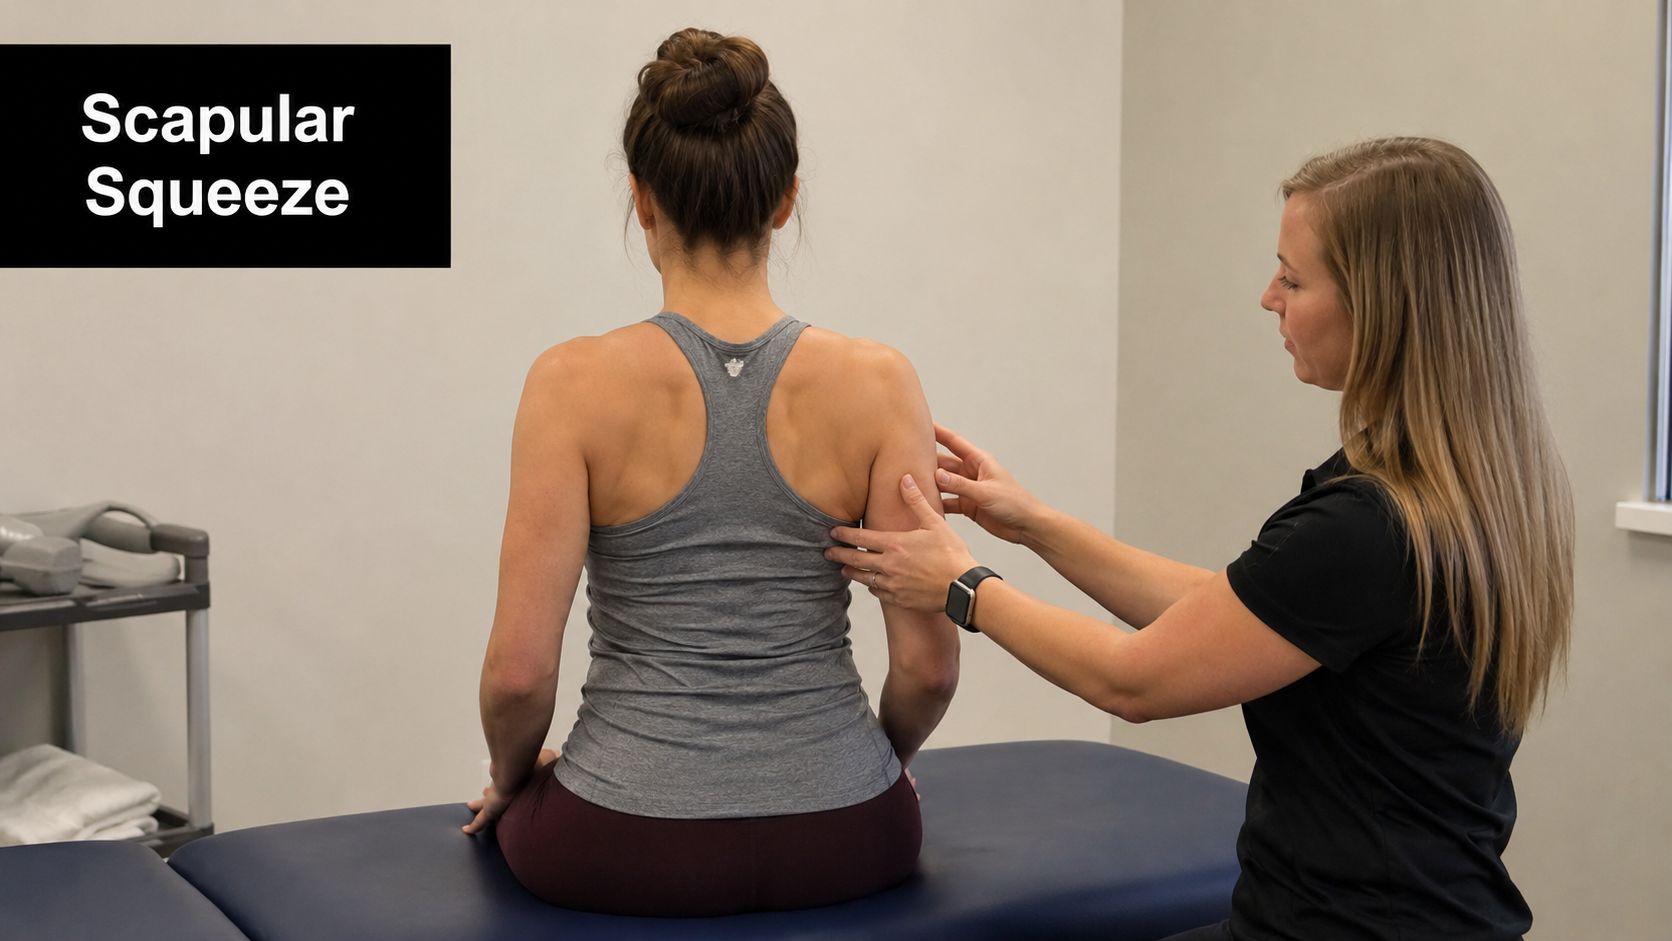
1. Scapular Stabilization Exercises (Scapular Squeezes and Retractions)
My initial focus for many unstable shoulders is just teaching the shoulder blade to sit and move well. Not overhead presses. Not fancy band circuits.
When the scapula drifts forward, wings out, or shrugs up too easily, the ball-and-socket joint loses a reliable base. That's when people say things like, “My shoulder feels loose,” even if they still have decent arm strength. Scapular squeezes and retractions clean that up.
How to do them well
Sit or stand tall. Let your arms relax by your sides. Gently draw your shoulder blades back and slightly down, like you're trying to widen your collarbones without puffing your ribs.
Hold briefly, then relax. The movement should be controlled and small. You should feel work between the shoulder blades, not tension climbing into the neck.
For people in early rehab, I often start with:
- Scapular squeeze holds: Gently squeeze and hold, then relax completely.
- Breathing cue: Exhale as you retract. That usually reduces neck compensation.
- Mirror check: Watch for shrugging, rib flare, or your chest jutting forward.
Practical rule: If your upper traps burn before the muscles around the shoulder blade do, you're probably shrugging instead of stabilizing.
A common progression is adding a light band for rows or pull-aparts, but only after the shoulder blade can move cleanly without resistance. If you're recovering from cuff irritation, this pairs well with conservative care like the guidance in MedAmerica's article on healing a rotator cuff injury without surgery.
Progression, regression, and red flags
Regression is simple. Do the exercise lying on your back or with your elbows supported on a towel roll so the neck stays relaxed. Progression can mean banded retractions, wall slides, or adding serratus-focused work later.
The trade-off is that this exercise looks easy, so people rush it. Don't. It's one of the best exercises for shoulder stability because it builds the platform that pressing and reaching depend on.
If you also train your upper back for physique goals, these patterns overlap with building a bigger yoke, but in rehab the priority is control, not load.
2. Prone Posterior Chain Exercises (Y-T-W Raises and Rear Delt Flyes)
If your posture lives in internal rotation all day, face-down posterior chain work usually exposes it fast. These drills target the muscles that pull the shoulder complex back into balance. They're humbling for desk workers, swimmers, lifters, and anyone who feels strong in the front and sloppy in the back.
I like these once a patient can control the shoulder blade without shrugging. Gravity does enough here. Generally, much weight isn't needed, and many do better with no weight at first.
Why they work
Prone Y-T-W patterns train the rear deltoid, rhomboids, lower trapezius, and the muscles that help the scapula stay organized during arm movement. That matters because a shoulder that tips forward too easily tends to lose space and control overhead.
Set up face-down on a bench or bed with the forehead supported if needed. Lift the arms into a Y, T, or W shape slowly, pause, then lower under control. For rear delt flyes, keep the thumbs slightly turned out and think “reach long,” not “heave high.”
Here's the coaching I give most often:
- Keep the neck quiet: Your chin shouldn't poke forward.
- Move from the shoulder blade first: Don't fling the hands.
- Stop at clean range: Shoulder height is plenty if form fades above that.
The biggest mistake is turning these into momentum reps. Once that happens, the low back arches, the neck joins the party, and the shoulder blade stops learning.
How to dose and progress
Start with a small volume and own it. If a position causes pinching, reduce range, bend the elbows more, or use a supported incline instead of fully prone.
A useful next step is adding brief pauses at the top before you add dumbbells. That exposes whether the stabilizers are working. This is also a great bridge between basic scapular drills and more demanding overhead stability.
Most people don't fail this exercise because they're weak. They fail because they try to lift the arm higher than they can stabilize.
3. External Rotation with Resistance Band (Side-Lying or Standing)
A common clinic pattern looks like this. The shoulder feels fine with the arm down, then gets shaky, sore, or unreliable the second you reach out to the side or overhead. External rotation is one of the first drills I use to clean that up because it trains the rotator cuff to center the ball of the shoulder joint while the arm moves.
For many patients, this is less about brute strength and more about precision. A light band or a small hand weight is usually enough. If the resistance is too heavy, the upper trap takes over, the elbow wanders, and the exercise stops targeting what it should.
Why it works
The external rotators, especially infraspinatus and teres minor, help resist the forward and upward drift that often shows up in irritated or unstable shoulders. In practice, that means better control during reaching, lifting, dressing, and the early return to throwing or racquet sports.
I usually start with clean sets of 8 to 10 reps for 2 to 3 sets. The goal early on is crisp activation with no shrugging, no trunk twist, and no pinching. Once that looks easy, the program should shift toward more functional control, such as wall-based stabilization or sport-specific mechanics, rather than just adding a thicker band.
How to do it
Option 1: Side-lying external rotation
- Lie on the non-working side.
- Bend the top elbow to 90 degrees and keep it lightly tucked against your ribs. A small towel between the elbow and side can help.
- Start with the forearm across the belly.
- Rotate the forearm upward as far as you can without the shoulder rolling back.
- Pause for a second, then lower slowly.
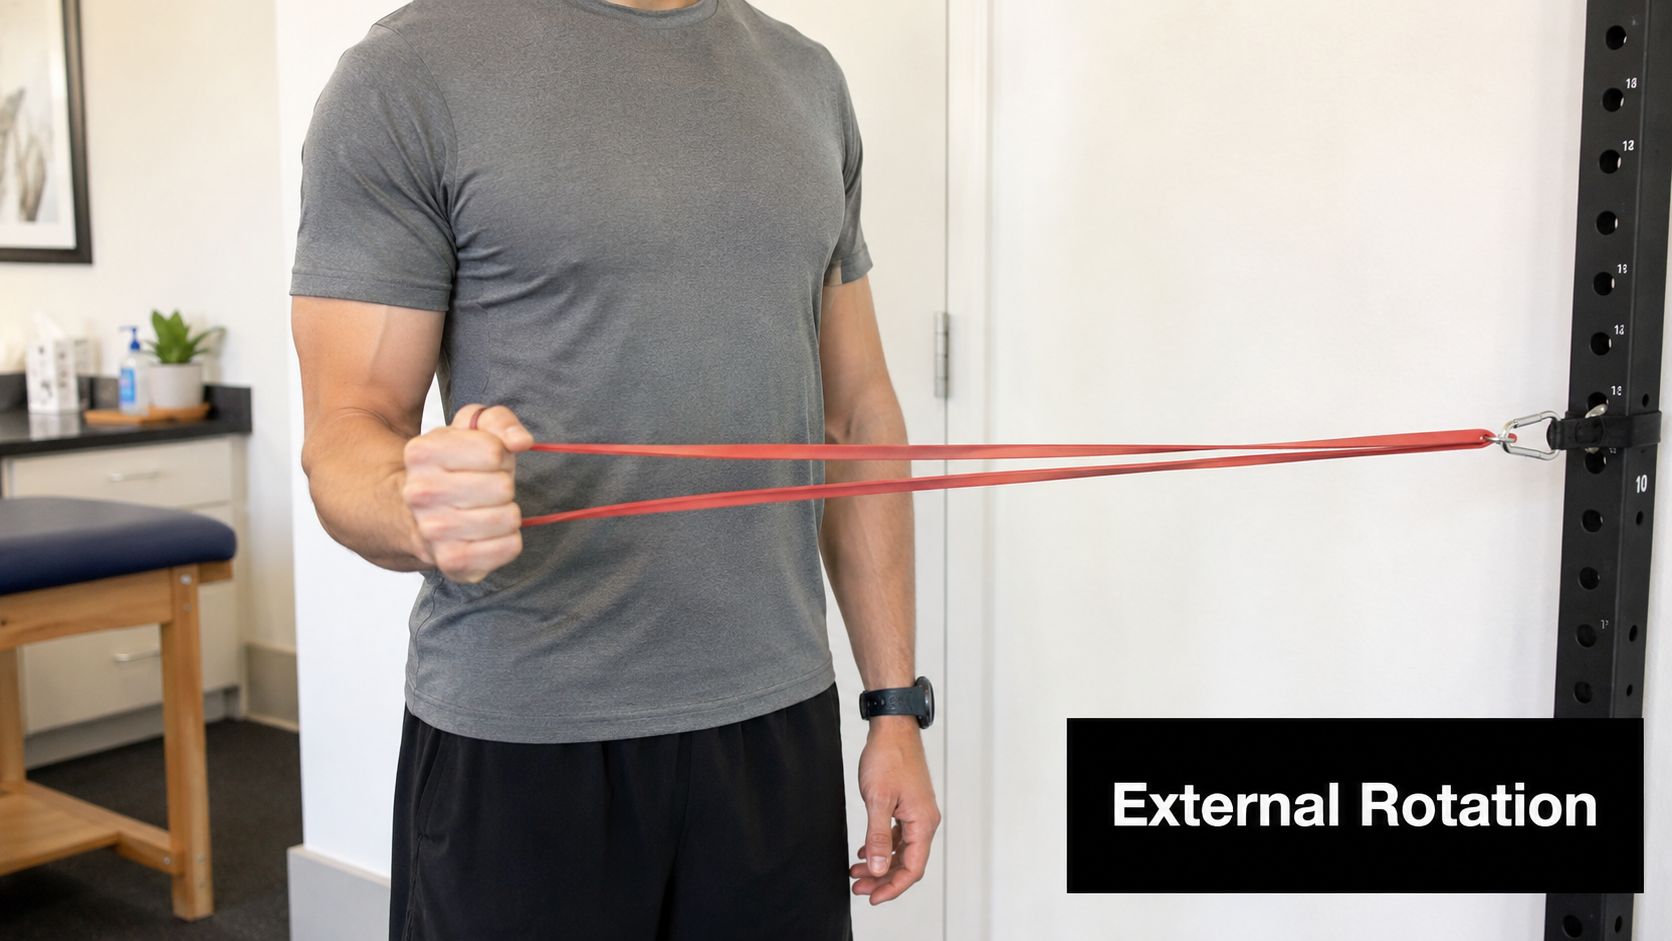
Option 2: Standing band external rotation
- Anchor the band at about elbow height.
- Stand tall with the working elbow bent to 90 degrees and tucked at your side.
- Start with the hand near the belly.
- Pull the band outward by rotating from the shoulder, not by turning the trunk.
- Return slowly to the start.
If you need a home setup, a latex-free resistance band for shoulder rehab drills is an easy option.
Coaching tips I give in the clinic
- Keep the elbow pinned gently to the side: If it drifts, the shoulder starts borrowing motion from somewhere else.
- Stay tall through the chest: Don't lean back to fake more range.
- Move only through the range you can own: A smaller arc with control beats a big arc with compensation.
- Use a slow lowering phase: That is often where cuff control shows up, or falls apart.
Regressions, progressions, and red flags
If side-lying feels too heavy, start standing with a very light band and a towel under the elbow. If standing band work causes pulling at the front of the shoulder, reduce the range and slow the tempo before changing the exercise.
To progress, add a brief hold at the end range, then increase resistance gradually. Another good step is performing the same motion at 30 to 45 degrees of shoulder abduction, but only if the basic version is steady and symptom-free.
Stop and get assessed if you feel sharp pain at the front of the shoulder, repeated clicking with loss of control, numbness, or the sense that the joint is slipping. Those findings call for an exam, not tougher band work.
4. Quadruped Shoulder Taps (Bird Dogs for Shoulders)
Some people do beautifully on the table, then lose all shoulder control the second they have to stabilize while their trunk shifts. That's where shoulder taps earn their place.
This exercise links scapular control, core stiffness, and weight-bearing through the arm. It looks simple. It is not. A shaky shoulder tap tells you a lot about how someone handles reaching, pushing off the floor, or catching themselves during daily movement.
Setup and execution
Start on hands and knees with hands under shoulders and knees under hips. Press the floor away slightly so you're not collapsing between the shoulder blades. Then lift one hand and tap the opposite shoulder without shifting your body all over the room.
Return the hand gently and alternate sides. Slow is better here. If the torso rotates, the pelvis tips, or the support shoulder shrugs up, you're beyond your current level.
Evidence-based shoulder rehab progressions include dynamic stabilization such as the shoulder tap in a push-up position, using 10 taps per arm for 20 total while keeping the shoulder blades in a controlled middle position. In clinic, many people need to start on all fours before they earn the full plank version.
Regressions and progressions
Make it easier by widening the knees, elevating the hands on a bench, or practicing weight shifts before adding the tap. Make it harder by moving to a high plank, narrowing the base, or adding a reach.
Use this if your shoulder feels unstable during everyday tasks like pushing up from bed or bracing with one arm while the other reaches. Don't use it early if weight-bearing sharply increases pain or if you can't hold a neutral trunk.
The support arm is the whole point. If all your attention is on the tapping hand, you're missing the exercise.
5. Dead Bug Exercise (Shoulder Stability Component)
Dead bugs don't look like shoulder rehab, and that's exactly why they're useful. They teach the rib cage, trunk, and shoulder to cooperate. A lot of instability complaints are made worse by a torso that extends and rotates every time the arm moves.
When I give this to patients, I'm not trying to tire out the abs for the sake of it. I'm trying to stop the shoulder from doing extra work because the trunk can't stay organized.
How to perform it
Lie on your back with your arms reaching toward the ceiling and hips and knees bent. Gently flatten the rib flare, not by smashing your low back, but by exhaling and stacking the ribs over the pelvis. From there, lower one arm overhead as the opposite leg moves away.
Come back to center and switch sides. Move slowly enough that nothing shifts. If the back arches or the ribs pop up, shorten the range.
This drill works well for people who feel shoulder discomfort during reaching, especially when they also have poor trunk control. It's also useful after surgery or after a flare-up, when standing exercises still feel too unstable.
Why it belongs in a shoulder program
Shoulder stability isn't only about the shoulder. The scapula glides on the rib cage. If the rib cage keeps changing position, the shoulder blade loses its platform.
What works here is precision. What doesn't work is turning it into a fast core burner.
Try these fixes if needed:
- Bend the moving leg more: Less strain, more control.
- Lower the arm only partway: Stay in pain-free range.
- Use a wall press with the opposite hand: That often improves trunk tension and shoulder awareness.
For patients who can't yet tolerate standing anti-rotation work, dead bugs are one of the best exercises for shoulder stability because they teach control without demanding full body weight through the arm.
6. Wall Push-Ups and Quadruped Push-Ups
A patient can often raise the arm without much trouble, then feel the shoulder complain the moment pushing is involved. Getting up from the floor, steadying on a countertop, or lowering into bed asks the shoulder blade and arm to share load well. That is why push-up regressions earn a place in a rehab plan.
Wall push-ups and quadruped push-ups build closed-chain shoulder stability with less stress than floor push-ups. In the clinic, I use them to train serratus anterior, improve scapular control, and expose weak points that are easy to miss during lighter band work.
Why these belong in a shoulder program
Pressing through the hand gives the brain useful feedback. It helps many patients find the shoulder blade on the rib cage, control forward translation of the humeral head, and build tolerance for real-life pushing tasks.
The American Academy of Orthopaedic Surgeons outlines a shoulder conditioning approach that starts with lower-strain mobility and conditioning work before heavier strengthening is added, as described in its shoulder conditioning program. That progression matches good rehab practice. Earn control first, then add load.
If overhead motion still feels stiff before pressing work, a shoulder pulley exerciser for home range-of-motion work can help restore motion so these drills feel cleaner.
How to do a wall push-up
Stand facing a wall with hands slightly wider than shoulder width, about chest height. Walk the feet back until the body is at a mild angle. Brace the trunk gently so the ribs do not flare and the low back does not sag.
Bend the elbows and bring the chest toward the wall in one controlled line. Press back to the start. At the top, reach a little farther so the shoulder blades wrap forward instead of pinching together.
Start with 2 to 3 sets of 8 to 12 slow reps. Rest 30 to 45 seconds between sets.
A few cues clean this up fast:
- Keep the neck long and eyes level.
- Let the elbows track at a comfortable angle, not straight out to the side.
- Finish with a small "plus" at the top, but do not shrug toward the ears.
- Stop short of pain that sharpens, catches, or lingers after the set.
How to progress to quadruped push-ups
Move to hands and knees only when wall push-ups are smooth and pain stays mild during and after the session. Set the hands under the shoulders and knees under the hips. Keep the trunk quiet, then bend the elbows slightly as the chest lowers a short distance between the hands.
Press the floor away and return to the start. Add the same small reach at the top without rounding the whole spine.
Use 2 to 3 sets of 6 to 10 reps at first. This version is harder than it looks. Good reps matter more than depth.
Regressions, progressions, and red flags
If either version feels shaky, raise the hands higher on the wall or reduce the range. A countertop push-up can work well between the wall and quadruped stages. If wrists are the limiting factor, place hands on dumbbells or a wedge to reduce wrist extension.
To progress, lower the hand support, slow the lowering phase, or add a brief pause at the bottom. Save floor push-ups for patients who can keep the shoulder blade moving well without pain, winging, or the shoulders dumping forward.
Stop and reassess if you see visible winging that gets worse with each rep, sharp pain at the front of the shoulder, a sense of slipping, or symptoms that stay irritated later that day. In the MedAmerica Rehab Center setting, those signs usually mean the current load is ahead of the patient's control, not that the exercise itself is wrong.
7. Stability Ball Shoulder Flexion and Abduction (Supine)
This is a useful middle-stage exercise for people who are past basic table work but not ready for aggressive overhead loading. The ball adds just enough instability to ask for better trunk and scapular control, without forcing the shoulder to manage full standing demands yet.
That in-between space matters. Many rehab programs jump from mat work to upright loading too quickly. I'd rather see smooth control on a ball than sloppy overhead work standing up.
How to set it up
Position the stability ball under the mid-back with feet planted firmly. Lift the hips enough to stay steady, but don't turn it into a glute bridge challenge. Start with arms reaching toward the ceiling.
From there, move into shoulder flexion overhead or abduction out to the side, staying in a controlled pain-free arc. The ball should stay quiet. If you wobble all over, reduce range or remove the ball.
Systematic review data on scapular activation highlights exercises such as the diagonal exercise, scapular protraction, bench press, and supine press as strong options for promoting the forward scapular movement needed for glenohumeral stability. That's one reason this supine-based progression works well. It teaches the scapula to stay engaged against the thorax while the arm moves.
Practical progression
Use no weight at first, then add light dumbbells only after the movement stays steady. If you need a gentler overhead option at home, a pulley can also help you rebuild motion before loading it more aggressively. MedAmerica offers an over-the-door pulley exerciser that fits that stage well.
This exercise tends to help people who feel vulnerable in overhead or side-reaching positions but still need support under them. It's less useful for someone who still can't control basic scapular retraction or has significant pain lying back on the ball.
8. Half-Kneeling Single-Arm Landmine Press
Most “best exercise” lists stop too early. They give you rotator cuff work, wall slides, maybe some floor drills, then assume that's enough for real life. It usually isn't.
Shoulders often get challenged during standing, moving, anti-rotation tasks. That's why I like the half-kneeling landmine press late in rehab. It trains pressing, scapular control, and trunk stability at the same time, with a friendlier angle than a straight overhead press.
Why this one matters
A recent sports physical therapy discussion highlights the gap in many shoulder guides. The missing piece is the transition into dynamic standing anti-rotation work, including half-kneeling patterns such as a half-kneeling cable rotation or band pull-apart for stabilizing the humerus against ground forces during real-world movement. That's the lane this press lives in.
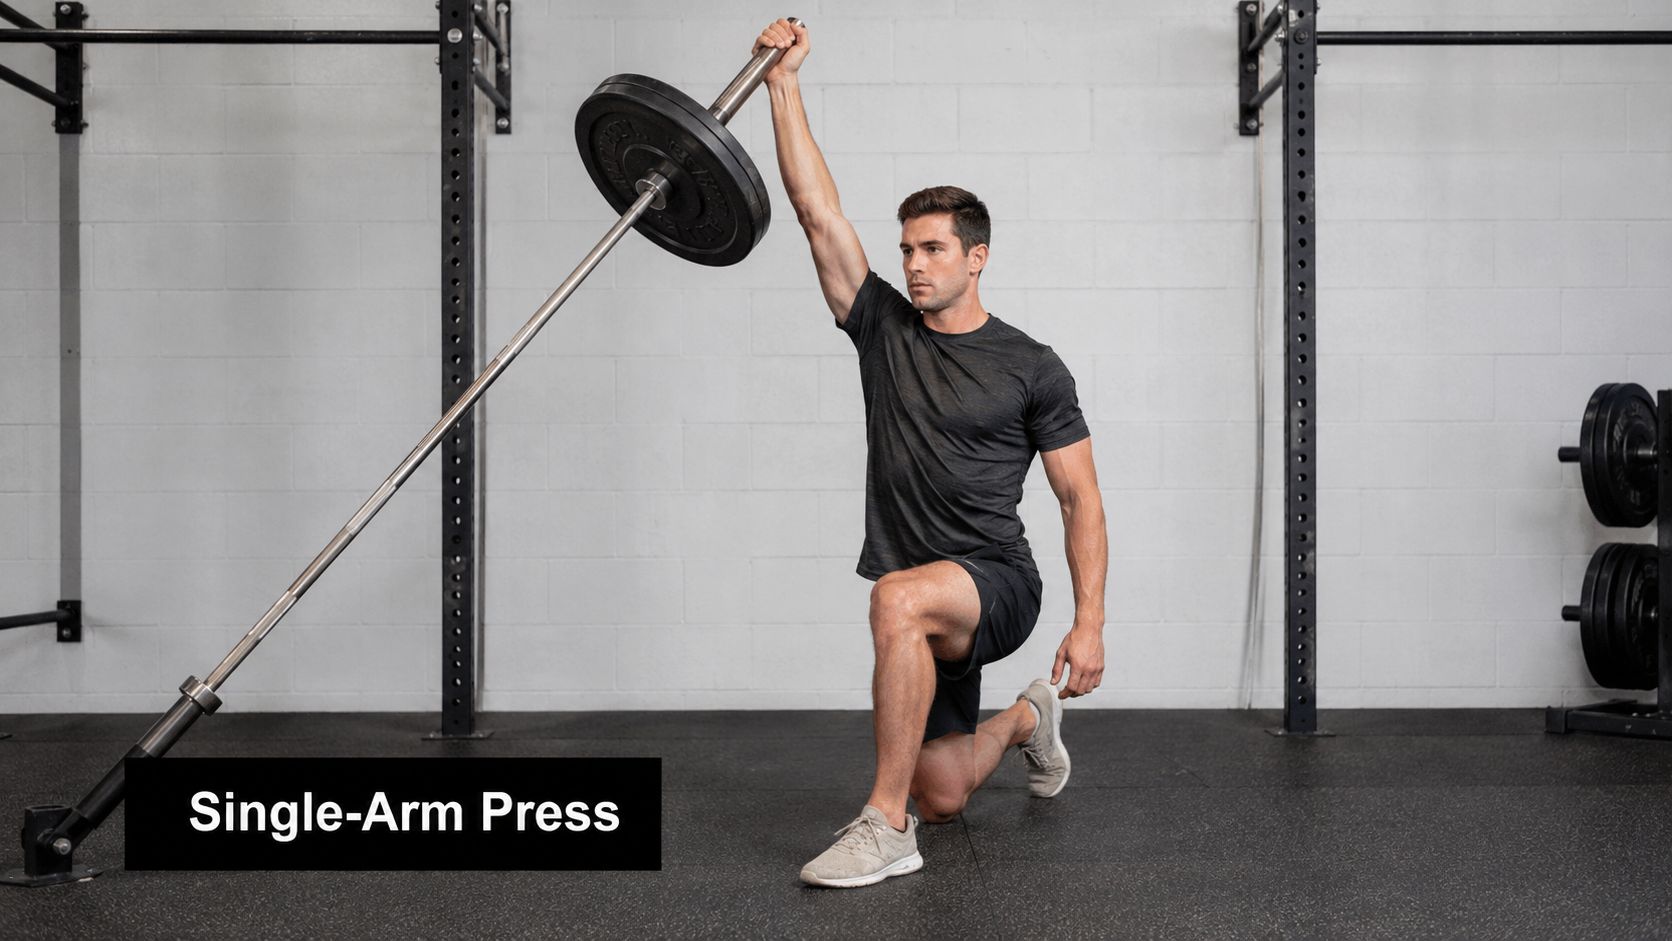
Set up in half-kneeling with the opposite knee forward from the working arm. Hold the landmine at shoulder height. Brace the trunk, keep the ribs down, and press up and slightly forward.
At the top, don't just lock out and hang on the joint. Reach into the press a little so the shoulder blade contributes.
Here's the demo if you want a visual:
Mistakes and safety notes
The common mistakes are all compensation-based. People arch the low back, rotate toward the pressing arm, or try to make the load impressive before the movement is stable.
A few guardrails:
- Use the half-kneeling stance intentionally: It should reduce cheating.
- Keep the press smooth: No jerking off the shoulder.
- Own the lowering phase: Instability often shows up on the way down.
This isn't an early rehab exercise. It belongs after you can control scapular work, rotator cuff activation, and simpler closed-chain drills. But once you're there, it's one of the best exercises for shoulder stability because it finally asks your shoulder to behave like a shoulder in real life.
8-Exercise Shoulder Stability Comparison
| Exercise | Implementation complexity | Resource requirements | Expected outcomes | Ideal use cases | Key advantages |
|---|---|---|---|---|---|
| Scapular Stabilization Exercises (Scapular Squeezes & Retractions) | Low, simple cues, easy progressions | Minimal, bodyweight, optional band, mirror | Improved scapular positioning, posture, foundational shoulder stability (weeks) | Early rehab, desk workers, Phase 1 post-op | Low risk, easy to integrate daily, builds foundation for advanced work |
| Prone Posterior Chain Exercises (Y‑T‑W, Rear Delt Flyes) | Low–Medium, prone motor control required | Minimal to light dumbbells/bands, mat | Increased posterior shoulder strength, better scapular control, posture correction | Postural correction, athletes, after basic stabilization | Targets neglected posterior muscles; clear progression path |
| External Rotation with Resistance Band (Side‑Lying/Standing) | Low, technique sensitive to isolate rotators | Bands (portable) | Rotator cuff strengthening, reduced anterior instability, improved overhead function | Rotator cuff rehab, overhead/throwing athletes, Phase 2 post‑op | Evidence‑based, portable, adjustable resistance, low injury risk |
| Quadruped Shoulder Taps (Bird Dogs for Shoulders) | Medium, requires core stability and coordination | Minimal, mat; optional stability ball | Improved proprioception, core‑shoulder integration, dynamic stability | Functional rehab, fall prevention, athletic stability work | Integrates core + shoulder, scalable, functional carryover |
| Dead Bug Exercise (Shoulder Stability Component) | Low–Medium, supine pattern, body awareness needed | Minimal, mat | Integrated core‑shoulder stability, anti‑rotation and anti‑extension control | Early rehab, patients needing core‑shoulder integration, cautious cases | Safe supine position, low risk, easily modified |
| Wall Push‑Ups and Quadruped Push‑Ups | Low–Medium, depends on progression and form control | None | Improved pressing strength, anterior shoulder stability, functional carryover | Progressive strength rehab, seniors, return‑to‑function programs | Functional compound movement, clear scalable progression |
| Stability Ball Shoulder Flexion & Abduction (Supine) | Medium, requires ball control and core strength | Stability ball, optional light weights | Enhanced proprioception, dynamic overhead stability, transition to loaded overhead work | Intermediate rehab, impingement cases progressing to overhead | Increases stabilization demand safely, combines core and shoulder training |
| Half‑Kneeling Single‑Arm Landmine Press | High, complex pattern and rotational demand | Landmine setup/barbell, space | Advanced integrated rotational strength, sport‑specific pressing stability | Advanced athletes, return‑to‑sport, heavy manual‑work rehab | High functional transfer, safer pressing angles, strong core‑shoulder integration |
Your Next Step to a Stable Shoulder
A stronger shoulder usually isn't built by finding one magic exercise. It's built by stacking the right progressions in the right order. First you restore position and control. Then you build endurance in the scapular muscles and rotator cuff. After that, you challenge the shoulder during pressing, reaching, and anti-rotation tasks that feel more like actual life.
That sequence matters. People often stall because they skip the unglamorous part. They jump straight to presses, heavy rows, or random band work from social media. Then they wonder why the shoulder still clicks, still feels loose, or still hurts when they reach across the body or overhead. In practice, the best results usually come from doing simple movements very well, then earning the harder ones.
Consistency beats variety here. A few exercises done with good form, repeated often enough, will help more than a giant menu of drills you never really learn. If your shoulder is irritable, the right amount of challenge should feel like muscular work and mild effort, not sharp pain, slipping, or a sense that the joint is about to give way. Those are signs to back off and get guidance.
I also tell patients to judge progress by function, not just soreness. Can you reach a shelf with less hesitation? Carry groceries with less guarding? Push up from bed more confidently? That's the kind of improvement that matters. The gym should support those wins, not distract from them.
If you're local and you're tired of guessing, MedAmerica Rehab Center can help sort out what's driving the problem. Some people need better scapular control. Some need cuff strengthening. Some need to restore motion first. Others are ready for higher-level stability work but are still using the wrong exercises or the wrong dosage. That's where an in-person assessment saves time.
At MedAmerica Rehab Center in Deerfield Beach, our licensed physical therapists and doctors build personalized plans based on how your shoulder moves, not just where it hurts. That hands-on, progression-based approach is a lot more useful than copying a generic routine and hoping it fits. And for clinic owners thinking about how better patient education supports growth, there are also useful marketing insights for owners.
If your shoulder feels unstable, painful, or unreliable, don't wait for it to become your new normal. A clear plan, the right exercise progression, and a little consistency can change a lot.
If your shoulder feels weak, loose, painful, or just not trustworthy, schedule an evaluation with MedAmerica Rehab Center. Their team in Deerfield Beach can identify the cause of your instability and build a personalized treatment plan that helps you move better, heal safely, and get back to work, sports, and everyday life with confidence.
MedAmerica Rehab · Deerfield Beach
Talk to a clinician about your pain
Physical therapy, chiropractic, acupuncture and shockwave therapy under one roof, since 1995. Same-day appointments are available.
Mon–Thu 8:00 AM – 6:30 PM · Fri 8:00 AM – 3:00 PM