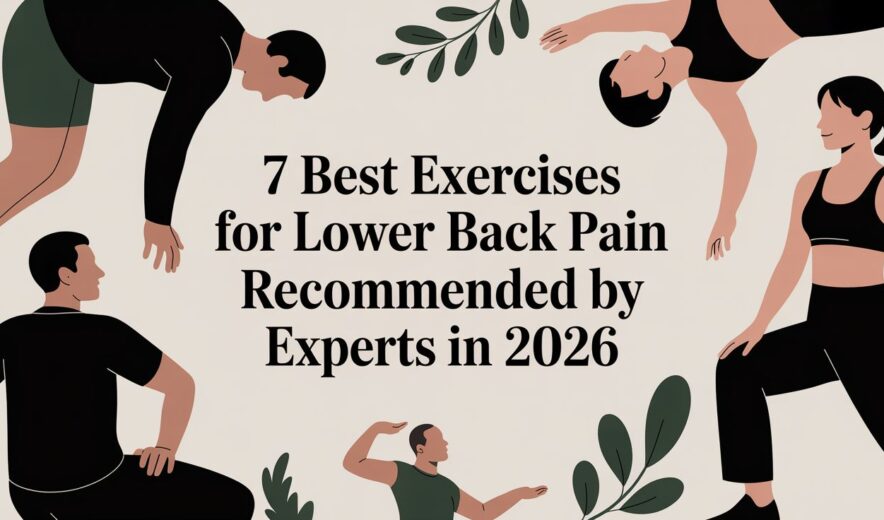
7 Best Exercises for Lower Back Pain Recommended by Experts in 2026
Lower back pain can be a debilitating cycle of discomfort, limited mobility, and frustration. It disrupts everything from work productivity to simple daily joys. While rest seems intuitive, targeted movement is often the most powerful medicine for lasting relief. But with countless conflicting recommendations, finding the right exercises can feel overwhelming.
This guide cuts through the noise. We will provide a detailed roundup of the 7 best exercises for lower back pain, meticulously detailed with step-by-step instructions, common mistakes to avoid, and modifications for every fitness level. This isn't just a list; it's a practical roadmap to building a resilient, pain-free back. We will explore how a balanced routine of stabilization, mobility, and strengthening can address the root causes of your discomfort, not just the symptoms. Beyond just specific movements, a well-rounded approach is key to finding lasting comfort and learning how to alleviate lower back pain and reclaim your day.
You will learn how to perform each movement safely and effectively, empowering you to take control of your back health. From foundational core stabilizers like the Bird Dog to gentle mobility work like the Cat-Camel stretch, these exercises are chosen for their proven ability to reduce strain and build strength where it matters most.
Important Safety Note: Before you begin any new exercise program, especially if your pain is severe, new, or the result of an injury, it is crucial to consult a healthcare professional. A proper diagnosis from a physical therapist or doctor, like the specialists at MedAmerica Rehab Center, is the safest first step to ensure these movements are right for you.
1. Bird Dog Exercise
The Bird Dog is a fundamental core stability exercise that tops many lists of the best exercises for lower back pain, and for good reason. It teaches your body to engage deep core muscles and stabilize the spine in a neutral position while your limbs are in motion. This movement directly strengthens the erector spinae (the muscles running alongside your spine) and the multifidus, small but critical muscles that provide segmental stability to your vertebrae.
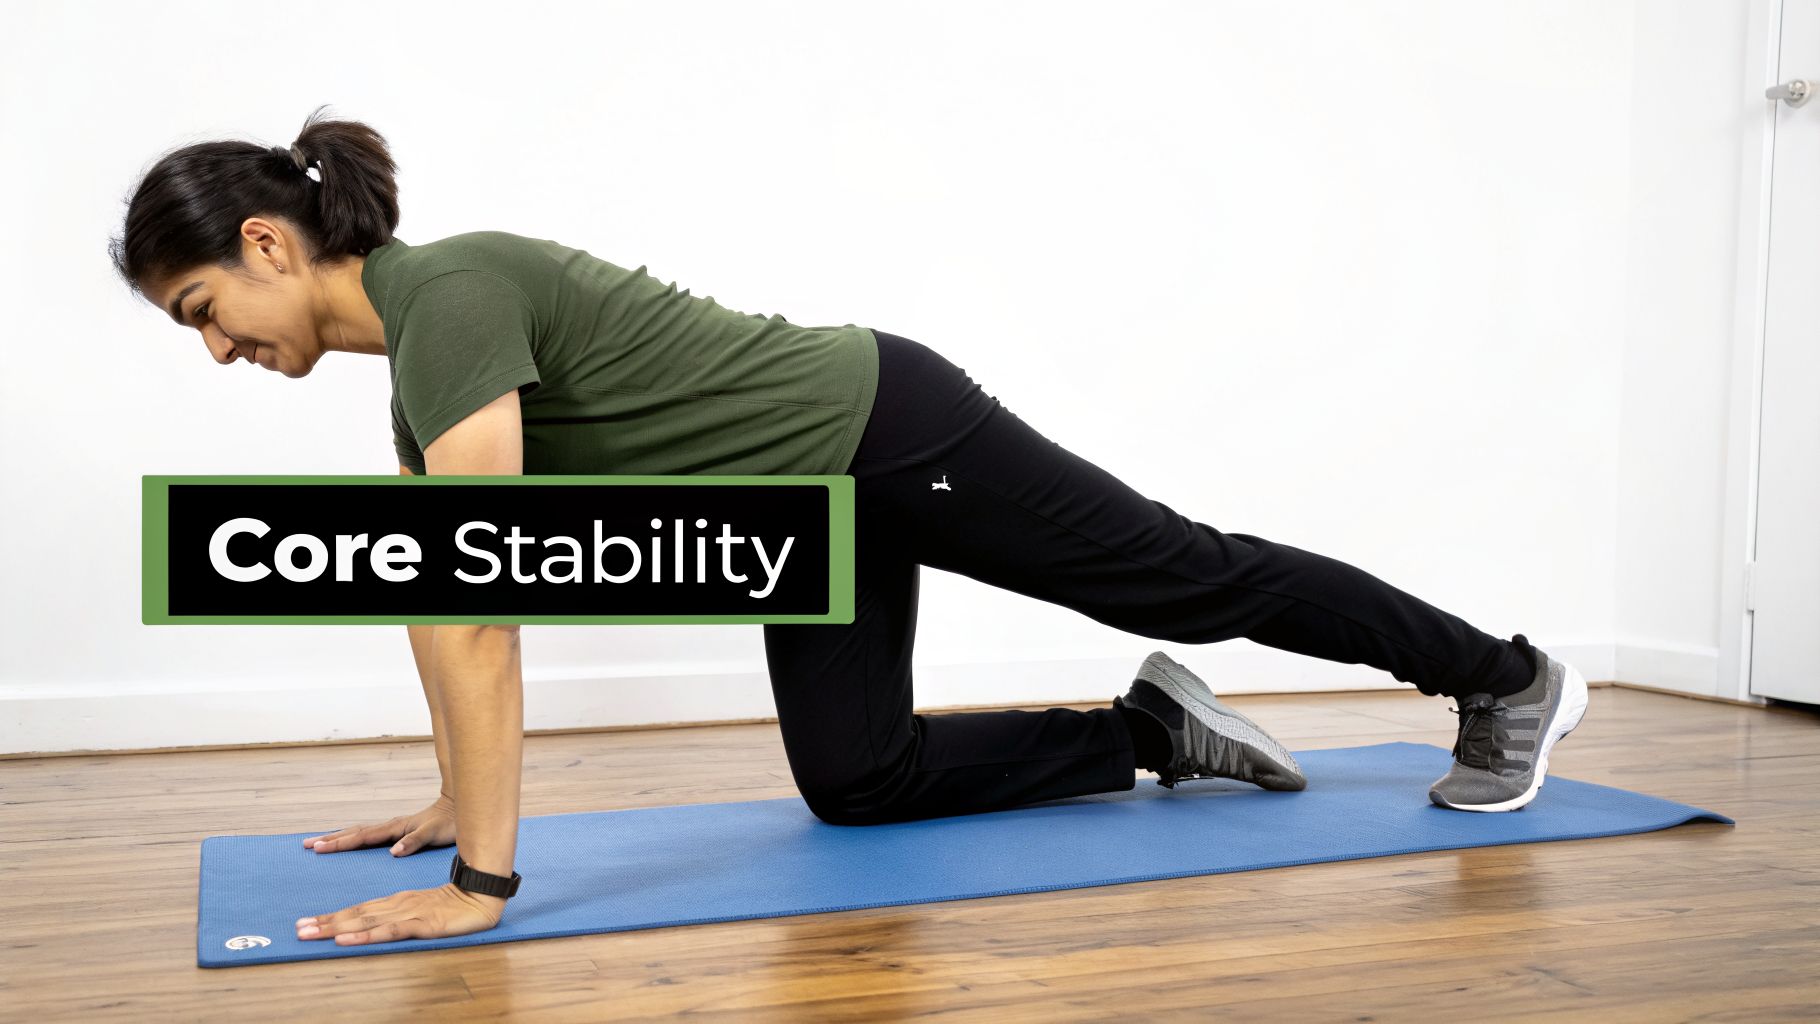
Unlike exercises that put direct pressure on the spine, the Bird Dog builds strength and endurance without a high degree of spinal loading. This makes it an exceptionally safe and effective choice for a wide range of individuals, from office workers looking to counteract the effects of prolonged sitting to patients in post-surgical rehabilitation.
How to Perform the Bird Dog Correctly
Executing this exercise with proper form is key to reaping its benefits and preventing further strain.
- Starting Position: Begin on all fours in a "tabletop" position. Your hands should be directly under your shoulders, and your knees should be directly under your hips.
- Engage Your Core: Before moving, brace your abdominal muscles as if you're about to be punched in the stomach. This is not the same as sucking your stomach in.
- The Movement: Simultaneously extend your right arm straight forward and your left leg straight back. Keep both parallel to the floor. Imagine balancing a glass of water on your lower back to keep it perfectly still and level.
- Hold and Return: Hold this extended position for 2-3 seconds, focusing on stability. Slowly and with control, return your arm and leg to the starting tabletop position.
- Repeat: Perform the same movement on the opposite side, extending your left arm and right leg. This completes one repetition.
Expert Tip: Your head and neck are part of your spine. Keep your gaze directed at the floor just in front of your hands to maintain a long, neutral line from the crown of your head to your tailbone.
Modifications and Common Mistakes
- For Beginners: If extending both an arm and a leg is too challenging, start by extending just one limb at a time. First, master extending only a leg, then only an arm, before combining them.
- For an Added Challenge: Once you've perfected the form, try holding the extended position for 5-10 seconds. You can also place a foam roller or a yoga block on your lower back to provide tactile feedback if you are rotating your hips.
- Common Mistake: Avoid arching your lower back as you lift your leg. This places stress on the lumbar spine and defeats the purpose of the exercise.
- Common Mistake: Rushing the movement. The Bird Dog is about control, not speed. Slow, deliberate motion engages the stabilizing muscles more effectively.
The controlled nature of this exercise makes it a go-to for physical therapists. If you are experiencing persistent discomfort or conditions like sciatica, expert guidance can make a significant difference. The team at MedAmerica Rehab Center can assess your movement patterns and provide personalized strategies for back pain and sciatica relief to ensure you're exercising safely and effectively for your specific needs.
2. Cat-Camel Stretch (Marjaryasana-Bitilasana)
The Cat-Camel stretch, known in yoga as Marjaryasana-Bitilasana, is a cornerstone of spinal mobility and one of the best exercises for lower back pain, especially for relieving stiffness. This dynamic movement gently guides the spine through its natural ranges of flexion (rounding like a cat) and extension (arching like a cow). This motion helps to improve the flexibility between individual vertebrae and promotes the circulation of synovial fluid within the spinal discs, which can nourish them and reduce degeneration.
This exercise is particularly beneficial for individuals who experience morning stiffness, such as those with certain types of arthritis, or desk workers looking to counteract the effects of static posture. By mobilizing the spine in a gentle, unloaded position, the Cat-Camel prepares the back for more demanding activities and can provide immediate relief from tightness.
How to Perform the Cat-Camel Correctly
Proper form and rhythm are essential to get the full benefit of this gentle yet powerful stretch.
- Starting Position: Begin on your hands and knees in a tabletop position, just like the Bird Dog. Ensure your hands are directly below your shoulders and your knees are directly below your hips.
- Engage Your Core: Find a neutral spine position first, with your back flat. Gently engage your abdominal muscles to maintain stability.
- The "Cat" (Flexion): As you exhale, gently tuck your chin toward your chest and round your spine up toward the ceiling. Allow your head to drop and your tailbone to tuck under. You should feel a gentle stretch through your entire back.
- The "Camel" or "Cow" (Extension): As you inhale, reverse the movement. Lift your chest and tailbone toward the ceiling, allowing your belly to sink toward the floor. Look slightly forward without straining your neck.
- Repeat: Flow smoothly between the Cat and Camel positions, linking your breath to the movement. This completes one repetition.
Expert Tip: The goal is fluid, continuous motion, not holding extreme positions. Think of moving one vertebra at a time, like a wave traveling up and down your spine. Always move within a pain-free range.
Modifications and Common Mistakes
- For Sensitive Wrists: If you feel discomfort in your wrists, you can perform the exercise on your fists (with a mat or towel for padding) or by placing your forearms on the floor.
- For an Added Challenge: While not about intensity, you can deepen the practice by focusing on initiating the movement from your tailbone and letting it ripple up your spine to your head.
- Common Mistake: Forcing the movement. Never push into a range that causes sharp pain. The stretch should feel relieving, not stressful.
- Common Mistake: Moving only from the mid-back. Ensure the movement involves your entire spine, from your neck down to your tailbone, to get the full mobilization effect.
The Cat-Camel is an excellent warm-up before other strengthening exercises and a fantastic way to improve your overall spinal health and posture. For more guidance on simple movements to build a healthier spine, you can find easy exercises you can do at home to improve your posture. If you have a specific spinal condition like stenosis or a disc injury, the physical therapists at MedAmerica Rehab Center can modify this exercise to ensure it is safe and effective for your needs.
3. Dead Bug Exercise
The Dead Bug exercise is a staple in physical therapy for developing profound core strength and spinal stability without placing direct stress on the lower back. Performed while lying on your back, it teaches you to maintain a braced, neutral spine while your limbs move, much like the Bird Dog but from a supine (face-up) position. This movement is exceptionally effective for strengthening the deep abdominal muscles, including the transverse abdominis, which acts like a natural corset for your spine.
This exercise is particularly useful for individuals who need to rebuild core control from the ground up. It’s a go-to for auto accident victims rebuilding stability, workers' compensation patients working toward functional activity, and even post-discectomy patients in a graduated return-to-activity program. Its low-impact nature also makes it ideal for seniors looking to improve balance and fall prevention.
How to Perform the Dead Bug Correctly
Proper form is non-negotiable for the Dead Bug to be effective and safe. The primary goal is to prevent any arching in the lower back.
- Starting Position: Lie on your back with your knees bent and feet flat on the floor. Raise your legs so your shins are parallel to the floor, creating a 90-degree angle at your hips and knees (the "tabletop" position). Extend your arms straight up toward the ceiling.
- Engage Your Core: Gently press your lower back into the floor. You should feel your abdominal muscles tighten. Maintain this pressure throughout the entire exercise.
- The Movement: Slowly lower your right arm and your left leg toward the floor at the same time. Go only as low as you can without your lower back arching off the floor.
- Hold and Return: Pause for a moment at the lowest point, then slowly and with control, bring your arm and leg back to the starting position.
- Repeat: Perform the same movement on the opposite side, lowering your left arm and right leg. This completes one repetition.
Expert Tip: Place one hand under the small of your back. As you lower your limbs, you should feel constant, gentle pressure on your hand. If the pressure lessens, you've lost your core engagement and should reduce your range of motion.
Modifications and Common Mistakes
- For Beginners: If lowering an arm and leg together is too difficult, start by lowering only one limb at a time. First, just lower one leg, then the other. Then, just one arm, then the other. Progress to opposite arm and leg as you get stronger.
- For an Added Challenge: Once the basic movement feels easy, you can increase the difficulty by extending your legs further out or by holding the lowered position for a few seconds longer.
- Common Mistake: Allowing the lower back to arch. This is the most critical mistake. It places stress on the lumbar spine and means your core is not properly engaged. Keep the movement small and controlled to prevent this.
- Common Mistake: Holding your breath. Breathe steadily throughout the exercise. A good pattern is to exhale as you lower your limbs and inhale as you return to the start.
The Dead Bug is a foundational exercise for managing and preventing lower back pain, but getting the core engagement right can be tricky. If you feel any sharp pain or are unsure about your form, professional guidance is key. The physical therapists at MedAmerica Rehab Center can assess your core function and ensure your technique provides maximum benefit, creating a personalized plan to help you build a stronger, more resilient back.
4. Quadruped Hip Flexor Stretch (Modified Lunge Position)
Chronic tightness in the hip flexors, a group of muscles at the front of your hip, is a primary contributor to lower back pain, especially for those who sit for long periods. The Quadruped Hip Flexor Stretch, performed in a half-kneeling or modified lunge position, directly targets these muscles, particularly the iliopsoas and rectus femoris. By elongating these tight muscles, this stretch helps correct an anterior pelvic tilt, where the pelvis tips forward, which reduces excessive curvature (lordosis) in the lumbar spine and alleviates pressure.
This stretch is one of the best exercises for lower back pain because it addresses a root cause of discomfort rather than just the symptoms. It’s a gentle, static stretch, making it a safe and accessible option for many people, including office workers, cyclists, and even patients recovering from certain types of hip surgery who need to restore flexibility. Releasing this tension allows the pelvis to return to a more neutral alignment, providing a solid foundation for a pain-free spine.
How to Perform the Quadruped Hip Flexor Stretch Correctly
Proper form is crucial to isolate the hip flexors and avoid compensating with your lower back.
- Starting Position: Begin by kneeling on a soft surface like a yoga mat or carpet. Place a folded towel or pillow under your knee for extra cushioning. Step one foot forward so that your front knee is bent at a 90-degree angle and directly over your ankle.
- Engage Your Core: Keep your torso upright and tall. Gently tuck your tailbone underneath you and engage your abdominal muscles. This "posterior pelvic tilt" immediately begins to lengthen the hip flexor of the back leg.
- The Movement: Keeping your back straight, slowly shift your body weight forward into your front leg. You should feel a distinct stretch along the front of the hip and thigh of your back leg. Do not lean your torso forward or arch your back.
- Hold and Breathe: Hold the stretch for 30-45 seconds, breathing deeply and allowing the muscle to relax and lengthen with each exhale. Avoid bouncing.
- Repeat: Slowly release the stretch and return to the starting position. Switch legs and perform the same stretch on the other side. This completes one repetition.
Expert Tip: To deepen the stretch and increase its effectiveness, actively squeeze the glute muscle of the back leg. This action helps to further open the front of the hip and intensify the stretch on the hip flexor.
Modifications and Common Mistakes
- For Beginners: If you feel unstable, place your hands on your front knee or hold onto a sturdy chair or wall for balance. Don't push into a deep stretch right away; start with a gentle lean.
- For an Added Challenge: To incorporate more of the chain, raise the arm on the same side as your back leg straight up towards the ceiling. You can add a slight side-bend away from the stretching leg to deepen the sensation along your side body.
- Common Mistake: Arching the lower back as you lean forward. This negates the stretch and can compress the lumbar spine. Keep your core engaged and pelvis tucked to prevent this.
- Common Mistake: Allowing the front knee to travel past the ankle. This places unnecessary stress on the knee joint. Ensure your front shin remains relatively vertical.
Understanding your unique pelvic alignment is key to making this stretch work for you. At MedAmerica Rehab Center, our physical therapists can assess your posture and provide hands-on guidance to ensure you’re performing this and other exercises with the correct form for maximum back pain and sciatica relief, helping you move toward a life with less pain.
5. Bridges and Single-Leg Bridges
The Glute Bridge is a foundational exercise celebrated for its ability to combat lower back pain by addressing one of its most common root causes: weak gluteal muscles. When your glutes (the muscles in your buttocks) are not strong enough to perform their primary function of hip extension, your lower back muscles are often forced to compensate, leading to overuse, strain, and pain. Bridges directly strengthen the entire posterior chain, including the gluteus maximus, hamstrings, and lower back extensors, from a safe, supported position.
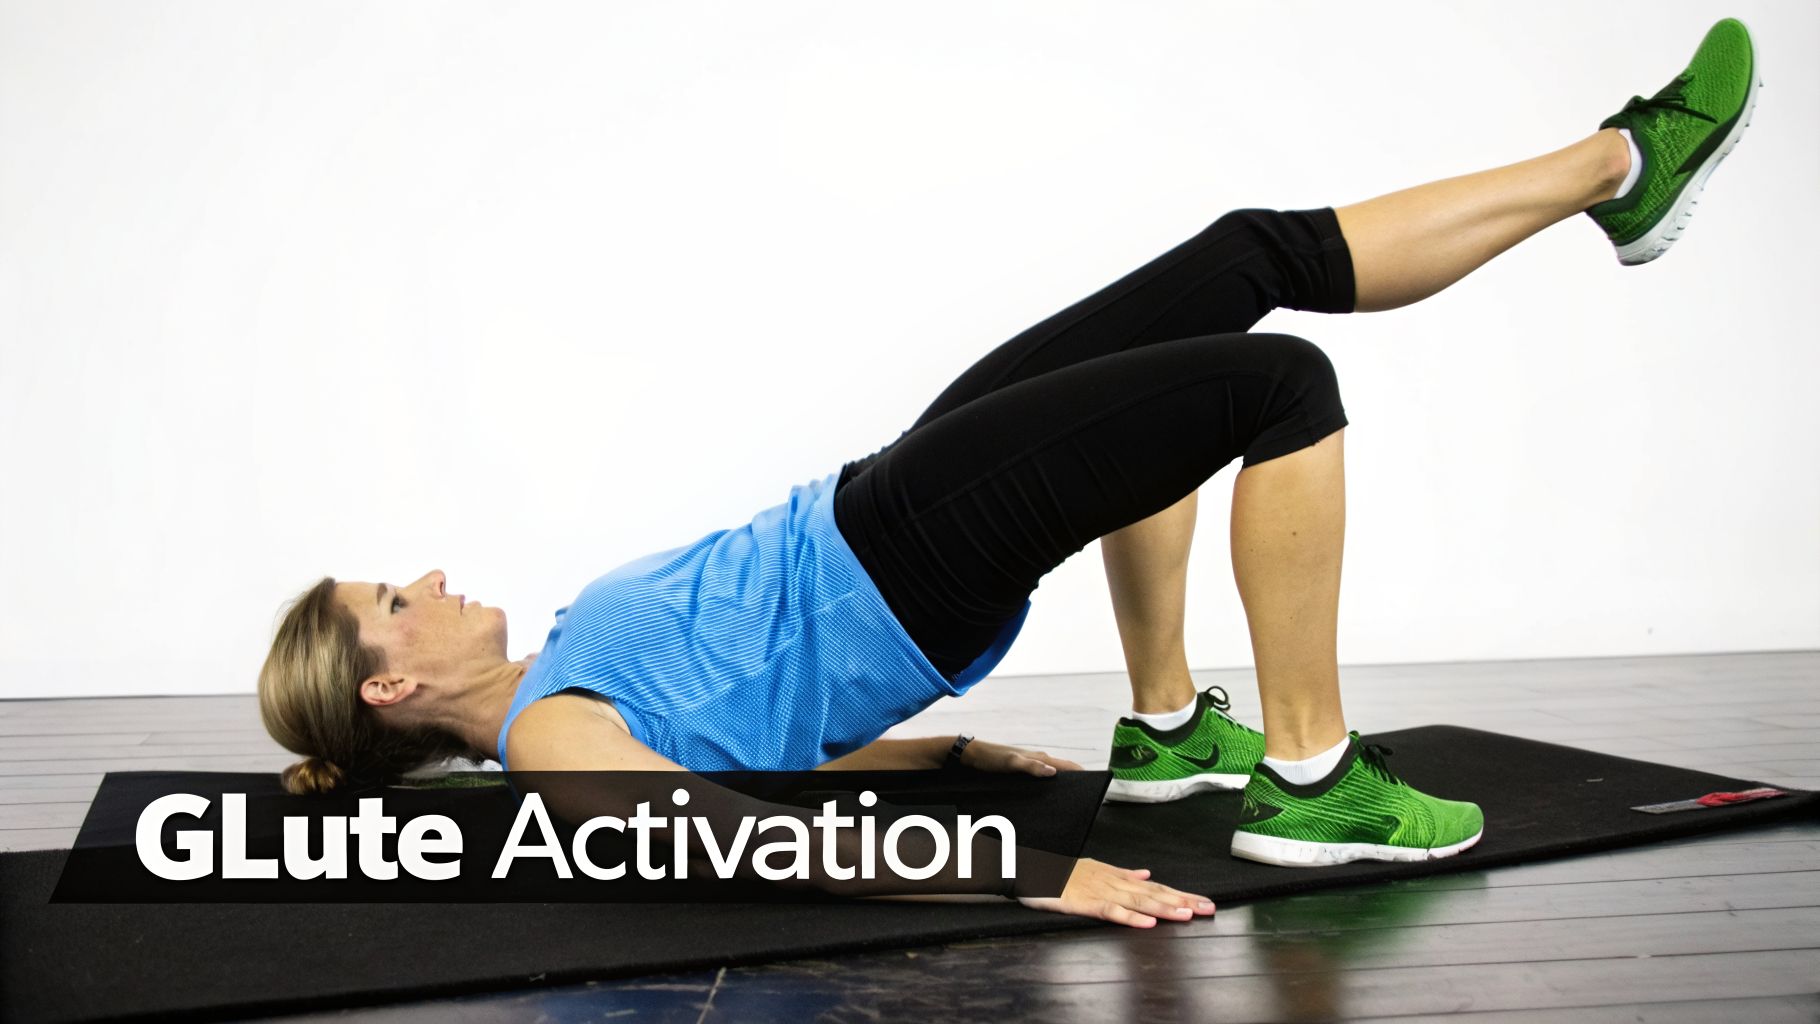
This exercise is particularly beneficial for sedentary office workers who often develop "gluteal amnesia" from prolonged sitting. By re-engaging and strengthening these powerful muscles, the Bridge helps restore proper movement patterns, taking significant pressure off the lumbar spine. Single-leg variations further challenge stability and help correct muscle imbalances between the left and right sides of the body.
How to Perform the Bridge Correctly
Proper form is essential to ensure you are activating your glutes and not overworking your lower back or hamstrings.
- Starting Position: Lie on your back with your knees bent and your feet flat on the floor, about hip-width apart. Your feet should be close enough that you can just graze your heels with your fingertips. Keep your arms at your sides with palms down.
- Engage Your Core: Gently brace your abdominal muscles and flatten your lower back against the floor to ensure a neutral spine before you begin the lift.
- The Movement: Squeeze your glutes and push through your heels to lift your hips off the floor. Raise them until your body forms a straight line from your shoulders to your knees.
- Hold and Return: Pause at the top for 1-2 seconds, focusing on a strong glute contraction. Slowly lower your hips back down to the starting position with control. This completes one repetition.
- Single-Leg Progression: Once you have mastered the standard bridge, you can progress by extending one leg straight out, keeping your thighs parallel. Perform the lift using only the grounded leg.
Expert Tip: To maximize glute activation, focus on driving the movement by pushing your heels firmly into the ground. If you feel the exercise primarily in your hamstrings, try moving your feet slightly closer to your body.
Modifications and Common Mistakes
- For Beginners: If a full bridge is difficult, start with a smaller range of motion, only lifting your hips a few inches off the floor. Focus on the mind-muscle connection of squeezing your glutes.
- For an Added Challenge: Once the single-leg bridge becomes easy, you can place a resistance band around your thighs (just above your knees) to add lateral resistance or place a weight across your hips.
- Common Mistake: Hyperextending the lower back. Avoid arching your back at the top of the movement; the goal is a straight line, not the highest possible lift. This prevents undue stress on the lumbar vertebrae.
- Common Mistake: Lifting with the lower back instead of the glutes. The initiation of the movement should come from a powerful glute squeeze, not from arching your back off the floor.
Because the Bridge is a staple in rehabilitation for conditions like sacroiliac (SI) joint dysfunction and post-hip surgery recovery, getting the form right is critical. The physical therapists at MedAmerica Rehab Center are experts in analyzing movement and can provide a personalized plan to ensure you are performing the best exercises for your lower back pain correctly and progressing at a safe, effective pace for your specific condition.
6. Plank and Modified Plank Variations
The Plank is a cornerstone isometric exercise known for its ability to build exceptional core endurance, making it one of the best exercises for lower back pain prevention and management. This position challenges the entire core musculature, including the deep transversus abdominis, rectus abdominis, obliques, and back extensors, to work in unison. By developing this muscular endurance, you create a natural "corset" that stabilizes the spine and protects the intervertebral discs from excessive or harmful motion.
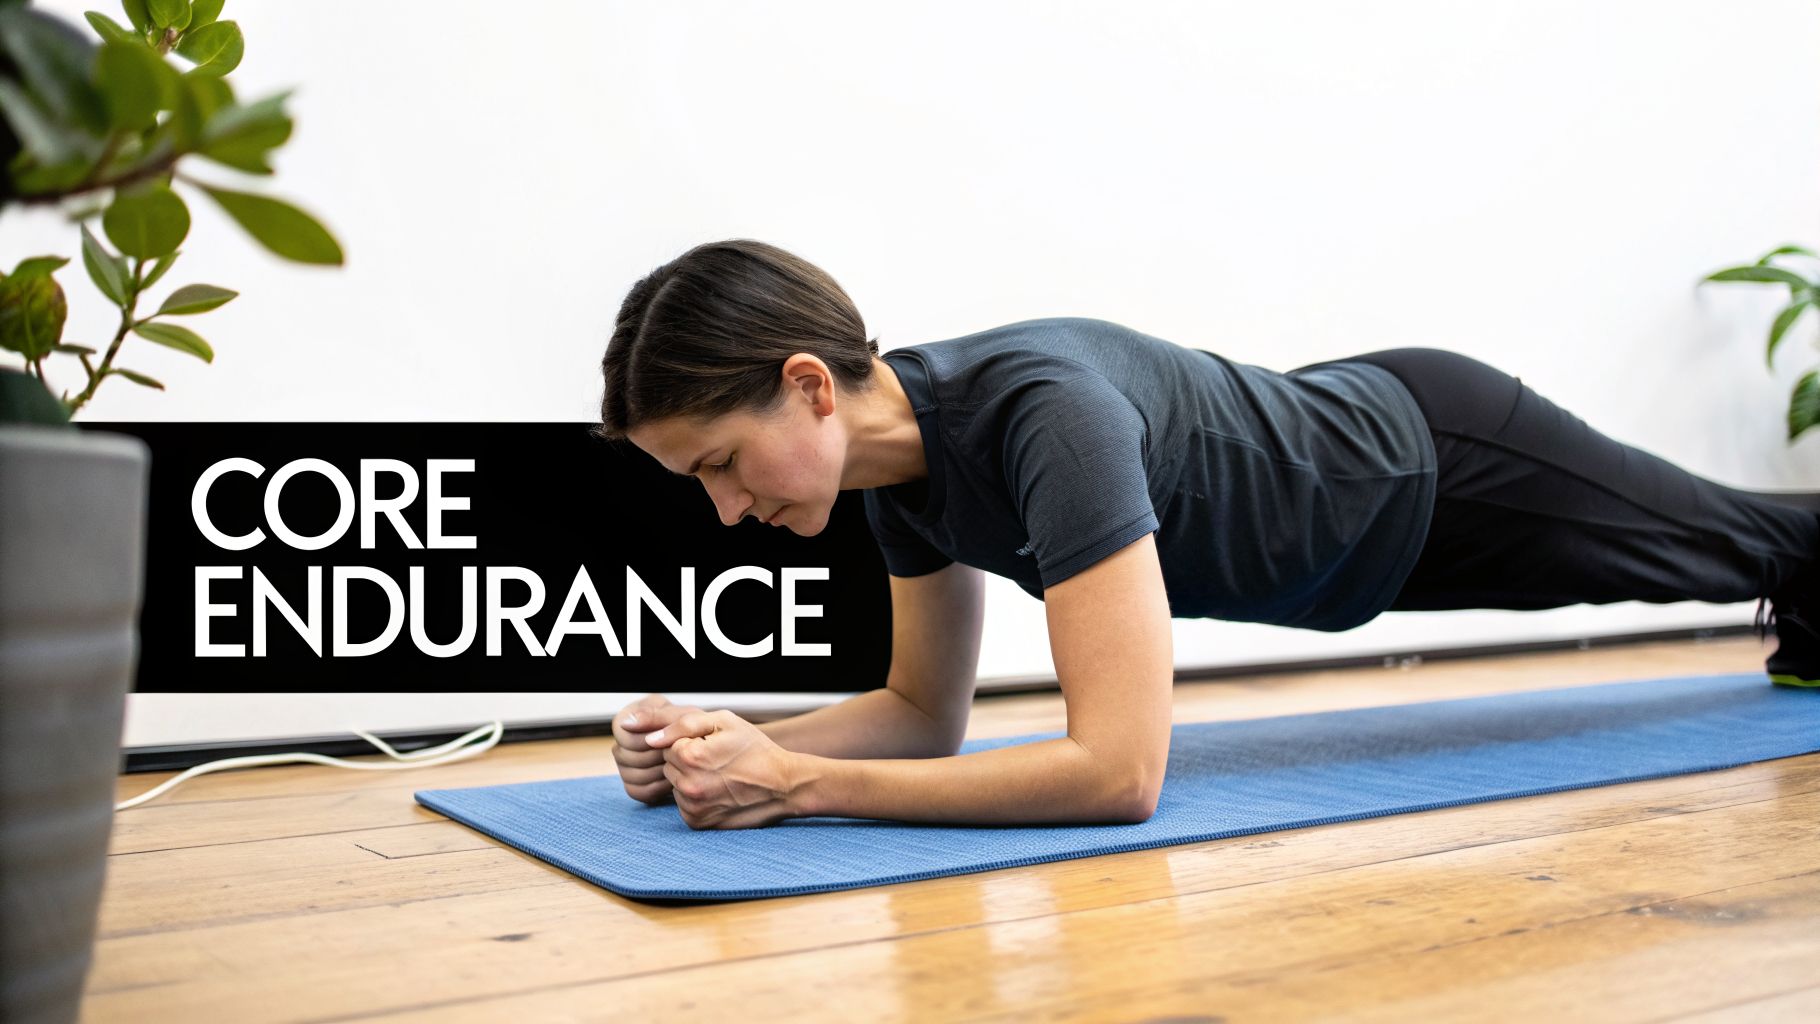
Unlike dynamic movements like crunches, the plank strengthens these crucial muscles without repeatedly flexing the lumbar spine. This static hold is ideal for athletes building stability for sports performance, workers in physically demanding jobs, and even individuals in later-stage post-surgical rehabilitation who need to rebuild strength safely. The progressive nature of plank variations allows anyone to start at an appropriate level and build up over time.
How to Perform the Plank Correctly
Maintaining proper alignment is critical to ensure the core is working and the lower back is not strained.
- Starting Position: Begin by lying face down. Place your forearms on the floor with your elbows directly under your shoulders and your hands clasped or palms flat.
- Engage Your Core: Actively draw your navel in toward your spine to engage the deep abdominal muscles. Squeeze your glutes to help stabilize your hips.
- The Movement: Lift your hips off the floor, forming a straight line from your head to your heels. Your body should be rigid, like a wooden plank.
- Hold and Breathe: Hold this position, focusing on maintaining the straight line. Do not hold your breath; continue to breathe steadily and deeply.
- Return and Repeat: Once you can no longer hold the form with perfect alignment, lower your hips back to the floor with control. Aim to perform 2-3 sets.
Expert Tip: Your hips are the key indicator of form. If they sag toward the floor, your lower back is arching under strain. If they rise toward the ceiling, you are shifting the work away from your core. Focus on keeping them perfectly in line with your shoulders and heels.
Modifications and Common Mistakes
- For Beginners: If a full plank is too difficult, perform a modified plank by keeping your knees on the floor. This reduces the load while still allowing you to build foundational core strength. Aim for holds of 45-60 seconds in this position.
- For an Added Challenge: Once you master the standard plank, progress by holding it for longer durations, adding a single leg lift for 2-3 seconds, or incorporating side planks to target the obliques.
- Common Mistake: Letting the hips sag. This is the most frequent error and places significant stress on the lumbar spine. Stop immediately if your form deteriorates; quality is always more important than duration.
- Common Mistake: Holding your breath. This increases intra-abdominal pressure and can raise blood pressure. Exhale as you lift into the plank and maintain consistent breathing throughout the hold.
Proper form is essential to protect your back and get the full benefit from core exercises. If you notice yourself compensating or are unsure about your technique, the physical therapists at MedAmerica Rehab Center can provide a form assessment. A personalized approach ensures you can strengthen your core with these exercises safely and effectively, preventing compensatory patterns that could lead to further pain.
7. Child's Pose Stretch with Spinal Flexion
Child's Pose, known as Balasana in yoga, is a restorative kneeling stretch that provides gentle decompression for the lower back. It is often recommended as one of the best exercises for lower back pain, especially for individuals whose discomfort worsens with extension-based movements like standing or arching the back. This pose gently stretches the muscles along the spine, including the erector spinae and multifidus, as well as the latissimus dorsi (lats) and glutes.
This gentle forward fold, or spinal flexion, creates space between the vertebrae, which can be particularly soothing for conditions like facet joint arthritis or spinal stenosis where narrowing is a concern. Beyond the physical stretch, Child's Pose is a calming position that encourages deep, diaphragmatic breathing, helping to reduce the stress-related muscle tension that often contributes to back pain. It's an excellent choice for a midday break for office workers or as part of an evening wind-down routine to promote relaxation and better sleep.
How to Perform the Child's Pose Stretch Correctly
Proper alignment and mindful breathing are essential to gain the full benefits of this restorative posture without causing strain.
- Starting Position: Begin on your hands and knees. You can keep your knees together or spread them slightly wider than your hips for a deeper stretch.
- Engage Your Core: Gently draw your abdominal muscles inward to support your spine as you move.
- The Movement: Exhale and slowly sit your hips back towards your heels. As you fold forward, walk your hands out in front of you, allowing your torso to rest between or on top of your thighs.
- Hold and Breathe: Let your forehead rest gently on the mat. Focus on taking deep, slow breaths, imagining your breath expanding into your back and rib cage. Hold the stretch for 30-60 seconds.
- Return: To come out of the pose, use your hands to slowly and carefully walk your torso back up to an upright, kneeling position. Repeat 2-3 times.
Expert Tip: Focus on releasing tension with every exhale. Let gravity do the work; you should not be actively pulling yourself into the stretch. The goal is relaxation and gentle elongation.
Modifications and Common Mistakes
- For Beginners: If your hips don't reach your heels, place a rolled-up towel or a pillow between your thighs and calves for support. A pillow or yoga block can also be placed under your forehead if it doesn't comfortably reach the floor.
- For an Added Challenge: To deepen the stretch in your lats and sides, walk your hands over to the right side of your mat, hold for a few breaths, and then walk them over to the left side.
- Common Mistake: Forcing your hips down to your heels. This can strain the knees or hips. Only go as far back as is comfortable.
- Common Mistake: Holding your breath. Tense, shallow breathing counteracts the relaxing purpose of the pose. Concentrate on deep, steady breaths to help your muscles release.
This stretch is generally very safe, but it's important to listen to your body. If forward-bending movements typically trigger your pain, you should proceed with caution. The physical therapists at MedAmerica Rehab can help determine if flexion-based exercises are right for you and can create a targeted program for back pain and sciatica relief that addresses the specific source of your discomfort. Stop immediately if you feel any sharp pain.
Lower Back Pain: 7-Exercise Comparison
| Exercise | Implementation complexity | Resource requirements | Expected outcomes | Ideal use cases | Key advantages |
|---|---|---|---|---|---|
| Bird Dog Exercise | Low — requires controlled movement and proper form | None (mat optional) | Improved deep core stability, proprioception, reduced back pain over weeks | Post-injury rehab, chronic low‑back pain, stability training | Low‑impact, progressive, safe for pain, no equipment |
| Cat‑Camel Stretch (Marjaryasana‑Bitilasana) | Very low — simple dynamic spinal movement | None (mat optional) | Immediate increase in spinal mobility and reduced stiffness | Morning stiffness, warm‑up, desk workers | Gentle, safe, easy to perform, promotes circulation |
| Dead Bug Exercise | Moderate — coordination and strict alignment needed | None (mat recommended) | Enhanced core strength and spinal stability, reduced compensatory patterns | Post‑injury recovery, functional rehab, core strengthening | Clear alignment feedback, progressive, evidence‑based |
| Quadruped Hip Flexor Stretch (Modified Lunge) | Low — alignment and knee protection important | Mat/pad; pillow recommended for knee comfort | Increased hip flexor length, improved pelvic alignment and posture | Sedentary patients, cyclists/runners, anterior pelvic tilt | Targets root cause of anterior tilt, quick posture benefits, complements other treatments |
| Bridges and Single‑Leg Bridges | Low–Moderate — basic to advanced progressions | None (mat); bands or weights optional for progressions | Stronger glutes and posterior chain, improved hip extension, reduced lumbar compensation | Glute weakness, athletes, post‑hip surgery rehab | Direct glute activation, scalable progressions, improves performance |
| Plank and Modified Plank Variations | Moderate — demands endurance and consistent technique | None (mat optional) | Greater core endurance and overall spinal stability, functional strength | Athletes, later‑stage rehab, high‑risk back patients needing endurance | Comprehensive core engagement, highly scalable, quick to perform |
| Child's Pose Stretch with Spinal Flexion | Very low — restorative, easy to modify | Mat/pillow optional | Immediate decompression, relaxation, reduced extension sensitivity | Extension‑sensitive patients, stress relief, desk breaks | Safe restorative relief, promotes relaxation and circulation |
Your Next Step: From Information to Action and Lasting Relief
You now possess a practical guide to some of the most effective and safest exercises for managing and preventing lower back pain. We've explored foundational movements like the Bird Dog and Dead Bug for core stability, essential stretches like the Cat-Camel and Child's Pose for spinal mobility, and strengthening exercises like Bridges and Planks to build a resilient back. The power of this information, however, lies not in just knowing it, but in consistently applying it. True progress is built one repetition at a time, with a steadfast focus on proper form and an awareness of your body's unique signals.
The journey from chronic discomfort to functional strength is a marathon, not a sprint. The goal is not to perform every exercise on this list every single day. Instead, think of these movements as your personal toolkit. Your primary objective should be to create a balanced, sustainable routine that you can stick with over the long term. This consistency is the cornerstone of building the deep core strength and spinal mobility needed to support a healthy, pain-free back.
Creating Your Foundational Routine
To translate this knowledge into action, start small and build momentum. A great starting point is to select a few exercises and integrate them into your weekly schedule, aiming for 3-4 sessions per week on non-consecutive days to allow for recovery.
Here’s a sample structure to consider:
- Core Stabilization (Choose 2): Begin with exercises that teach you to brace your core while moving your limbs. The Dead Bug and Bird Dog are perfect examples. Focus on slow, controlled movements.
- Spinal Mobility (Choose 1-2): Incorporate movements that gently take your spine through its range of motion. The Cat-Camel stretch is excellent for this, helping to lubricate the spinal joints and relieve stiffness.
- Posterior Chain Strength (Choose 1): Add an exercise to strengthen the muscles on the back side of your body. Glute Bridges are a fantastic, low-impact choice for activating your glutes and hamstrings, which are crucial for supporting the lower back.
As you get stronger and more comfortable, you can introduce variations like the Plank or Single-Leg Bridges. Remember, the key is listening to your body. If an exercise causes sharp, radiating, or increased pain, stop immediately. The adage "no pain, no gain" absolutely does not apply when dealing with lower back injuries.
The Bigger Picture: A 24/7 Approach to Back Health
While these targeted exercises are fundamental, lasting relief often requires a more complete view of your daily habits. Your efforts in the gym or on your yoga mat can be significantly supported or undermined by what happens during the other 23 hours of the day. This is especially true for the one-third of your life you spend sleeping.
An unsupportive mattress can force your spine into an unnatural alignment, causing muscles to tighten and preventing them from fully recovering overnight. To complement your exercise routine and promote lasting relief, ensure your sleeping environment supports your recovery by understanding what really works when it comes to finding the best mattress for back pain and moving beyond common marketing myths.
When to Seek Professional Guidance
Self-management through exercise is a powerful tool, but it has its limits. Back pain is a complex issue, and what works for one person may not work for another. If you've been consistent with your routine and your pain isn't improving, or if it's getting worse, it's time to seek a professional diagnosis.
Do not ignore these red flags:
- Pain that is severe, constant, or progressively worsening.
- Pain accompanied by numbness, tingling, or weakness in your legs or feet.
- Back pain resulting from a specific trauma, like a car accident or a fall.
- Pain that disrupts your sleep or daily activities.
These symptoms suggest that a more significant underlying issue may be present, one that requires a specific diagnosis and a professionally guided treatment plan. Persisting with a generic exercise program in these cases could delay your recovery or even worsen your condition. The best exercises for lower back pain become even more effective when they are prescribed for the right person at the right time. Taking the next step toward professional care is a sign of strength, not failure. It’s an investment in a faster, safer, and more permanent recovery.
Don't let persistent back pain dictate your life in Deerfield Beach. At MedAmerica Rehab Center, our expert team of physical therapists and chiropractors specializes in diagnosing the root cause of your discomfort to create a personalized recovery plan. Move from general advice to targeted care by scheduling your consultation with us today.