
8 Balance Exercises for Seniors with Pictures (2026 Guide)
Feeling a little unsteady when you get out of bed, turn in the kitchen, or step away from a chair can shake your confidence fast. That doesn't mean you're “just getting older.” Balance is a skill, and with the right practice, many seniors can improve stability, reaction time, and trust in their own bodies. This guide to balance exercises for seniors with pictures gives you a practical starting point, with clear progressions, safety cues, and the same kind of form coaching our therapists use every day at MedAmerica Rehab Center.
The best results come from simple movements done consistently, with a sturdy counter, chair, or wall nearby. National survey data show balance work is still underused, even though it's a practical, low-cost way to support mobility and fall prevention in older adults, with only 40.7% of older adults reporting balance activities at least 1 day per week, and just 25.3% doing them at least 3 days per week in one large U.S. survey published in 2021 (PubMed). If you want a broader home-ready environment while you practice, you can also browse age in place designs.
1. Single-Leg Stand
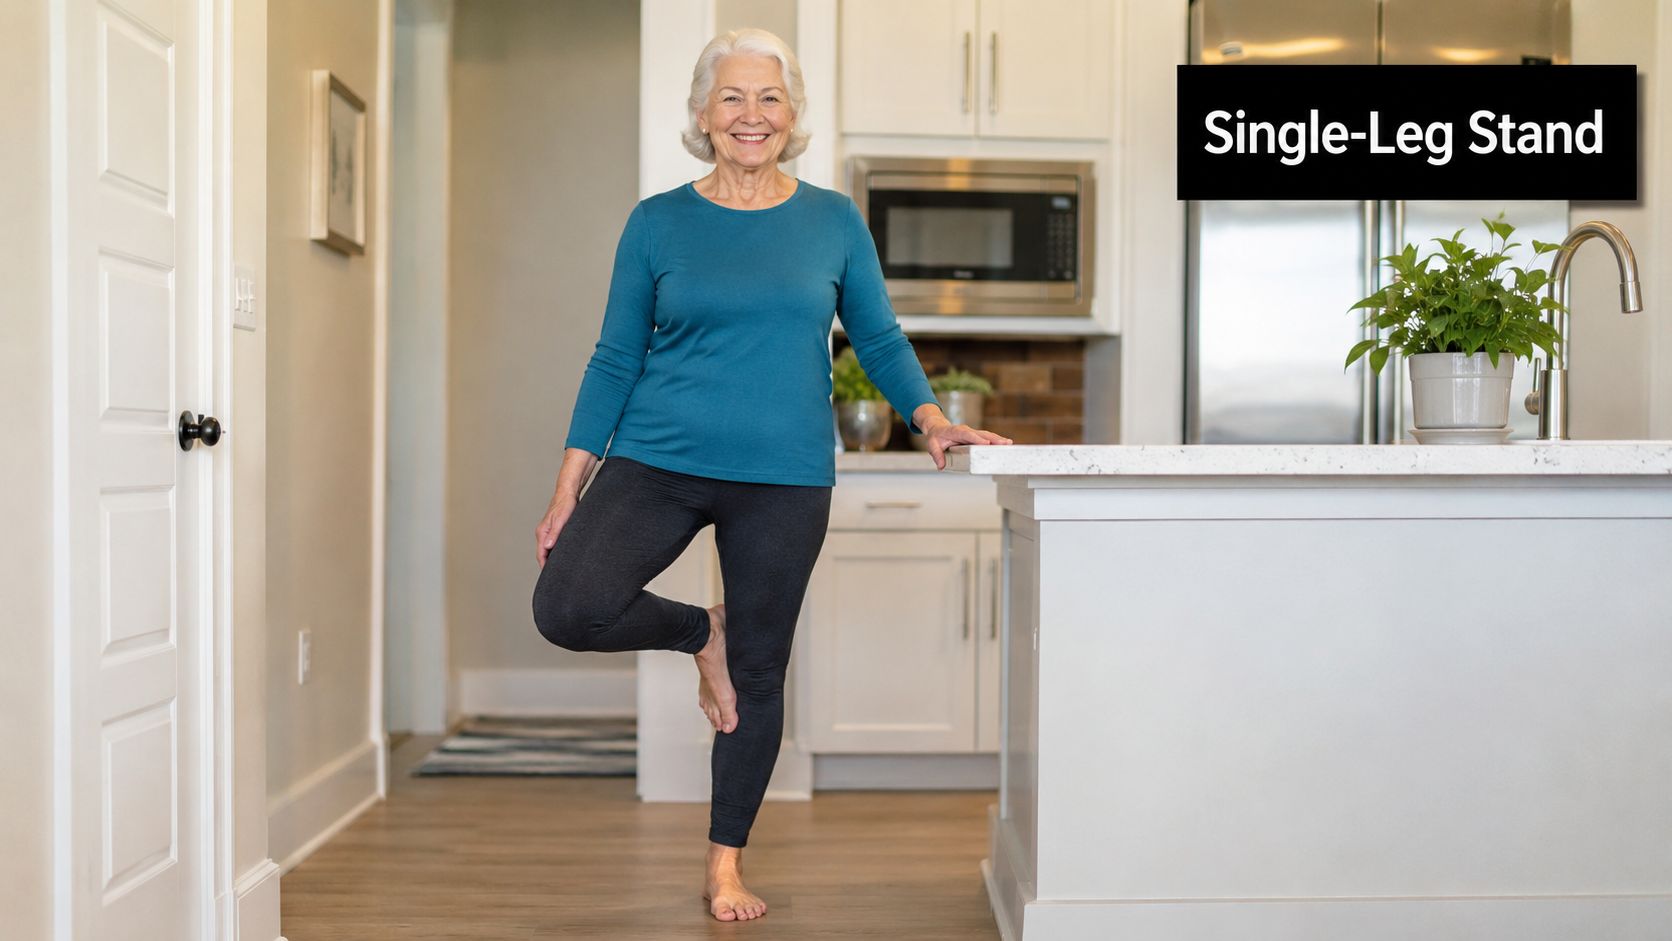
The single-leg stand looks basic, but it tells you a lot about how your ankles, hips, and core cooperate when your base of support gets smaller. At MedAmerica Rehab Center, we often start patients here because it shows whether they can hold themselves upright without hiking a hip, gripping their toes, or leaning heavily into the counter. It's also easy to make safer or harder without changing the exercise entirely. Our own balance programs often use a counter in the kitchen, a sturdy chair back, or a wall within arm's reach so the body can learn the skill without the fear of falling.
How to do it
Stand tall near a sturdy surface, then shift your weight onto one leg and lift the other foot just off the floor. Keep your chest lifted and your eyes forward. If you're using support, let your fingertips rest lightly rather than hanging your weight on your arms.
Practical rule: if your standing hip is drifting out to the side, the hold is too hard right now.
A good progression is simple. Start with both hands on a counter, then reduce to one hand, then fingertip contact, then no touch at all for a few seconds at a time.
Common mistakes and form fixes
- Leaning toward the support: stand closer to the counter and keep your ribs stacked over your pelvis.
- Locking the standing knee: keep a soft bend so the leg can react instead of freezing.
- Holding your breath: exhale slowly as you lift the foot and stay relaxed through the shoulders.
- Letting the lifted foot drift behind you: keep it near the standing leg so you're training balance, not hip extension.
If you want a deeper home routine, the MedAmerica guide on how to improve balance in elderly pairs well with this drill. For many people, the win is not a dramatic pose, it's standing in line, turning at the sink, or stepping away from a chair with less hesitation.
2. Tandem Stance
Tandem stance is the heel-to-toe version of standing still, and it asks your balance system to work harder than a normal shoulder-width stance. That narrow line of support is why it's so useful for seniors who feel fine in open spaces but get wobbly in tight hallways, crowded stores, or busy bathrooms. The exercise also gives you clean visual feedback, which is why it fits so well into balance exercises for seniors with pictures. You can see exactly where the feet are placed and whether the body is swaying.
Set one foot directly in front of the other so the heel of the front foot nearly touches the back toes. Start with your hands hovering above a counter or lightly touching a rail. Hold long enough to feel the ankles and trunk engage, then switch foot positions so both sides get trained.
How to make it effective
The best tandem stance is quiet, not tense. Your shoulders should stay level, your hips should stay square, and your head should not jut forward as you try to “concentrate harder.” If you're swaying a little, that's fine. If you're grabbing the counter, the stance is too challenging for today.
Keep the feet in line, not splayed out. Toe-out turns the exercise into a wider, easier stance.
Ways to progress safely
- Reduce hand support: move from both hands, to one hand, to fingertips only.
- Change the lead foot: practice with each foot in front so both legs learn the control.
- Add a stillness challenge: once the position feels steady, try a short eyes-closed hold only if you're already near support and feeling secure.
- Build duration gradually: don't rush. Clean posture matters more than chasing a long hold.
People often treat tandem stance like a quick test, but it's also a training tool. It asks the feet, ankles, and trunk to work together, and that coordination carries over to daily turning, sidestepping around furniture, and navigating narrow walkways. If you're using it for fall prevention, consistency matters more than intensity. A few well-controlled holds done regularly will beat a shaky marathon attempt every time.
3. Marching in Place with High Knees
Marching in place turns balance into motion, which is why it's one of the most useful drills for walking confidence. Each time one knee lifts, the other leg has to support your body long enough for the next step to happen. That's the same basic problem you face when stepping over a threshold, moving through a doorway, or walking across a parking lot with distractions around you.
Start near a counter or walker if needed, then lift one knee at a time in a slow, controlled rhythm. The goal is not speed. The goal is smooth weight shift, upright posture, and enough knee lift that the foot clears the floor cleanly. Keep your trunk from leaning backward, because that usually means the hips are doing less work than they should.
What good marching looks like
Your steps should look deliberate and symmetrical. The knee comes up, pauses briefly, then lowers under control before the other side lifts. If you hear your feet slap down, slow the movement and shorten the lift until the descent is quiet.
For a real-world example, think of stepping into a shower stall or over a low curb. Marching trains the coordination needed for those transitions without requiring a full walk right away. It's especially helpful after periods of inactivity, when the legs have gotten strong enough for standing but still need better timing.
Common errors and safer options
- Rushing the motion: slow it down until every step feels predictable.
- Leaning away from the lifted leg: keep the torso vertical.
- Pulling the knee too high too soon: lift only as far as you can keep control.
- Using the arms to yank the body upward: arms can assist with support, but they shouldn't do the work.
H3 A simple progression pattern
Begin with two hands on a counter. Then switch to one hand, then fingertips, then no hand support for a few steps at a time. If you're unsure, stay near a wall and practice for short bouts with rests in between.
At MedAmerica Rehab Center, we like marching because it's honest. If a patient can march steadily, that usually tells us their weight shift, hip control, and confidence are moving in the right direction. If not, we learn exactly what needs attention before a fall happens.
4. Sit-to-Stand Exercise
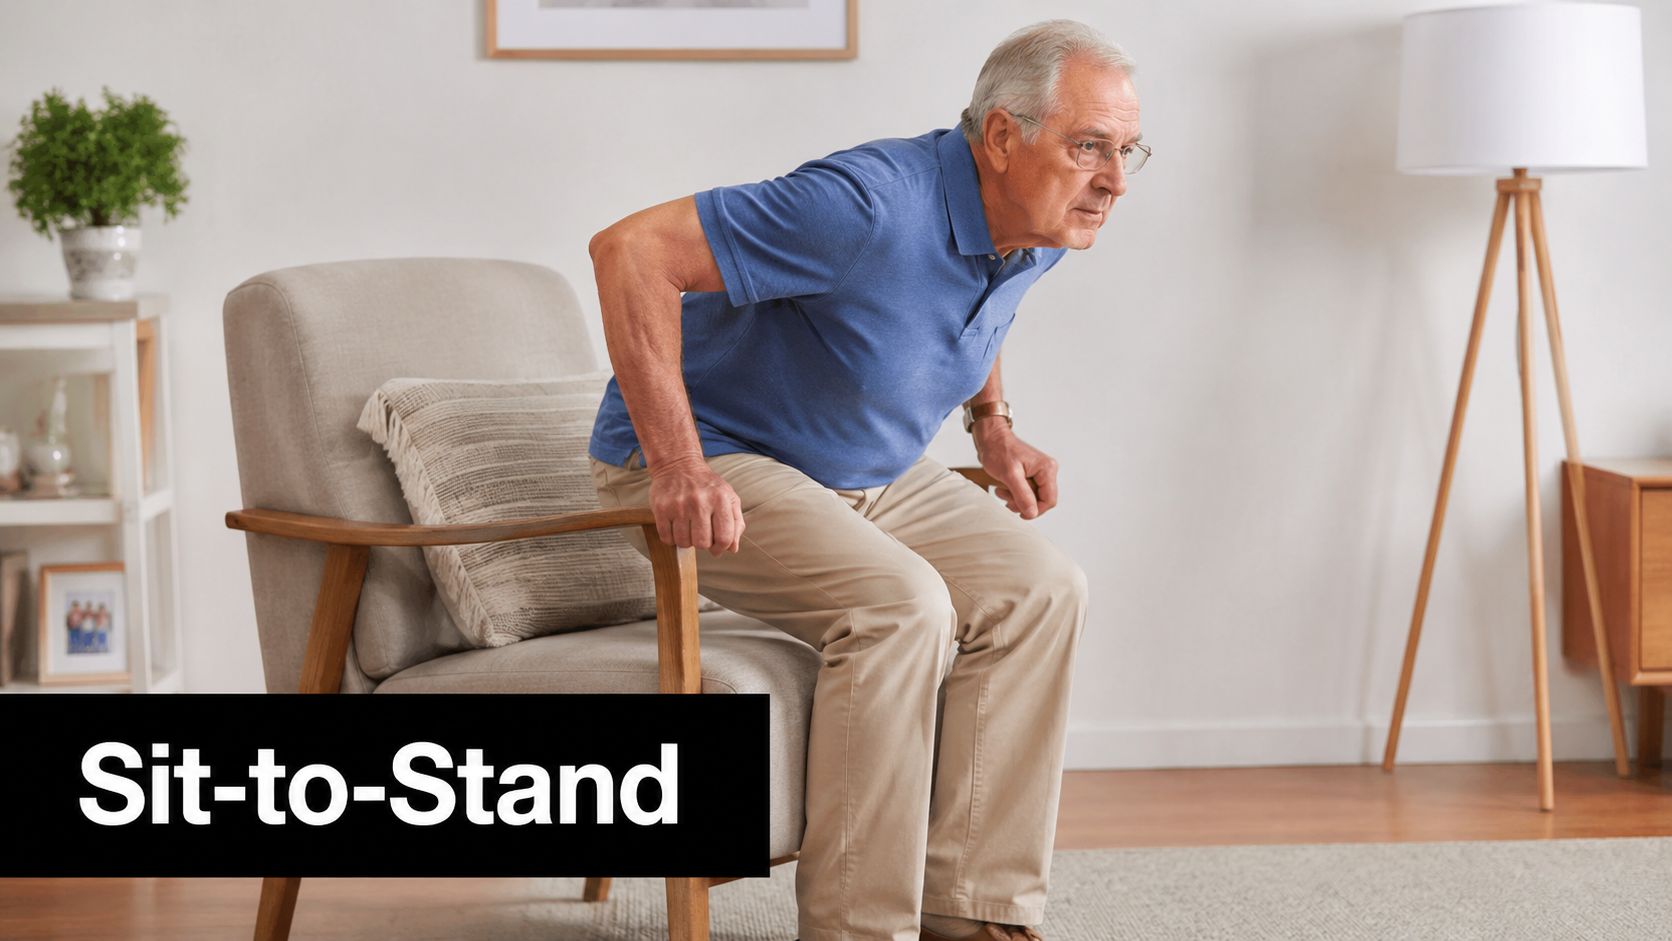
Sit-to-stand is one of the most practical balance drills you can do, because it rehearses one of the most common movement problems older adults run into. Getting out of a chair sounds simple until the legs are weaker, the knees ache, or the body forgets how to shift forward and rise without pushing awkwardly through the arms. That's why this movement belongs in any serious list of balance exercises for seniors with pictures. The picture shows the setup, and the mechanics tell the story.
Use a firm chair against a wall so it won't slide. Sit with your feet flat, hip-width apart, then lean your trunk slightly forward before standing. If needed, press through the armrests at first, but work toward less hand use as the legs take over. Lower yourself back down slowly, because the descent is part of the training.
Why form matters here
A fast flop into the chair teaches your body very little. A controlled lower teaches the thighs and hips to manage your weight the way they have to when you sit at the edge of a bed, lower into a car seat, or settle into a low sofa.
Professional tip: if the chair is too low, raise the seat height before you blame your legs.
How to progress without making it unsafe
- Start with armrests: they help you learn the forward lean and standing pattern.
- Move to hands-free reps: only when you can stand without shifting sideways.
- Control the lowering phase: count slowly on the way down so you don't drop.
- Keep feet planted: if your heels lift, move your feet a bit farther back and try again.
If you want a strengthening companion piece, our MedAmerica resource on how to strengthen legs for seniors pairs well with this movement. Sit-to-stand is not glamorous, but it's one of the best tests of whether a person can safely manage daily life with less reliance on the arms and furniture.
5. Walking Heel to Toe
Heel-to-toe walking changes a balance drill from standing still to moving with control. Place one foot directly in front of the other and walk along an imaginary straight line on the floor. That narrow base asks for attention, coordination, and careful foot placement, which is exactly why it helps seniors who want to feel more steady in hallways, store aisles, and other tight spaces.
Stand beside a wall, rail, or countertop so you have support within reach. Keep your eyes on a point ahead, not locked on your feet. Move slowly and keep the steps clean. If the feet drift apart, stop, reset, and begin again. The goal is not a perfect performance. The goal is repeatable steps without rushing or wobbling.
A safe way to build the skill
Start with tandem stance if heel-to-toe walking feels unstable. Once the narrow position feels manageable, take one small step at a time along a taped line on the floor. For the first few tries, a spotter is a good idea, especially if the person has had recent falls, dizziness, or an uneven gait.
At MedAmerica Rehab Center, we often connect this drill to real walking demands. In a gait training approach used in physical therapy, the body learns to place each step with more control and less hesitation. Heel-to-toe walking fits that same idea because it asks for precision, posture control, and steady weight shift while the person stays upright.
H3 What to watch for
- Short, careful steps: big steps make the exercise sloppy.
- Level hips: twisting or swaying usually means the base is too narrow too soon.
- Quiet feet: slapping the ground often signals loss of control.
- Consistent line of travel: if you veer, slow down and shorten the distance.
A few small adjustments make a real difference. If the person feels unsteady, keep one hand close to the wall or counter and reduce the length of the walk. If the pattern stays clean, make the line a little longer or reduce hand support. A mirror can help with alignment, but only if it does not distract from safe footing. The exercise should look controlled, not forced.
6. Standing Hip Abduction
Standing hip abduction strengthens the muscles on the side of the hip, which do a lot more work than people realize. These muscles help keep the pelvis level when you stand on one leg, walk, or shift weight to reach for something on a shelf. When they're weak, the body often compensates by leaning, swaying, or swinging the leg instead of controlling it.
Stand near a counter with one hand available for light support. Shift weight onto one leg, then lift the other leg out to the side without turning the toes outward or hiking the hip. The motion should look small and deliberate, not dramatic. If the body leans to the side to “help” the leg lift, the lift is too high.
H3 How to keep the hips honest
A mirror can help, because you'll see quickly if the trunk is tilting. Keep the standing knee soft, the ribs stacked over the pelvis, and the movement smooth. The lifting leg should stay under control on the way out and on the return path.
Practical rule: a smaller range with clean alignment beats a bigger swing with a crooked trunk.
Better, easier, harder
- Easier: perform the motion with both hands lightly on the counter and a smaller lift.
- Safer for very unsteady days: do the side lift while lying down until standing balance improves.
- Harder: use only fingertip support, then eventually no support if you stay stable.
- Avoid momentum: if the leg swings, slow it down and shorten the distance.
This exercise matters in real life because side stability affects how you step around a table leg, shift at the sink, or steady yourself while turning. It also pairs well with walking practice, since side hip control helps keep the pelvis from dropping when the body moves from one leg to the other. That's the kind of detail that makes a home program more than just a random list of leg lifts.
7. Clock Reaches
Clock reaches add direction to balance training. Instead of just standing still, you reach forward, sideways, and diagonally as if you're touching numbers on a clock face around your body. That challenge matters because many falls happen during reaching, not just during walking. A person leans toward a cabinet, overextends toward a table, or twists for a phone, and the body has to recover fast.
Stand with both feet on the floor to begin. Imagine a clock around you, with 12 o'clock straight ahead, 3 o'clock to the right, 6 o'clock behind you, and 9 o'clock to the left. Reach one arm toward each point without stepping, then return to center before the next reach.
H3 Why this works so well
Clock reaches train weight shift in multiple directions, not just straight ahead. They also ask the eyes, trunk, and hips to coordinate, which is useful for daily tasks like opening a cabinet, retrieving laundry, or reaching over the sink without losing your base. If you want to make it more challenging later, shift a little more weight to one leg while reaching, but only if you can keep the movement smooth.
A few good coaching cues
- Reach, don't lunge: stepping turns the drill into a different exercise.
- Keep the torso tall: bending at the waist usually means you're borrowing motion from the spine.
- Return to center after each reach: resetting improves control.
- Go only as far as you can stay steady: distance should grow with confidence, not force.
A common mistake is trying to make every reach big. That often leads to grabbing, twisting, or wobbling. Small, accurate reaches teach the nervous system more than sloppy ones. For seniors who feel fine walking straight but struggle when turning or reaching, this drill gives a very clear bridge to those daily movements.
8. Stepping Over Obstacles
Stepping over obstacles is one of the most functional balance drills on this list because it trains the body to avoid trips. Furniture legs, low thresholds, throw rugs, and scattered items on the floor all create the same basic problem, the foot has to clear something without breaking rhythm or confidence. Balance training becomes practical, not abstract.
Set up a very low obstacle first, like a taped line or a soft foam noodle. Walk slowly toward it, lift the knee enough to clear it, and place the foot down with control before bringing the other leg through. Keep the path uncluttered and the lighting good. A counter, wall, or rail should be available nearby in case the step feels uncertain.
H3 Make the challenge match the person
For someone who's very cautious, a floor line is enough. For someone with better control, a small cone or foam object works well. The height should increase only when the current version feels consistent and safe. If the person is clipping the obstacle, shorten the step or raise the knee a little more, but don't rush to a higher target before the pattern is solid.
A useful coaching cue: accuracy first, pace second.
Watch these details closely
- Lift the foot, don't drag it: dragging is a tripping risk.
- Stay tall through the trunk: leaning forward can throw off balance.
- Use the eyes to plan the step: look ahead, not only at the obstacle.
- Practice both lead legs: each side needs its own training.
A market report on the half balance ball trainer market valued the category at $0.4 billion in 2025 and projected it to reach $0.7 billion by 2034 at a 5.8% CAGR, with North America at 35.2% of revenue and the resistance bands segment at 58.3% share (Marketintelo). That's a commercial estimate, not a clinical benchmark, but it does reflect a broader preference for hybrid stability-plus-resistance tools in rehab and senior fitness. In therapy, the same logic applies, because a small obstacle paired with careful stepping often teaches more than a flashy machine.
Comparison Table: 8 Senior Balance Exercises with Images
| Exercise | Implementation complexity | Resource requirements | Expected outcomes | Ideal use cases | Key advantages | Safety & progression |
|---|---|---|---|---|---|---|
| Single-Leg Stand (Flamingo Stance) | Low, beginner to intermediate | None; optional chair/counter for support | Improved single-leg stability, ankle proprioception, standing confidence | Early balance training, fall-prevention screening, daily routine | Simple, portable, easily progressed | Start with fingertip support or wall; spot initially; progress to longer holds or eyes closed |
| Tandem Stance (Heel-to-Toe Standing) | Moderate | Clear floor space; optional support surface | Improved vestibular challenge, core engagement, gait confidence | Intermediate progression, balance assessment | Measurable hold times; prepares for advanced tasks | Begin with hand support; progress to fingertip then eyes closed; risk if balance poor |
| Marching in Place with High Knees | Moderate | Small clear area; chair or countertop for support if needed | Better gait mechanics, hip flexor strength, light cardiovascular benefit | Dynamic balance, gait training, endurance work | Combines cardio, strength and balance; engaging | Start slow with support; avoid if severe joint pain or vestibular instability |
| Sit-to-Stand (Chair Squats) | Low to moderate (functional) | Stable chair (appropriate height); armrests optional | Increased leg strength, improved transfers, reduced sit-to-stand falls | Functional independence training, post-rehab progression, ADL improvement | Highly functional, measurable (30s test), motivating | Use chair against wall; begin using hands and progress to hands-free when safe |
| Walking Heel-to-Toe (Tandem Walking) | High, advanced | Straight clear path, visual line or rail for support | Advanced gait control, motor-planning improvement, reveals subtle deficits | Advanced balance training, neurological rehab, complex navigation tasks | Challenges complex balance systems; sensitive assessment tool | Practice tandem stance first; use spotter/rail; not for beginners |
| Standing Hip Abduction (Side Leg Lifts) | Low to moderate | Minimal; optional ankle weights or chair for balance | Stronger hip abductors, improved frontal-plane stability, reduced pelvic drop | Post-hip/knee rehab, gait stability training, injury prevention | Targets often-neglected muscles; quick and scalable | Begin lying if balance poor; add small weights progressively |
| Clock Reaches (Directional Weight Shifting) | Moderate | Small space; optional floor markers | Improved multidirectional balance, proprioception, reach confidence | Reaching tasks, vestibular rehab, cognitive-motor training | 360° functional challenge; engaging and measurable | Start bipedal with short reaches; progress to single-leg and farther reaches with spotter |
| Stepping Over Obstacles (Obstacle Avoidance) | High, dynamic, complex | Space, low obstacles (cones/foam), supervision/spotter | Improved trip-prevention, foot clearance, reactive balance | Real-world navigation training, post-stroke or Parkinson's rehab | Directly trains obstacle negotiation; functional and measurable | Begin with very low obstacles and close supervision; increase height/spacing gradually |
When to Seek Professional Guidance for Your Balance
Practicing these exercises at home is a smart step toward better stability and fall prevention, but home training has limits. If you feel dizzy, have pain that changes your gait, notice numbness, or keep losing balance even with light support, don't guess at the cause. A physical therapist can look at how you stand, walk, turn, and rise from a chair, then decide whether the issue is strength, mobility, vestibular control, or something else that needs medical attention.
Balance work is most effective when it fits the person doing it, not a generic routine copied from the internet. Research reviews show that balance-challenging programs can reduce falls, but they also point to the importance of the right dose and the right progression, not random effort (BMJ Open). Clinical guidance summarized in the literature recommends balance work on 3 or more days per week, along with resistance and aerobic exercise, which gives home practice a clearer target than vague advice to “move more” (PMC review).
At MedAmerica Rehab Center, we look for the reason a person feels unsteady, then build a plan that fits their home, their goals, and their safety level. Some seniors need supported standing and chair work first. Others are ready for more advanced gait drills, reactive stepping, or a structured fall-prevention plan.
If your balance has changed recently, if you've had a fall, or if you're not sure which of these exercises is appropriate, contact a licensed clinician before pushing harder on your own. A careful evaluation can save time, reduce fear, and keep a small wobble from becoming a serious injury. You can also browse aging in place flooring to ensure your home environment is as safe as possible. For seniors in Deerfield Beach and nearby communities, MedAmerica Rehab Center is ready to help you move with more confidence and less hesitation. Visit MedAmerica Rehab Center to get started with a personalized balance assessment and a plan that's built around safe, steady progress.
MedAmerica Rehab · Deerfield Beach
Talk to a clinician about your pain
Physical therapy, chiropractic, acupuncture and shockwave therapy under one roof, since 1995. Same-day appointments are available.
Mon–Thu 8:00 AM – 6:30 PM · Fri 8:00 AM – 3:00 PM