IT Band Syndrome Exercises: A 6-Week Rehab Plan
If you're dealing with a sharp, nagging pain on the outside of your knee, you've probably already tried the obvious fixes. You rested for a few days. You stretched the side of your leg. Maybe you rolled directly on the sore spot and hoped it would finally “release.” Then the pain came back on your next run, long walk, stair climb, or leg day.
That pattern is frustrating, but it's also common. The good news is that individuals often experience improvement when they stop chasing the painful area and start improving the way the hip, pelvis, and leg handle load. That's where the right IT band syndrome exercises make a real difference.
Understanding IT Band Syndrome and Why It Hurts
That outer-knee pain usually shows up in a familiar way. It may start after a certain distance into a run, during downhill walking, or when you go up and down stairs. Sometimes it eases quickly after activity. Sometimes it lingers and makes squatting or getting up from a chair feel surprisingly annoying.

The iliotibial band, or IT band, is a thick band of connective tissue that runs along the outside of the thigh. A major evidence-based review reported that IT band syndrome prevalence in runners ranges from 1.6% to 12% across studies, which helps explain why there isn't one universal rehab script for everyone with this problem (evidence-based ITBS review).
The tight IT band idea is often oversimplified
A lot of people are told their IT band is “tight” and needs aggressive stretching. That explanation sounds neat, but it often leads people in the wrong direction. In practice, the painful area is usually better managed by reducing irritation and improving how the leg moves under load.
What matters more is often the stuff pulling on that system. If the hip muscles aren't controlling the pelvis well, or the knee keeps drifting inward during single-leg tasks, the outside of the knee can become the place that complains.
Practical rule: If an exercise or stretch only makes the outside of your knee angrier, it's probably not addressing the real driver.
What usually helps more
The long-term fix usually includes a mix of:
- Hip strength so the leg stays better aligned
- Trunk control so your pelvis doesn't wobble during walking and running
- Mobility work for surrounding muscles, not aggressive yanking on the band itself
- Load management so the tissue has time to calm down while you rebuild capacity
If you also feel stiff through the front of the hips or the glutes, improving nearby movement can help support the rehab process. MedAmerica has a practical guide on how to improve hip mobility that fits well alongside strengthening work.
Phase 1 Foundational Mobility and Activation
The first mistake many people make is going after the IT band directly. They dig a foam roller into the outside of the thigh, hold painful stretches, and keep repeating the same routine because it feels like they're “doing something.” Usually, that just irritates the area more.
Instead, start with the tissues that influence the IT band. Reputable guidance emphasizes hip and glute strengthening plus movement retraining, not trying to “lengthen” the IT band itself, because it's a thick fascial structure and rehab works better when it targets load drivers like hip weakness and poor pelvic control (Harvard Health on IT band syndrome treatment).
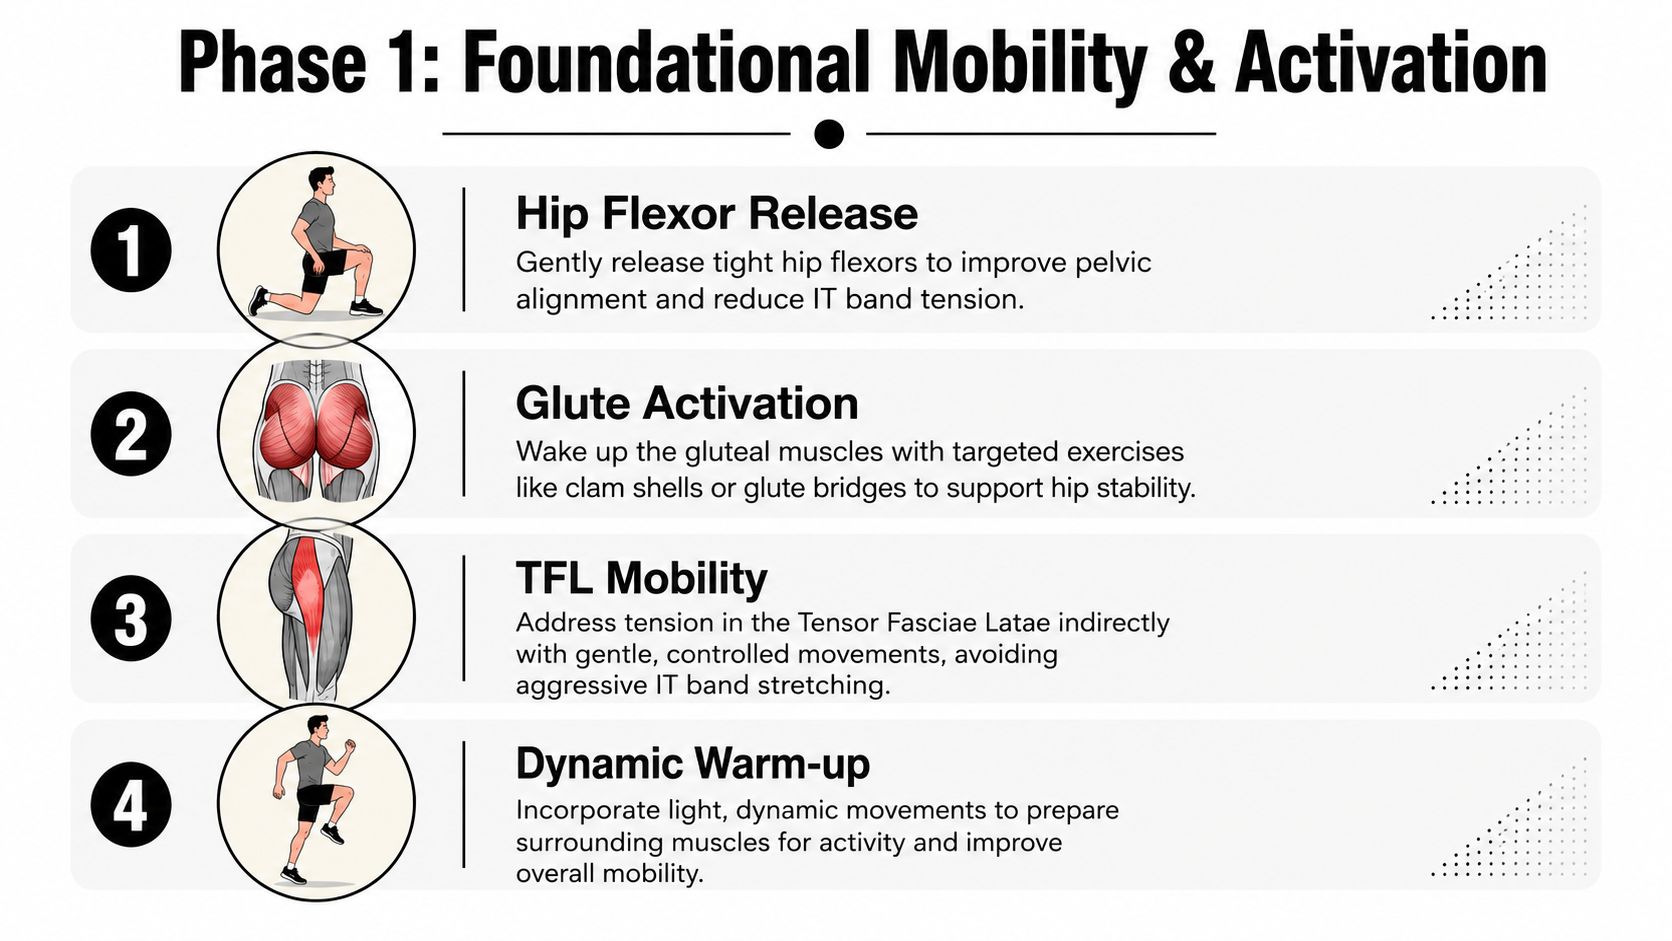
Mobility that helps without poking the sore spot
Use these drills gently. You should feel relief or mild work, not a flare-up.
- Foam roll the glutes and outer quad: Sit on the roller for the glute, then shift slightly toward the back and side of the hip. For the quad, roll the front and outer-front thigh. Avoid pinning the roller directly onto the tender outside of the knee.
- Figure-four stretch: Lie on your back, cross one ankle over the opposite knee, and pull the bottom leg in until you feel the stretch in the glute. Keep it easy and steady.
- Hip flexor stretch: A half-kneeling position works well. Tuck the pelvis slightly and shift forward until you feel the front of the hip open up. Don't arch your low back to force range.
If you want extra ideas for the hip side of the problem, this guide can help you strengthen your gluteus medius and minimus with focused exercise options that support pelvic control.
Early activation drills
Once the surrounding tissues are calmer, add activation work. These exercises aren't flashy, but they often change symptoms quickly because they wake up muscles that have gone quiet.
Clamshells
Lie on your side with knees bent and feet together. Keep your pelvis stacked. Open the top knee without rolling backward through the trunk. You should feel the side of the hip, not the low back.Glute bridge
Lie on your back with knees bent. Press through the heels and lift the hips without arching the spine. Pause at the top, then lower with control.Standing weight shift
Stand tall and shift onto one leg without letting the pelvis drop or the knee cave inward. This starts teaching the single-leg control you'll need later.
Don't worry if these feel small. Small, controlled hip work often beats aggressive stretching in the early stage.
What Phase 1 should feel like
This phase should calm things down and improve awareness. The outside of the knee shouldn't feel more irritated after the session. If it does, back off the range, shorten the hold, or reduce how many drills you do in one sitting.
Phase 2 Core Strengthening Exercises to Build Stability
Once the basic activation drills feel manageable, it's time to build strength that changes how you move. Many effective IT band syndrome exercises then start to look less like rehab and more like training with purpose.

Current rehab guidance commonly uses clear dosage targets instead of vague advice. For example, a hip bridge with a resistance band may be prescribed for 3 sets of 10 repetitions, and strengthening work often progresses to 3 sets of 10 to 12 repetitions, performed 3 times per week (NASM corrective exercise guide for ITBS).
The main exercises worth your time
Here are the staples I'd prioritize before worrying about more advanced drills.
Side-lying hip abduction
Lie on your side with the bottom knee bent and the top leg straight. Lift the top leg slightly behind your body, not forward. Keep the toes mostly pointed forward. If your hip flexors take over, you've probably drifted too far in front.Lateral band walk
Place a loop band around the ankles or just above the knees. Bend slightly at the hips and knees, then step sideways without bouncing. Keep tension on the band the whole time. Short, controlled steps beat big sloppy ones.Side plank
Start from the knees if needed. Lift the hips and hold your body in a straight line. The trunk and pelvis need to stay steady while the leg does its job. If you'd like more support on that piece, this resource on strengthen your core with these exercises pairs well with IT band rehab.
Form mistakes that keep people stuck
Individuals don't fail because they're weak. They fail because they let stronger muscles cheat.
Watch for these common problems:
- Torso rocking: If your trunk swings during side-lying work, the hip isn't doing the job.
- Feet turning out: This often shifts effort away from the target muscles.
- Speeding through reps: Fast reps feel productive but usually reduce control.
- Knee collapse: If the knee drops inward during band walks or standing drills, slow down and shorten the range.
A good rep is controlled on the way up and controlled on the way down. You should feel the side of the hip and glute working hard by the end of the set.
Here's a movement demonstration to make the strengthening phase easier to picture:
Add one hinge pattern
A useful next step is the single-leg Romanian deadlift, starting with bodyweight. Reach the hips back, keep the spine long, and let the standing leg do the work. You don't need to go low. You need to stay level through the pelvis.
Better hip control often shows up before pain fully disappears. That's a good sign, not a problem.
Phase 3 Advanced Progressions and Load Management
At some point, isolated exercises stop being enough. Your hip might be stronger on the mat, but real life asks for stairs, hills, longer walks, uneven ground, and eventually running. To meet these demands, rehab needs to look more functional.
A practical progression is to use load-tolerant strengthening and keep symptoms around 2/10 pain or less during exercise, rather than expecting every session to be completely pain-free (E3 Rehab IT band progression).

Functional strength moves
These exercises bridge the gap between rehab and activity.
Split squat
Start in a staggered stance. Lower straight down, keeping the front knee tracking over the foot. Don't chase depth if control disappears. This drill loads the hip and knee in a way that feels much closer to walking hills, climbing stairs, and running.
Side lunge
Step out to the side and sit back into the hip. Keep the planted foot flat and the knee aligned. This helps because the body doesn't only move front to back. The hip has to control side-to-side forces too.
Step-down
Stand on a step and slowly lower the opposite heel toward the floor. This is one of the best reality checks for pelvic control. If the knee dives inward or the pelvis drops, reduce the height and own the motion before progressing.
How to use the pain scale
The pain scale keeps people from doing too much on a good day and too little on a cautious day.
- 0 to 2 out of 10: Usually acceptable during exercise
- More than that: Reduce range, resistance, or total volume
- Symptoms that spike and linger: Your body is telling you the load was too much
This approach is different from the old all-or-nothing model. You don't have to wait for every sensation to vanish before you train. You do need to keep the work tolerable and repeatable.
Some discomfort during rehab is acceptable. A steady flare that carries into the next day usually means the dose was too high.
Returning to running or impact
When walking, stairs, and strength drills feel more controlled, start reintroducing impact gradually. Begin with short bouts on flat ground and separate those days from harder strengthening if your knee tends to react.
Keep your return simple:
- Pick one variable to increase at a time. Distance, speed, or hills. Not all three.
- Use alternating days at first if symptoms have been touchy.
- Stay honest about mechanics. If your pelvis drops and the knee caves in as fatigue builds, end the session there.
For some people, adding light jump prep or hop drills later makes sense. For others, walking hills and step-downs are the better bridge. The right progression is the one your symptoms tolerate consistently.
Your 6-Week IT Band Rehab Routine
A good plan should be clear enough to follow without guessing. The schedule below organizes the exercises into a simple progression. Keep sessions consistent, focus on quality, and adjust any movement that pushes pain beyond a tolerable level.
Sample 6-Week IT Band Syndrome Rehab Plan
| Week | Phase Focus | Exercises (Sets x Reps) | Activity Modification |
|---|---|---|---|
| Week 1 | Foundational mobility and activation | Figure-four stretch (gentle holds), hip flexor stretch (gentle holds), clamshells, glute bridge 3 x 10 | Reduce aggravating activity. Avoid workouts that reliably trigger the outer knee pain. |
| Week 2 | Foundational mobility and activation | Foam roll glutes and outer quad, clamshells, glute bridge 3 x 10, standing weight shift | Resume only light daily activity that stays comfortable. Skip hills or long efforts if they aggravate symptoms. |
| Week 3 | Core strengthening | Side-lying hip abduction 3 x 10 to 12, lateral band walk 3 x 10 to 12, side plank | Keep activity easy and predictable. If walking is comfortable, continue. Avoid testing yourself too often. |
| Week 4 | Core strengthening | Side-lying hip abduction 3 x 10 to 12, lateral band walk 3 x 10 to 12, side plank, bodyweight single-leg Romanian deadlift | Continue modified activity. Add only what you can repeat without a clear flare afterward. |
| Week 5 | Advanced strengthening and control | Split squat, step-down, side lunge, bridge or band walk for maintenance | Reintroduce higher-demand activity gradually. Keep symptoms mild and stop short of a clear limp or compensation. |
| Week 6 | Functional progression | Split squat, step-down, side lunge, single-leg Romanian deadlift, side plank | Trial short, easy return to your preferred activity if mechanics stay controlled and symptoms remain tolerable. |
How to use the plan without overthinking it
A few simple rules make the routine work better:
- Prioritize consistency: Doing the program regularly beats doing a heroic session once in a while.
- Protect form first: If the target muscles stop doing the work, the set is over.
- Keep one or two anchors: Individuals often benefit from keeping bridges, side-lying abduction, or band walks in the plan even as they progress.
If one exercise always irritates the outside of the knee, don't force it just because it appears in a routine. Swap to a nearby variation that trains the same pattern with better tolerance.
What progress usually looks like
Progress is rarely dramatic from one workout to the next. More often, you notice that stairs feel easier, your walking stride feels cleaner, or you can do single-leg tasks with less wobbling. Those changes matter because they show the system is handling load better, which is the whole point of IT band syndrome exercises.
When Exercises Are Not Enough Red Flags and Next Steps
A structured program helps many cases of outer-knee pain, but self-treatment has limits. If pain is getting worse instead of better, starts waking you up at night, shows up strongly at rest, or comes with numbness, tingling, or a sense that the knee may buckle, it's time to get examined.
Another reason to seek help is uncertainty. Not every pain on the outside of the knee is classic IT band syndrome. A proper evaluation can separate movement-related irritation from other knee, hip, or back-related problems that may need a different plan.
When imaging or a medical workup may matter
It's often not necessary to jump straight to scans, but some situations do call for more investigation. If you're unsure when imaging makes sense, MedAmerica has a useful breakdown on when do you need an MRI and when do you need an X-ray.
What a professional evaluation adds
A therapist can do more than hand you a generic list of stretches. They can check hip strength, single-leg control, trunk stability, walking or running mechanics, and the specific movements that reproduce your symptoms. They can also modify exercises on the spot so you're not stuck doing drills that look right on paper but don't fit your body.
If you're in Deerfield Beach and your symptoms keep circling back, getting assessed can save time and reduce the trial-and-error approach that often drags this issue out.
If outer-knee pain is limiting your walks, workouts, or runs, MedAmerica Rehab Center can help you figure out whether it's IT band syndrome and build a treatment plan around your movement, strength, and activity goals. A guided rehab program can make the process simpler, safer, and a lot less frustrating.