The Ultimate Guide: 8 Mobility Exercises for Older Adults in 2026
As we age, it's common to notice some stiffness, a little less stability, or a bit more caution when moving. Simple activities like reaching for a high shelf, getting out of a chair, or enjoying a walk in the park can become challenging. But what if you could not only slow this process but actively improve it? The answer lies in targeted mobility. This isn't about extreme fitness; it's about reclaiming the ease and confidence in your body's everyday movements.
In this detailed guide, we will explore 8 essential mobility exercises for older adults, specifically chosen to restore flexibility, improve balance, and reduce pain. Each exercise is broken down with step-by-step instructions, important safety precautions for fall prevention, and expert insights from the physical therapists at MedAmerica Rehab Center, who have been helping seniors in the Deerfield Beach community move better since 1995. Think of this as your practical playbook for better movement, focusing on key areas like your hips, shoulders, and spine.
To maintain and improve overall range of motion throughout the day, consider incorporating a routine of gentle morning stretches for seniors. These can prime your body for the day's activities and complement the exercises outlined here. By following this guide, you will gain the knowledge to perform these movements safely and effectively at home. Let’s begin the journey to a more mobile, independent, and vibrant you.
1. Gentle Neck Mobility Exercises (Cervical Range of Motion)
The neck, or cervical spine, is a common source of stiffness and discomfort, especially for older adults. Years of holding postures, age-related changes like arthritis, and even modern habits like "text neck" can severely limit its movement. Gentle neck mobility exercises are controlled, deliberate movements designed to restore the natural range of motion in the cervical spine, making it a fundamental starting point for any senior mobility program.
These exercises are not about strength; they are about re-establishing flexibility and reducing pain. By moving the neck slowly through its primary directions- flexion (chin to chest), extension (looking up), lateral flexion (ear to shoulder), and rotation (looking over the shoulder)- you gently lubricate the joints and stretch the surrounding muscles. This process improves blood flow, eases stiffness, and can significantly decrease chronic neck pain.
How to Perform Neck Mobility Exercises
Begin by sitting or standing with a tall, relaxed posture, shoulders down and back. Perform each movement slowly and smoothly.
- Neck Flexion/Extension: Gently lower your chin toward your chest, feeling a light stretch in the back of your neck. Hold for 2-3 seconds. Then, slowly lift your head and tilt it back to look toward the ceiling. Avoid crunching your neck; move only to a comfortable range.
- Lateral Flexion: Keeping your face forward, slowly tilt your right ear toward your right shoulder until you feel a gentle stretch on the left side of your neck. Hold for 2-3 seconds. Return to the center and repeat on the left side. Do not raise your shoulder to meet your ear.
- Neck Rotation: Turn your head slowly to the right as if looking over your shoulder. Stop when you feel a mild stretch. Hold for 2-3 seconds. Return to the center and repeat on the left side.
Key Insight: The goal is gentle movement, not a deep stretch. If you feel any sharp pain, numbness, or tingling, stop immediately. Consistency is more important than intensity.
Tips for Success and Safety
- Warm-Up First: Apply a warm compress to your neck and shoulder area for 5-10 minutes before starting. This can help relax tight muscles.
- Slow and Steady: Rushing through these movements negates their benefit and can cause injury. Each movement should be a conscious, controlled action.
- Breathe: Do not hold your breath. Inhale as you prepare to move and exhale as you perform the stretch.
- Frequency: Aim to perform these exercises 5-10 times for each direction, once or twice daily. This makes it an ideal addition to your morning routine or a break from sitting.
At MedAmerica Rehab, we often incorporate these exact movements into recovery plans for patients in Deerfield Beach, from those healing from whiplash to seniors looking to improve their daily function. If you're experiencing persistent neck pain or have concerns about performing these exercises, a professional assessment can provide a personalized and safe mobility plan.
2. Hip Mobility Drills (Hip Flexor & Rotator Stretches)
The hips are the powerhouse of the lower body, and their mobility is directly tied to an older adult's ability to walk, climb stairs, and maintain balance. Stiffness in the hips, often caused by prolonged sitting, arthritis, or age-related muscle changes, can lead to a shortened stride, lower back pain, and an increased risk of falling. Hip mobility drills are a series of targeted movements designed to restore the full range of motion in the hip joint, making them one of the most important mobility exercises for older adults.
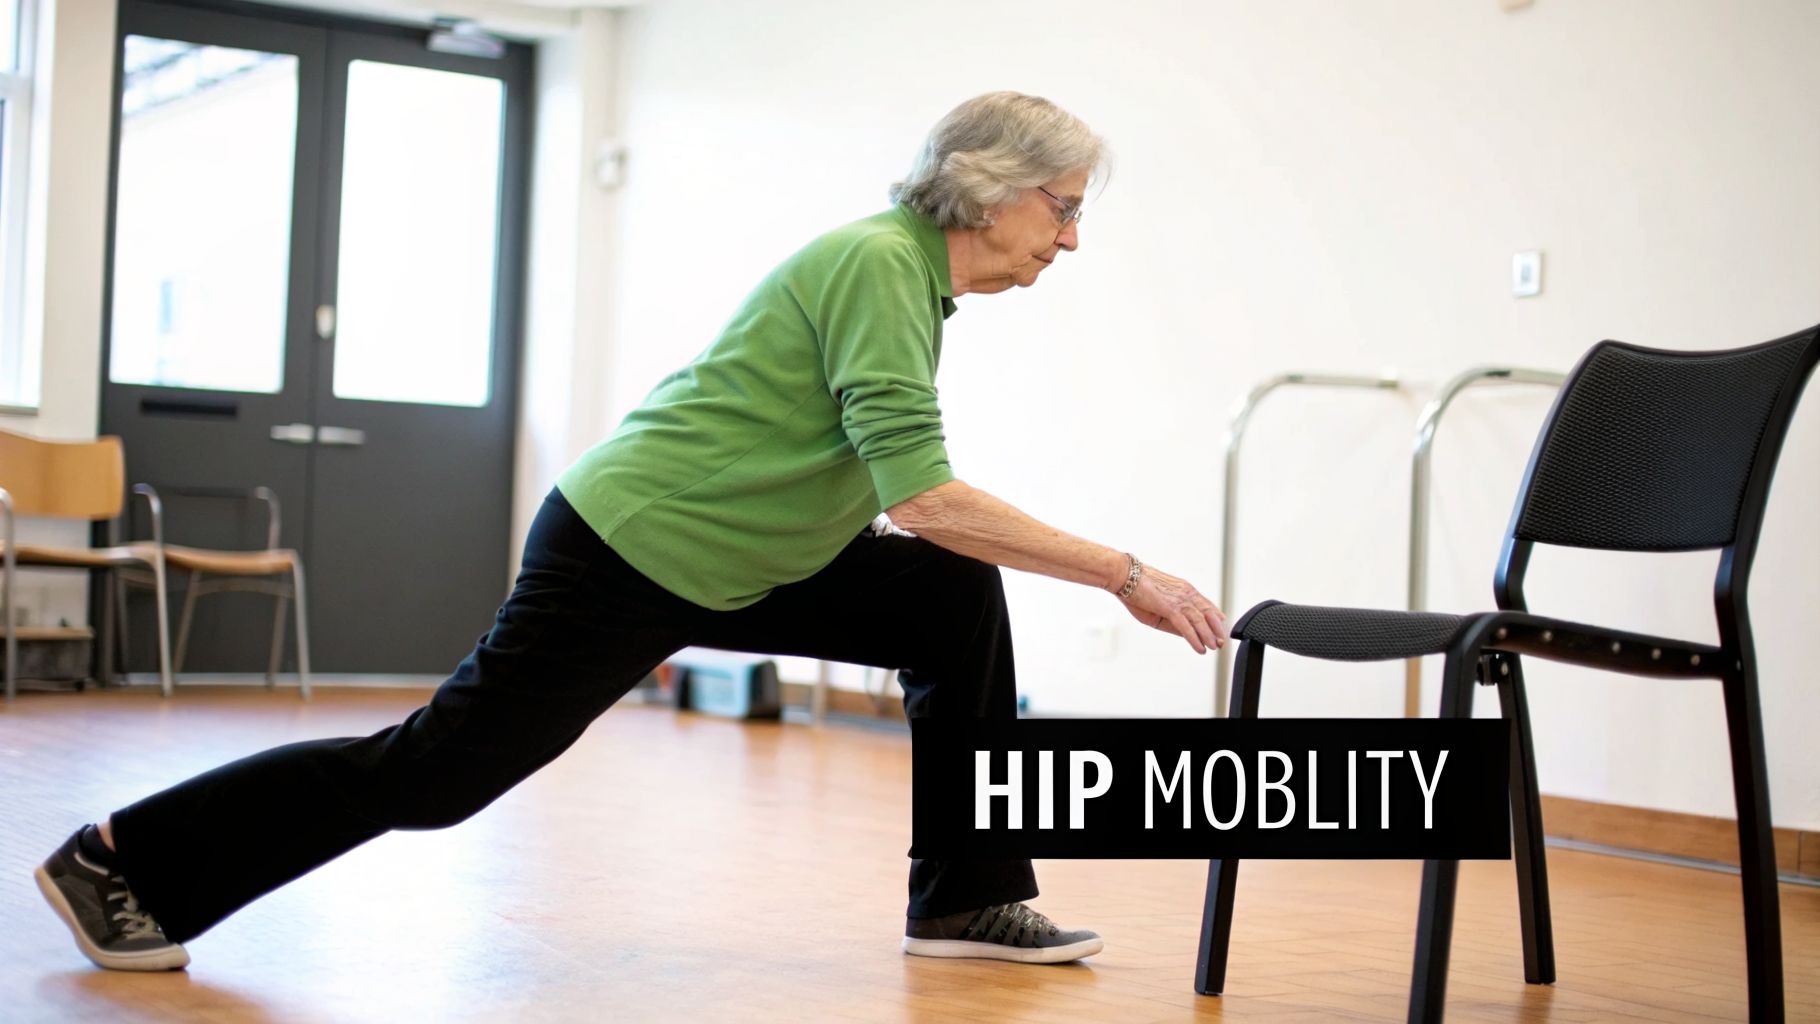
These drills focus on gently stretching the hip flexors, glutes, and rotators, which are crucial for fluid movement. By moving the hip joint through its natural planes of motion, you lubricate the joint capsule, reduce stiffness, and improve the function of surrounding muscles. This process is fundamental to improving walking patterns and reducing the compensation that often leads to knee or back issues. For a deeper dive into this topic, you can learn more about how to improve hip mobility on our blog.
How to Perform Hip Mobility Drills
Always use a chair or wall for support to ensure safety and balance. These movements should be controlled and pain-free.
- Standing Hip Flexion (Marching): Stand tall while holding onto a chair. Slowly lift your right knee toward your chest, as if marching in place. Go only as high as is comfortable without rounding your lower back. Hold for 2-3 seconds, then slowly lower your foot. Repeat with the left leg.
- Seated Figure-Four Stretch: Sit upright in a sturdy chair with your feet flat on the floor. Cross your right ankle over your left knee. Gently press down on your right knee to feel a stretch in your right hip and glute. Hold for 30 seconds. Switch legs and repeat.
- Standing Hip Abduction (Side Leg Raises): Stand sideways to a wall or chair for support. Keeping your leg straight and toes pointing forward, slowly lift your outer leg to the side. Move only as far as you can without leaning your torso. Hold for 2-3 seconds and slowly lower.
Key Insight: The goal is to isolate movement at the hip joint. Avoid arching your back or tilting your pelvis to achieve a greater range of motion. Quality of movement is far more important than quantity.
Tips for Success and Safety
- Warm-Up First: Perform a 5-minute gentle walk, either in place or around the room, to increase blood flow to your hip muscles before stretching.
- Hold for Duration: For static stretches like the Figure-Four, hold the position for at least 30 seconds to allow the muscles to relax and lengthen.
- Focus on Symmetry: Pay attention to any differences in mobility or comfort between your left and right sides. This can highlight imbalances that need attention.
- Frequency: Aim to incorporate hip mobility drills into your routine 4-5 times per week for optimal results and to prevent stiffness from returning.
At MedAmerica Rehab in Deerfield Beach, our fall-prevention programs heavily feature hip mobility drills to improve balance and confidence. We guide patients recovering from hip surgery or auto accidents through these exact movements to restore symmetrical function and get them back to their daily activities safely.
3. Thoracic Spine Rotation and Extension Exercises
The thoracic spine, or mid-back, often becomes a forgotten region, yet its stiffness is a major contributor to poor posture and restricted movement in older adults. Years of slouching, a more sedentary lifestyle, and age-related changes can cause this area to become rigid and locked in a forward-flexed position. Thoracic spine mobility exercises are designed to counteract this by restoring rotation and extension, which is crucial for overall spinal health.
These movements directly address the "hunched over" posture common in aging. By focusing on untwisting and extending the mid-back, you can improve your ability to stand up straight, take deeper breaths, and reduce strain on the neck and lower back. Improving mobility in this area allows the entire spine to move more efficiently, distributing forces more evenly and decreasing the risk of pain and injury. These are essential mobility exercises for older adults looking to maintain an active, upright life.
How to Perform Thoracic Spine Mobility Exercises
Begin on your hands and knees for the "Thread the Needle" or lie on your back for extensions. Ensure your movements are slow and controlled, guided by your breath.
- Thread the Needle (Rotation): Start on all fours with your wrists under your shoulders and knees under your hips. Lift your right hand and "thread" it under your left arm, allowing your torso to twist. Lower your right shoulder and the side of your head toward the floor. Hold for 20-30 seconds, breathing deeply. Repeat on the other side.
- Thoracic Extension over a Rolled Towel: Roll up a bath towel and place it on the floor. Lie on your back with the towel placed horizontally under your mid-back, just below your shoulder blades. Place your hands behind your head to support your neck and gently allow your upper back to arch over the towel. Hold for 20-30 seconds, breathing into the stretch.
Key Insight: The goal is to isolate movement in the mid-back. Avoid overarching your lower back or craning your neck; let the thoracic spine do the work.
Tips for Success and Safety
- Breathe with the Movement: Coordinate your breath with the exercises. When performing "Thread the Needle," exhale as you twist deeper into the stretch. This helps relax the muscles.
- Use Props: A foam roller can be an excellent tool for self-mobilization. For more information on its proper use, you can explore resources on how a PE foam roller can help. Use it 2-3 times per week to gently massage and mobilize the mid-back.
- Stay Consistent: Perform these exercises daily, especially if you spend a lot of time sitting. Consistency is key to counteracting postural habits.
- Monitor Your Posture: Be mindful of your posture throughout the day. Try to sit and stand tall, reinforcing the gains you make during your exercise routine.
At MedAmerica Rehab, we find that focused thoracic mobility work is a game-changer for our patients in Deerfield Beach. We’ve seen individuals with chronic upper back pain achieve significant improvement in as little as 6-8 weeks. If you feel sharp pain or are unsure about your form, a professional assessment can provide guidance tailored to your body's needs.
4. Ankle and Calf Mobility Work (Dorsiflexion & Plantarflexion)
The ankles are the foundation of our stability, yet they are often neglected in mobility routines. For older adults, stiffness in the ankles and tightness in the calves can dramatically alter walking patterns, make navigating stairs treacherous, and significantly increase the risk of a fall. Ankle and calf mobility work focuses on restoring two key movements: dorsiflexion (flexing the foot, bringing toes toward the shin) and plantarflexion (pointing the foot and toes down).
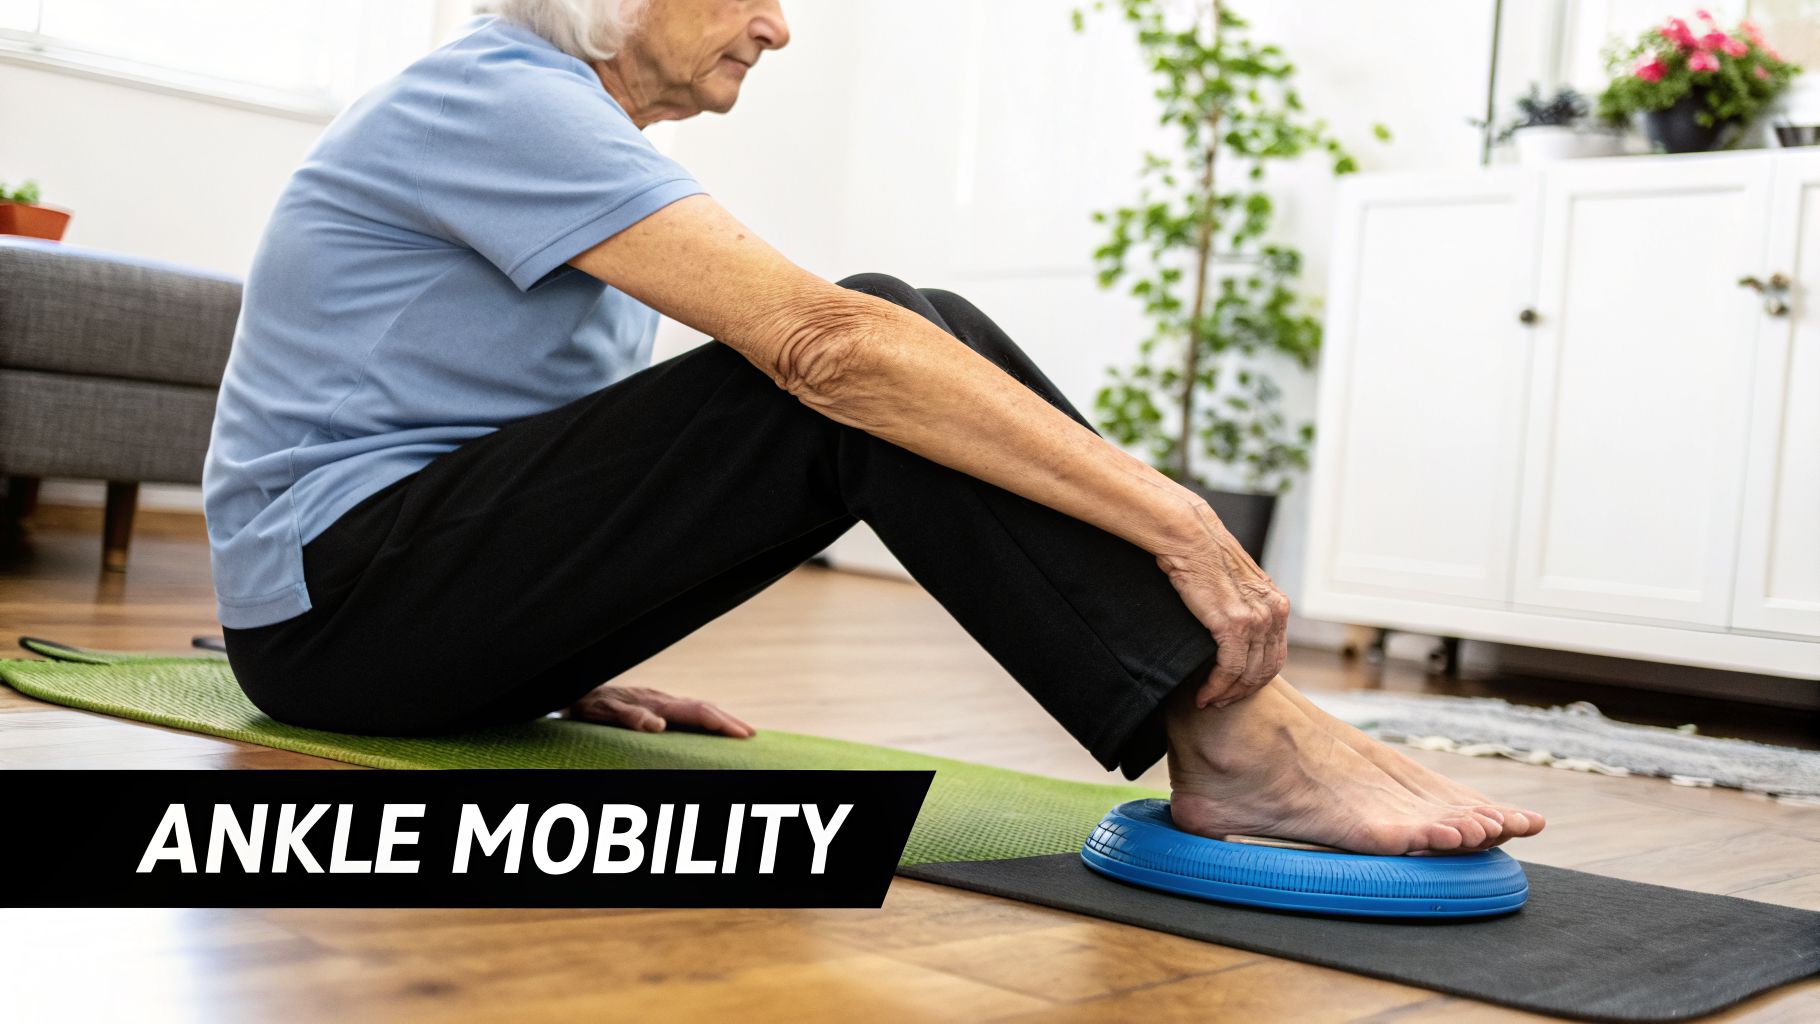
These movements are not just about flexibility; they are fundamental to a proper gait cycle. Adequate dorsiflexion allows your foot to clear the ground as you step forward, preventing trips and stumbles. Good plantarflexion provides the push-off power needed for walking and climbing. By regularly performing these specific mobility exercises for older adults, you can improve joint lubrication, reduce Achilles tendon tightness, and enhance the proprioceptive feedback between your feet and your brain, which is vital for balance.
How to Perform Ankle and Calf Mobility Exercises
Start seated in a sturdy chair with your feet flat on the floor. For the standing stretch, use a wall for support.
- Ankle Pumps (Dorsiflexion/Plantarflexion): While seated, extend one leg out in front of you. Slowly point your toes away from you (plantarflexion) and hold for 2-3 seconds. Then, slowly pull your toes back toward your shin (dorsiflexion), feeling a stretch in your calf. Hold for 2-3 seconds. That is one repetition.
- Ankle Circles: Extend one leg and slowly trace a large circle with your big toe. Imagine you are drawing a circle on the wall in front of you. Perform 10 circles in a clockwise direction, then switch to 10 circles counter-clockwise. Repeat with the other foot.
- Standing Calf Stretch: Stand facing a wall with your hands placed on it for support. Step one foot back, keeping the heel on the floor and the back leg straight. Gently lean into the wall until you feel a stretch in the calf of your back leg. Hold for 30-45 seconds. Repeat on the other side.
Key Insight: Stiff ankles force other joints, like the knees and hips, to compensate, which can lead to pain and instability. Improving ankle mobility is a direct and effective way to prevent falls.
Tips for Success and Safety
- Be Consistent: Perform ankle circles and pumps daily, perhaps while watching television or sitting at a desk. Make it a habit.
- Add Resistance: As you get stronger, you can loop a resistance band around your foot during ankle pumps to add a strengthening component to the dorsiflexion movement.
- Challenge Your Balance: Once comfortable, try performing ankle circles while standing on one leg (holding onto a chair or counter for support). This combines mobility with balance training.
- Wear Supportive Shoes: Avoid walking barefoot or in flimsy slippers for long periods, as this can strain the ankles. Choose footwear with good arch and ankle support for daily activities.
At MedAmerica Rehab, our fall-prevention programs in Deerfield Beach place a strong emphasis on ankle function, contributing to significant reductions in ankle-related falls. We guide patients recovering from fractures through this exact progression, from passive movements to active resistance, helping them regain confidence and stability. If stiff ankles are limiting your daily life, a targeted assessment can make a world of difference.
5. Shoulder Mobility Sequence (Rotator Cuff & Scapular Movements)
The shoulder is the body's most mobile joint, but this freedom comes at the cost of stability. For many older adults, the shoulder complex becomes a source of significant limitation due to arthritis, muscle weakness, and rotator cuff issues. A dedicated shoulder mobility sequence focuses on restoring movement in the rotator cuff and improving the mechanics of the scapula (shoulder blade), which are essential for functional independence in daily tasks like reaching overhead, dressing, and grooming.
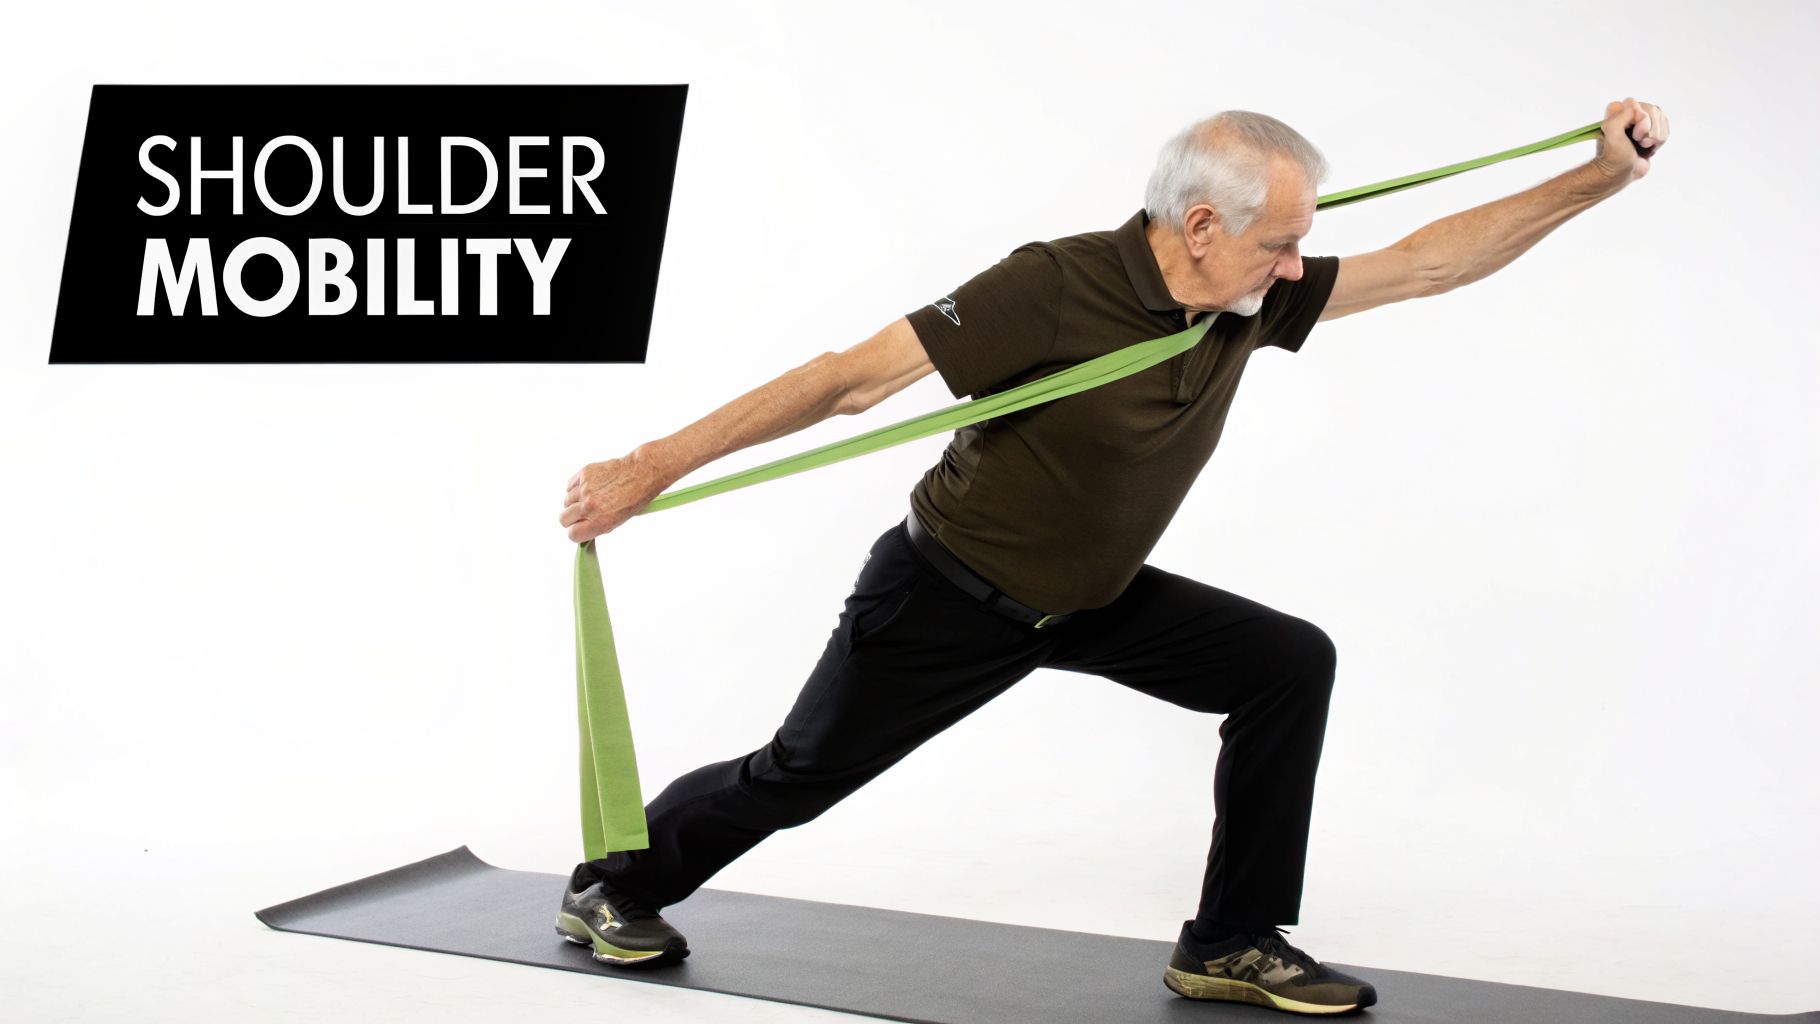
These movements are designed to re-educate the muscles and joints of the shoulder girdle. By targeting internal and external rotation, forward flexion, and scapular stabilization, you can improve joint lubrication, reduce impingement pain, and rebuild the capacity for everyday activities. At MedAmerica Rehab, we have seen post-surgical shoulder patients regain significant function and seniors with frozen shoulder progress from passive to active movements by following these principles. This approach is a cornerstone of our mobility exercises for older adults.
How to Perform Shoulder Mobility Exercises
Perform these movements slowly, focusing on control and proper form. Use a chair for support if needed.
- Pendulum Circles: Lean forward slightly, supporting yourself with one hand on a table or chair. Let your other arm hang down loosely. Gently swing the arm forward and backward, then side to side, and finally in small circles. Let gravity and momentum do most of the work.
- Wall Slides: Stand facing a wall with your forearms placed on it, elbows bent at 90 degrees. Slowly slide your arms up the wall as high as you can comfortably go, keeping your shoulder blades pulled down and back. Hold for a moment, then slide back down.
- External Rotation with a Band: Hold a light resistance band with both hands, palms up, and your elbows tucked into your sides at a 90-degree angle. Gently pull the band apart by rotating your forearms outward. Keep your elbows stationary.
Key Insight: Healthy shoulder function depends on the partnership between the arm and the shoulder blade. If the scapula doesn't move correctly, the shoulder joint is forced to work harder, leading to strain and injury.
Tips for Success and Safety
- Start Passively: If you have severe pain or stiffness, begin with passive movements where your "good" arm helps move the affected one. Using an over-the-door pulley exerciser is an excellent way to accomplish this.
- No Sharp Pain: You should only feel a mild stretch or muscle engagement. If you experience any sharp, shooting pain, stop the exercise immediately.
- Hold Stretches: When performing static stretches, hold the position for 30-60 seconds at a point of mild tension, not pain.
- Frequency: For optimal progress, aim to incorporate shoulder mobility exercises into your routine 5-6 times per week.
At our Deerfield Beach facility, we guide patients through these exact sequences to recover from shoulder injuries and combat age-related stiffness. A physical therapist can help determine the right starting point for you and ensure your technique is safe and effective for long-term shoulder health.
6. Spinal Mobility Circuit (Cat-Cow & Seated Twists)
The spine is the central pillar of movement, but age-related changes, arthritis, and general stiffness can make it feel more like a rigid rod than a flexible column. A spinal mobility circuit combining flexion, extension, and rotation is a powerful tool for restoring fluid motion. The Cat-Cow and Seated Twist exercises work together to mobilize the entire vertebral column, addressing stiffness from the low back all the way up to the neck.
These dynamic movements are not about building core strength but about gently lubricating the spinal joints and improving the flexibility of the surrounding muscles. The Cat-Cow alternates between arching and rounding the back, while seated twists introduce a rotational component. This combination improves blood flow, reduces pain associated with conditions like degenerative disc disease, and greatly enhances overall movement quality, making everyday activities like bending and reaching easier.
How to Perform the Spinal Mobility Circuit
For the Cat-Cow, you may use a yoga mat or folded towel for comfort. For the seated twist, a sturdy, armless chair is ideal.
- Cat-Cow Pose: Begin on your hands and knees with your wrists directly under your shoulders and knees under your hips.
- Cow (Inhale): Inhale as you drop your belly toward the floor, lift your chest and chin, and look slightly forward. This creates an arch in your back.
- Cat (Exhale): Exhale as you press into your hands, round your spine toward the ceiling, and tuck your chin to your chest, like a cat stretching.
- Seated Spinal Twist: Sit tall on the edge of a chair with your feet flat on the floor.
- Place your right hand on the outside of your left knee and your left hand on the chair behind you for support.
- Inhale to lengthen your spine. As you exhale, gently twist your torso to the left. Keep your hips facing forward. Hold for 2-3 seconds, then return to the center and repeat on the other side.
Key Insight: Coordinate your breath with the movement. Inhale during extension (Cow pose, sitting tall) and exhale during flexion or rotation (Cat pose, twisting). This rhythm makes the movement more effective and relaxing.
Tips for Success and Safety
- Mindful Movement: Perform each repetition slowly and deliberately. The goal is to feel a gentle mobilization, not to force a deep stretch.
- Modify as Needed: If getting on your hands and knees is difficult, perform the Cat-Cow movement while seated in a chair, placing your hands on your knees for support.
- Listen to Your Body: Never push into sharp pain. If you have a condition like sciatica, focus on a smaller, pain-free range of motion. Consistent, gentle movement is key.
- Frequency: Aim to perform 5-10 repetitions of the Cat-Cow sequence and 3-5 twists on each side. Practice this circuit once or twice daily, especially in the morning to ease stiffness.
At MedAmerica Rehab, we often recommend this exact circuit for our Deerfield Beach patients managing chronic back pain or recovering from auto accidents. We have seen sciatica patients achieve a 20-30% reduction in pain with consistent practice. If you are experiencing acute pain or are unsure how to modify these exercises for your condition, a professional assessment can help you move safely and effectively.
7. Standing Balance & Proprioceptive Exercises (Single-Leg Stance & Tandem Walking)
Falls are a leading cause of serious injury among older adults, often stemming from a decline in balance and proprioception, which is your body's ability to sense its position in space. Standing balance exercises directly challenge and retrain this internal sense of stability. By practicing movements like single-leg stances and tandem (heel-to-toe) walking, you improve the communication between your brain, muscles, and joints, which is crucial for preventing falls.
These are not simply strength exercises; they are neurological drills that sharpen your body’s reaction time and coordination. When you stand on one leg, for example, your nervous system must make constant, tiny adjustments to keep you upright. This practice strengthens the stabilizing muscles in your ankles, knees, and hips, making you more resilient to unexpected trips or uneven surfaces. This type of training is essential for maintaining independence and confidence in daily activities.
How to Perform Balance & Proprioceptive Exercises
Always begin near a sturdy support like a countertop, wall, or the back of a solid chair. Safety is the first priority.
- Single-Leg Stance: Stand tall with your feet hip-width apart, holding onto your support. Slowly shift your weight onto your right foot and lift your left foot off the floor just an inch or two. Hold for 10-30 seconds. Lower your foot and repeat on the other side.
- Tandem Stance & Walk: Stand with your support nearby. Place the heel of one foot directly in front of the toes of the other, as if walking on a tightrope. Hold this stance for 10-30 seconds. To progress, take a few slow, deliberate steps forward in this heel-to-toe pattern, using your support as needed.
- Weight Shifts: Stand with your feet about shoulder-width apart. Slowly shift your weight to the right side, lifting the heel of your left foot. Then, smoothly shift your weight to the left side, lifting the heel of your right foot. Continue this gentle rocking motion.
Key Insight: Balance is a skill that must be practiced. The goal is to challenge your stability just enough to create an adaptation, but not so much that you risk falling. Progress is measured in seconds held and steadiness, not reps.
Tips for Success and Safety
- Support is Non-Negotiable: Always start with a hand or two on a stable surface. Progress from two hands to one, then to fingertips, and finally to hovering your hand just above the support.
- Wear Proper Footwear: Practice in supportive, non-slip shoes on a firm, flat surface. Avoid practicing in socks or on thick rugs.
- Gradual Progression: To increase the challenge safely, try closing your eyes (with support!), standing on a slightly less stable surface like a thin cushion, or slightly turning your head side-to-side while balancing.
- Frequency: Consistency is key for fall prevention. Aim to practice these exercises for a few minutes daily or at least 4-5 times per week.
At MedAmerica Rehab, our fall prevention programs in Deerfield Beach have helped reduce fall rates among participants by demonstrating these exact techniques. We see patients post-hip fracture regain the confidence to walk independently, and those with arthritis improve their stability for safer daily living. If you feel unsteady or are concerned about your balance, a professional assessment can provide a safe, structured program tailored to your specific needs.
8. Lumbar Spine Stabilization & Mobility (Bird Dog & Pelvic Tilts)
The lower back, or lumbar spine, is a critical area for overall movement and stability, yet it's also a frequent site of pain for many older adults. Conditions like arthritis, degenerative disc disease, or general stiffness can compromise its function. Lumbar spine exercises like pelvic tilts and the bird dog are designed to target the deep core muscles that support the spine, improving stability while gently promoting mobility.
These movements are not about heavy lifting; they focus on controlled activation of often-underused stabilizer muscles. By coordinating the core, hips, and back, you create a muscular "corset" that protects the lumbar spine from excessive strain. This improves posture, reduces chronic lower back pain, and builds a resilient foundation for other movements, making it one of the most effective mobility exercises for older adults.
How to Perform Lumbar Spine Exercises
It is best to perform these on a comfortable, padded surface like a yoga mat. Master the pelvic tilt before moving on to the more complex bird dog.
- Pelvic Tilts: Lie on your back with your knees bent and feet flat on the floor. Keep your arms relaxed by your sides. Gently flatten your lower back against the floor by tightening your stomach muscles and slightly tilting your pelvis upward. Hold for 3-5 seconds, then relax. You should feel your abdominal muscles engage, not your legs or glutes.
- Bird Dog: Start on your hands and knees in a tabletop position, with your hands directly under your shoulders and your knees under your hips. Keep your back flat and your head in line with your spine. Slowly extend your right arm straight forward and your left leg straight back, maintaining a flat back. Hold for 2-3 seconds, then slowly return to the starting position. Repeat on the opposite side (left arm, right leg).
Key Insight: The goal is control, not speed or height. Avoid arching your back or rocking your hips side-to-side during the bird dog. A stable torso is the primary objective.
Tips for Success and Safety
- Core Engagement: Focus on gently drawing your belly button in toward your spine to engage your core before each movement. Avoid forcefully bracing or holding your breath.
- Neutral Spine: Use a mirror if possible to ensure you are maintaining a neutral, flat back throughout the bird dog exercise.
- Slow and Deliberate: Rushing through these exercises compromises their effectiveness and can lead to strain. Each repetition should be smooth and controlled.
- Frequency: Aim for 10-15 pelvic tilts and 5-10 bird dog repetitions on each side. Performing these once or twice daily can provide significant long-term benefits for spinal health.
At MedAmerica Rehab, we frequently use these foundational exercises to help patients manage and overcome chronic back pain. For example, many of our patients in Deerfield Beach with sciatica or degenerative disc issues have seen a major reduction in their symptoms by consistently incorporating these movements. If you suffer from persistent back pain, a professional evaluation can ensure you perform these critical exercises correctly and safely for maximum benefit.
8 Mobility Exercises Comparison for Older Adults
| Intervention | Implementation Complexity | Resource Requirements | Expected Outcomes | Ideal Use Cases | Key Advantages |
|---|---|---|---|---|---|
| Gentle Neck Mobility Exercises (Cervical ROM) | Low — simple, short routines | None; chair optional | Improved neck flexibility, less stiffness/headaches | Seniors with arthritis, text-neck, post-whiplash rehabilitation | Low risk, quick relief, can be repeated daily |
| Hip Mobility Drills (Hip flexor & rotator stretches) | Moderate — combines active/passive drills | Chair, strap/band optional | Better gait, reduced hip/back pain, improved rotation | Fall-prevention, hip arthritis, post-op hip rehab | Improves walking efficiency and balance, modifiable |
| Thoracic Spine Rotation & Extension | Moderate — requires body awareness | Mat, foam roller optional | Improved posture, breathing, reduced upper back/neck strain | Slouched posture, desk workers, spine rehab | Restores mid-back motion and decreases compensations |
| Ankle & Calf Mobility (Dorsi/Plantarflexion) | Low — brief, repeatable exercises | None; resistance band optional | Improved ankle ROM, stability, reduced fall risk | Fall prevention, post-fracture, gait dysfunction | Foundational for balance and gait, minimal equipment |
| Shoulder Mobility Sequence (Rotator cuff & scapular) | Moderate — progressive, may need guidance | Light bands, wall or chair | Increased overhead reach, less shoulder pain, better scapular control | Frozen shoulder, post-op shoulder rehab, ADL limitations | Prevents stiffness, restores functional arm use |
| Spinal Mobility Circuit (Cat-Cow & Seated Twists) | Low–Moderate — gentle flow-based routine | Mat or chair | Reduced spinal stiffness, improved mobility and posture | General back stiffness, arthritis, sciatica maintenance | Whole-spine approach, safe for most older adults |
| Standing Balance & Proprioceptive Exercises | Moderate — progressive challenge levels | Chair/wall for support; minimal props | Reduced fall risk, improved confidence and coordination | Fall prevention programs, post-hip/ stroke rehab | Most evidence-based for fall reduction; measurable gains |
| Lumbar Stabilization & Mobility (Bird Dog & Pelvic Tilts) | Moderate — requires correct technique | Mat or chair | Increased core stability, less low back pain, improved function | Chronic low back pain, sciatica, post-surgical rehab | Targets deep stabilizers, fast symptom improvement with practice |
Your Next Step: Partnering with Experts for Personalized Mobility
Embarking on a new movement routine is a significant and commendable step toward safeguarding your health and independence. Throughout this guide, we've explored a detailed collection of mobility exercises for older adults, targeting key areas from the neck and shoulders down to the hips and ankles. You've learned specific, actionable drills like Gentle Neck Rotations, Hip Flexor Stretches, Thoracic Spine Extensions, and Ankle Dorsiflexion, each designed to restore function and ease stiffness. The goal isn't just to move; it's to move well—with confidence, control, and without pain.
The true value of these exercises is unlocked through consistent, mindful practice. Integrating even a few of these movements into your daily schedule creates a powerful ripple effect. Better mobility can lead to easier daily tasks, a reduced risk of falls, less chronic pain, and a greater capacity to enjoy the activities that bring you joy, whether it's gardening, playing with grandchildren, or simply taking a comfortable walk in your Deerfield Beach neighborhood.
From General Advice to a Personal Plan
While this list provides a strong foundation, it's important to recognize that it is a general guide. Every person's body has a unique history of injuries, conditions, and movement patterns. What works perfectly for one individual might need adjustment for another, especially for those managing conditions like arthritis, sciatica, or recovering from surgery.
This is where professional guidance becomes essential. A one-size-fits-all approach can only take you so far. True progress and safety are found in a program that understands your specific needs, limitations, and goals.
Key Insight: The most effective mobility program is not just about the exercises themselves, but about how they are selected, sequenced, and progressed for your individual body. A licensed physical therapist can identify subtle imbalances or compensatory patterns that you might miss on your own, ensuring you get the maximum benefit from every movement.
Why Personalized Guidance Matters
Consider the common challenges many older adults face when starting a new exercise routine:
- Uncertainty: "Am I doing this correctly?" Performing an exercise with poor form can be ineffective at best and harmful at worst.
- Pain: "This movement hurts. Should I push through it or stop?" A professional can help distinguish between the discomfort of a new stretch and the pain that signals a potential problem.
- Progression: "I've been doing these for a month. What's next?" A physical therapist can systematically advance your exercises to ensure you continue to build strength and mobility without hitting a plateau.
- Fear of Falling: For many, the fear of losing balance during an exercise is a major barrier. A supervised setting provides a safe environment to build confidence and master balance-specific training.
If you're in Deerfield Beach or the surrounding communities and find yourself asking these questions, you don't have to figure it out alone. The dedicated team at MedAmerica Rehab Center specializes in creating personalized plans that address these very concerns. Our licensed physical therapists and doctors are experts in assessing and treating the unique needs of older adults, from post-operative orthopedic recovery to managing chronic back pain and improving balance. We are committed to helping you move better and live with less pain.
Your mobility is your ticket to a full and active life. By combining the knowledge from this article with the expert, personalized care available right here in your community, you can build a sustainable routine that supports your health for years to come. The first step is often the hardest, but taking it with a trusted partner makes all the difference.
Ready to move beyond generic advice and get a plan built just for you? The team at MedAmerica Rehab Center is here to help you regain confidence and improve your quality of life with our specialized programs in balance training, fall prevention, and personalized physical therapy. Contact us today to schedule your comprehensive assessment and discover the difference expert guidance can make.